Configuración de conjuntos de datos en wis2box
Resultados de aprendizaje
Al final de esta sesión práctica, podrás:
- usar el editor de conjuntos de datos de wis2box-webapp
- crear nuevos conjuntos de datos utilizando Template=weather/surface-based-observations/synop y Template=other
- definir tus metadatos de descubrimiento
- revisar tus mapeos de datos
- publicar una notificación WIS2 para tus metadatos de descubrimiento
Introducción
wis2box utiliza conjuntos de datos que están asociados con metadatos de descubrimiento y mapeos de datos.
Metadatos de descubrimiento se utilizan para crear un registro WMO Core Metadata Profile (WCMP2) que se comparte mediante una notificación WIS2 publicada en tu broker de wis2box.
Mapeos de datos se utilizan para asociar complementos de datos a tus datos de entrada, permitiendo que tus datos sean transformados antes de ser publicados en WIS2.
En esta sesión práctica, aprenderás cómo crear y configurar conjuntos de datos utilizando el editor de conjuntos de datos de wis2box-webapp.
Configurar conjuntos de datos sin usar wis2box-webapp
wis2box también admite la configuración de conjuntos de datos utilizando el formato archivo de control de metadatos (MCF) definido por la herramienta pygeometa.
Usar MCF permite más flexibilidad y control, pero debe escribirse con precisión para garantizar que el MCF esté correctamente formateado e indentado, cumpliendo con el esquema requerido.
Los archivos MCF pueden publicarse desde la línea de comandos en el contenedor wis2box-management. Consulta la documentación de wis2box para más información.
Preparación
Conéctate a tu broker utilizando MQTT Explorer.
En lugar de usar las credenciales internas de tu broker, utiliza las credenciales públicas everyone/everyone:
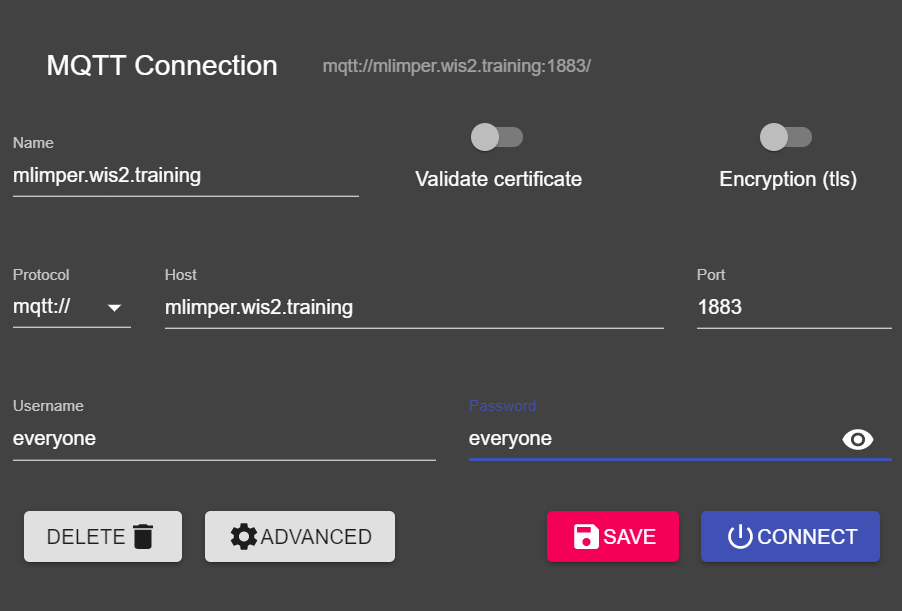
Nota
Nunca necesitas compartir las credenciales de tu broker interno con usuarios externos. El usuario 'everyone' es un usuario público que permite compartir notificaciones WIS2.
Las credenciales everyone/everyone tienen acceso de solo lectura en el tema 'origin/a/wis2/#'. Este es el tema donde se publican las notificaciones WIS2. El Global Broker puede suscribirse con estas credenciales públicas para recibir las notificaciones.
El usuario 'everyone' no verá temas internos ni podrá publicar mensajes.
Abre un navegador y ve a http://YOUR-HOST/wis2box-webapp. Asegúrate de haber iniciado sesión y de poder acceder a la página 'dataset editor'.
Consulta la sección sobre Inicializar wis2box si necesitas recordar cómo conectarte al broker o acceder a wis2box-webapp.
Crear un token de autorización para processes/wis2box
Necesitarás un token de autorización para el endpoint 'processes/wis2box' para publicar tu conjunto de datos.
Para crear un token de autorización, accede a tu máquina virtual de entrenamiento mediante SSH y utiliza los siguientes comandos:
cd ~/wis2box
python3 wis2box-ctl.py login
Luego ejecuta el siguiente comando para crear un token de autorización generado aleatoriamente para el endpoint 'processes/wis2box':
wis2box auth add-token --path processes/wis2box
También puedes crear un token con un valor específico proporcionando el token como argumento al comando:
wis2box auth add-token --path processes/wis2box MyS3cretToken
Asegúrate de copiar el valor del token y almacenarlo en tu máquina local, ya que lo necesitarás más adelante.
Una vez que tengas tu token, puedes salir del contenedor wis2box-management:
exit
El editor de conjuntos de datos de wis2box-webapp
Navega a la página 'dataset editor' en wis2box-webapp de tu instancia de wis2box accediendo a http://YOUR-HOST/wis2box-webapp y seleccionando 'dataset editor' desde el menú en el lado izquierdo.
En la página 'dataset editor', bajo la pestaña 'Datasets', haz clic en "Create New ...":

Aparecerá una ventana emergente que te pedirá proporcionar:
- Centre ID: este es el acrónimo de la agencia (en minúsculas y sin espacios), según lo especificado por el Miembro de la OMM, que identifica el centro de datos responsable de publicar los datos.
- Template: El tipo de datos para los que estás creando metadatos. Puedes elegir entre usar una plantilla predefinida o seleccionar other.
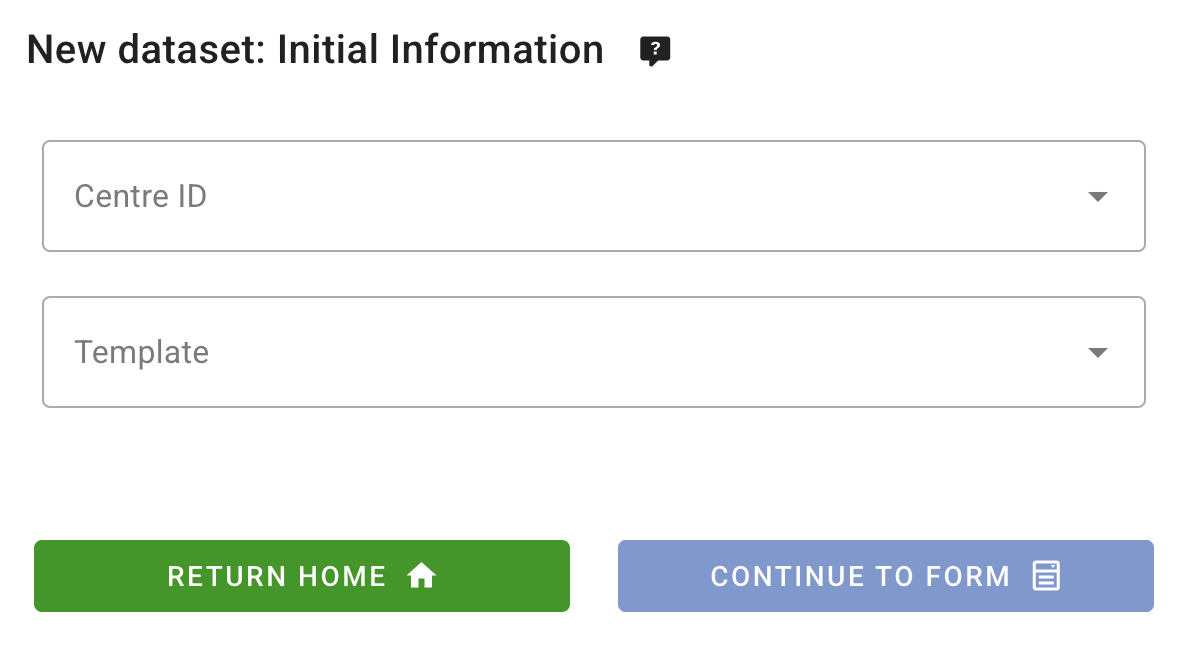
Centre ID
Tu Centre ID debe comenzar con el TLD de tu país, seguido de un guion (-) y un nombre abreviado de tu organización (por ejemplo, fr-meteofrance). El Centre ID debe estar en minúsculas y usar solo caracteres alfanuméricos. La lista desplegable muestra todos los Centre IDs registrados actualmente en WIS2, así como cualquier Centre ID que ya hayas creado en wis2box. Por favor, elige un Centre ID apropiado para tu organización.
Template
El campo Template te permite seleccionar de una lista de plantillas disponibles en el editor de conjuntos de datos de wis2box-webapp. Una plantilla pre-poblará el formulario con valores predeterminados sugeridos apropiados para el tipo de datos. Esto incluye un título y palabras clave sugeridas para los metadatos y complementos de datos preconfigurados.
El tema se establece automáticamente en el tema predeterminado vinculado a la plantilla seleccionada, a menos que selecciones other. Si seleccionas other, el tema puede definirse desde una lista desplegable basada en la Jerarquía de Temas WIS2.
Para el propósito del entrenamiento, crearás dos conjuntos de datos:
- Un conjunto de datos utilizando Template=weather/surface-based-observations/synop, que incluye complementos de datos que transforman los datos al formato BUFR antes de la publicación.
- Un conjunto de datos utilizando Template=other, donde eres responsable de definir el Tema WIS2 y donde utilizarás el complemento "Universal" para publicar los datos sin transformación.
Template=weather/surface-based-observations/synop
Para Template, selecciona weather/surface-based-observations/synop:
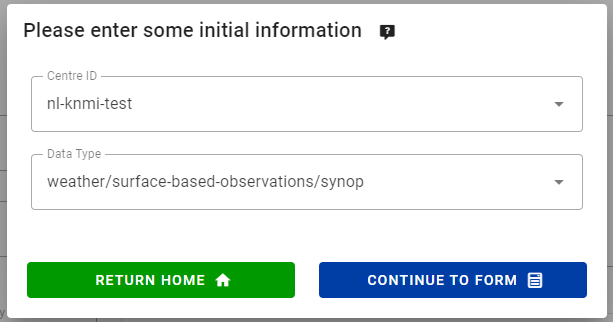
Haz clic en continue to form para proceder. Ahora se te presentará el Formulario del Editor de Conjuntos de Datos.
Dado que seleccionaste la plantilla weather/surface-based-observations/synop, el formulario estará pre-poblado con algunos valores iniciales relacionados con este tipo de datos.
Crear metadatos de descubrimiento
El Formulario del Editor de Conjuntos de Datos te permite proporcionar los Metadatos de Descubrimiento para tu conjunto de datos que el contenedor wis2box-management utilizará para publicar un registro WCMP2.
Dado que seleccionaste la plantilla 'weather/surface-based-observations/synop', el formulario estará pre-poblado con algunos valores predeterminados.
Por favor, asegúrate de reemplazar el 'Local ID' generado automáticamente con un nombre descriptivo para tu conjunto de datos, por ejemplo, 'synop-dataset-wis2training':
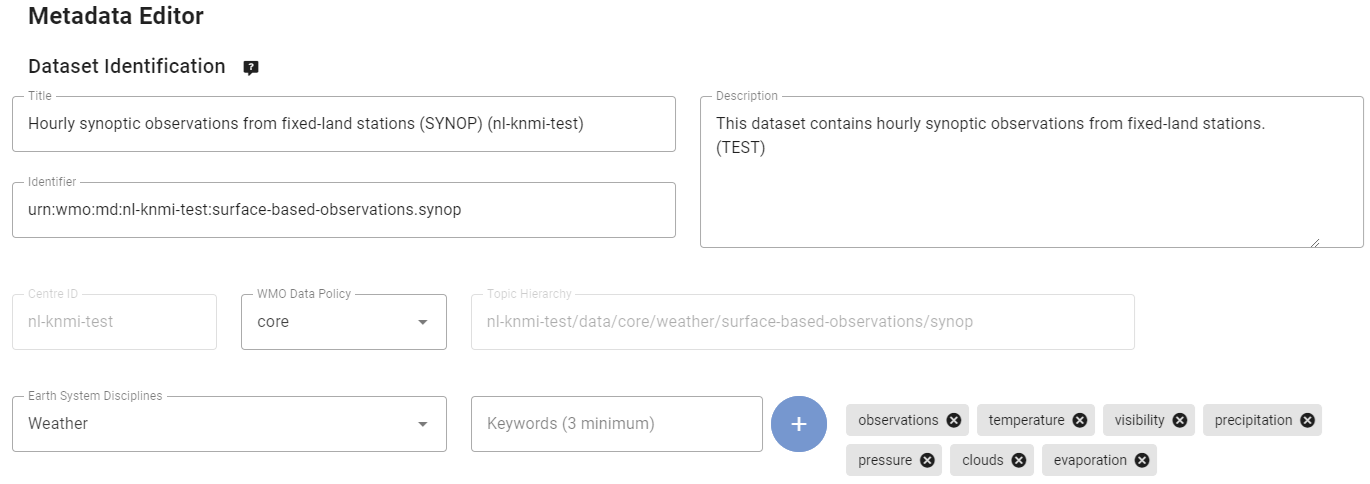
Revisa el título y las palabras clave, actualízalos según sea necesario y proporciona una descripción para tu conjunto de datos.
Nota que hay opciones para cambiar la 'Política de Datos de la OMM' de 'core' a 'recommended' o para modificar tu Identificador de Metadatos predeterminado. Por favor, mantén la política de datos como 'core' y utiliza el Identificador de Metadatos predeterminado.
A continuación, revisa la sección que define tus 'Propiedades Temporales' y 'Propiedades Espaciales'. Puedes ajustar el cuadro delimitador actualizando los campos 'North Latitude', 'South Latitude', 'East Longitude' y 'West Longitude':
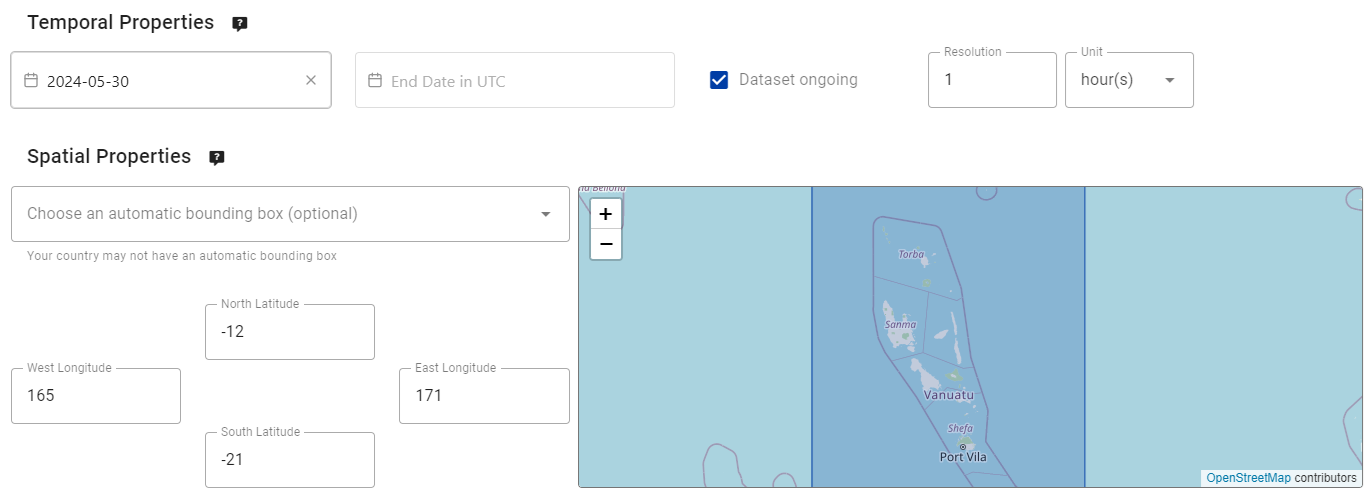
Luego, completa la sección que define la 'Información de Contacto del Proveedor de Datos':

Finalmente, completa la sección que define la 'Información de Calidad de los Datos':
Una vez que hayas completado todas las secciones, haz clic en 'VALIDATE FORM' y verifica el formulario para detectar errores:

Si hay errores, corrígelos y haz clic en 'VALIDATE FORM' nuevamente.
Asegúrate de que no haya errores y que obtengas una ventana emergente indicando que tu formulario ha sido validado:

A continuación, antes de enviar tu conjunto de datos, revisa los mapeos de datos para tu conjunto de datos.
Configuración de mapeos de datos
Dado que utilizaste una plantilla para crear tu conjunto de datos, las asignaciones de datos se han preconfigurado con los complementos predeterminados para la plantilla 'weather/surface-based-observations/synop'. Los complementos de datos se utilizan en el wis2box para transformar los datos antes de que se publiquen utilizando la notificación WIS2.
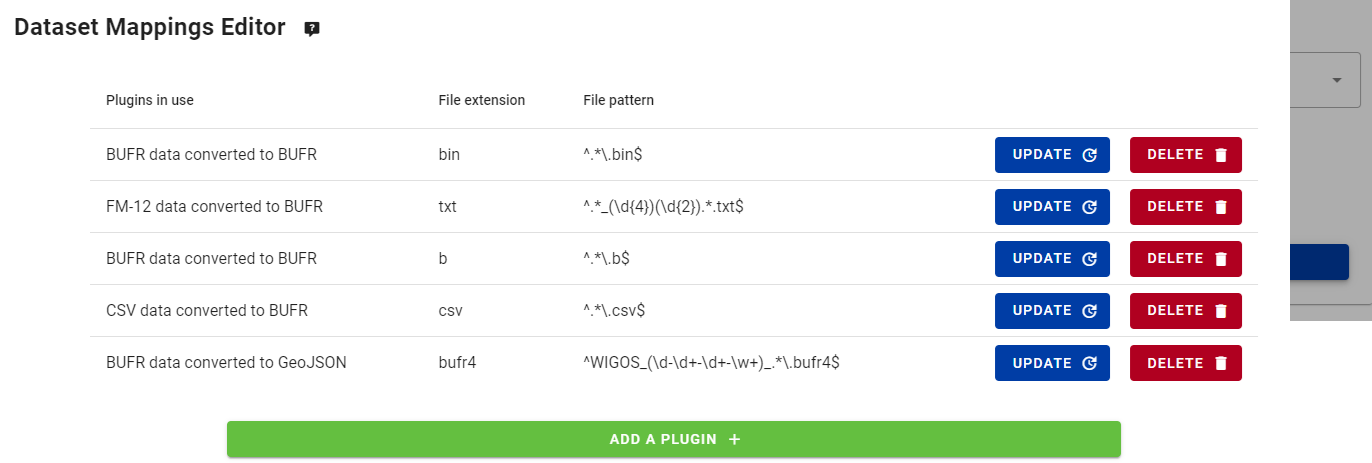
Ten en cuenta que puedes hacer clic en el botón "Update" para cambiar la configuración del complemento, como la extensión de archivo y el patrón de archivo. Por ahora, puedes dejar la configuración predeterminada.
Sobre la casilla de verificación para almacenar datos principales en caché
Verás la siguiente casilla de verificación:

Si desmarcas esta casilla, el wis2box añadirá properties.cache=False, indicando que no deseas que el Global Cache descargue y almacene una copia de tus datos. Por defecto, esta casilla está marcada, lo que significa que el Global Cache almacenará en caché tus datos principales, lo cual es la configuración recomendada para la mayoría de los conjuntos de datos.
Enviar tu conjunto de datos
Finalmente, puedes hacer clic en 'submit' para publicar tu conjunto de datos.
Necesitarás proporcionar el token de autorización para 'processes/wis2box' que creaste anteriormente. Si no lo has hecho, puedes crear un nuevo token siguiendo las instrucciones en la sección de preparación.
Verifica que obtienes el siguiente mensaje después de enviar tu conjunto de datos, indicando que se envió correctamente:

Después de hacer clic en 'OK', serás redirigido a la página principal del Editor de Conjuntos de Datos. Ahora, si haces clic en la pestaña 'Dataset', deberías ver tu nuevo conjunto de datos listado:

Revisar la notificación WIS2 para tus metadatos de descubrimiento
Ve a MQTT Explorer. Si estabas conectado al broker, deberías ver una nueva notificación WIS2 publicada en el tema origin/a/wis2/<your-centre-id>/metadata:
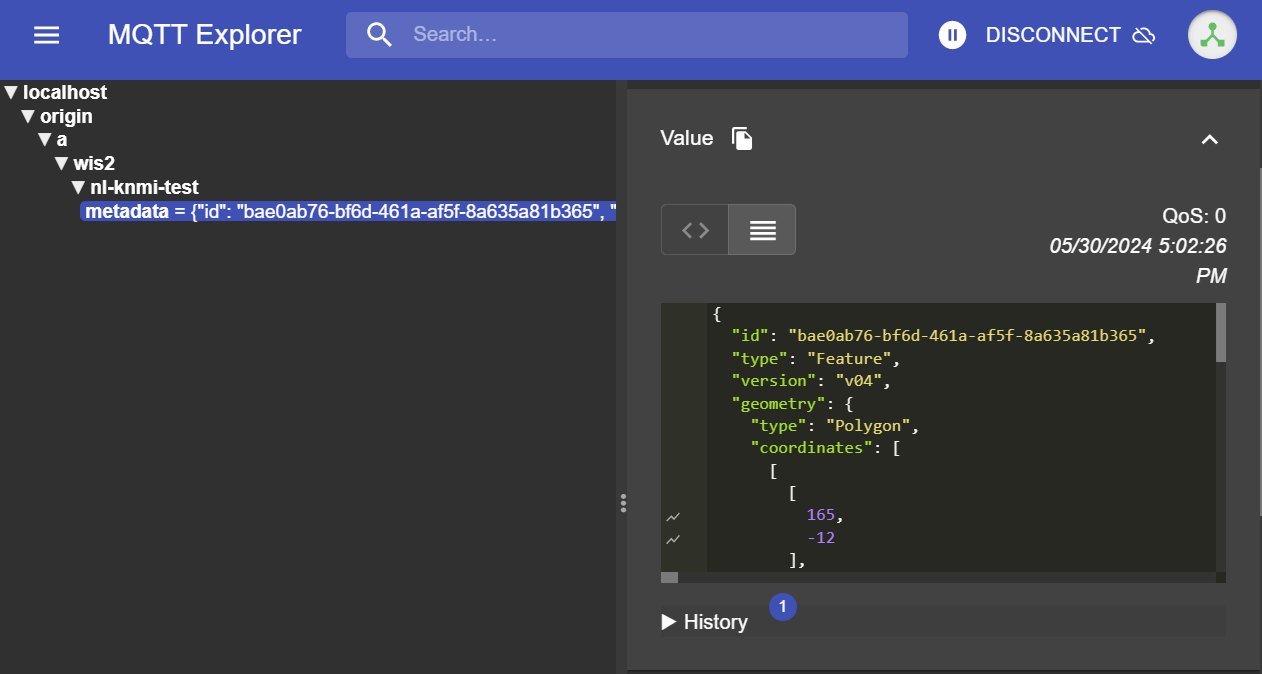
Activar la republicación de metadatos de descubrimiento
La notificación WIS2 se publica tan pronto como los metadatos de descubrimiento se envían correctamente. Si no ves la notificación, puede ser porque no estabas conectado al broker en el momento de la publicación.
Si no ves la notificación WIS2, puedes activar manualmente la republicación de los metadatos de descubrimiento utilizando el siguiente comando:
python3 wis2box-ctl.py execute wis2box metadata discovery republish
Inspecciona el contenido de la notificación WIS2 que publicaste. Deberías ver un JSON con una estructura correspondiente al formato de Mensaje de Notificación WIS (WNM).
Question
¿En qué tema se publica la notificación WIS2?
Haz clic para revelar la respuesta
La notificación WIS2 se publica en el tema origin/a/wis2/<your-centre-id>/metadata.
Question
Intenta encontrar el título, la descripción y las palabras clave que proporcionaste en los metadatos de descubrimiento dentro de la notificación WIS2. ¿Puedes encontrarlos?
Haz clic para revelar la respuesta
¡El título, la descripción y las palabras clave que proporcionaste en los metadatos de descubrimiento no están presentes en la carga útil de la notificación WIS2!
En su lugar, intenta buscar el enlace canónico en la sección "links" de la notificación WIS2:

La notificación WIS2 contiene un enlace canónico al registro WCMP2 que se publicó.
Copia y pega este enlace canónico en tu navegador para acceder al registro WCMP2. Dependiendo de la configuración de tu navegador, se te puede solicitar descargar el archivo o puede mostrarse directamente en tu navegador.
Encontrarás el título, la descripción y las palabras clave que proporcionaste dentro del registro WCMP2.
wis2box proporciona solo un número limitado de plantillas predefinidas. Estas plantillas están diseñadas para tipos comunes de conjuntos de datos, pero pueden no coincidir siempre con datos especializados. Para todos los demás tipos de conjuntos de datos, puedes crear tu conjunto de datos seleccionando Template=other.
Template=other
A continuación, crearemos un segundo conjunto de datos utilizando Template=other.
Haz clic en "Create New ..." nuevamente para crear un nuevo conjunto de datos. Usa el mismo centre-id que utilizaste antes, debería estar disponible en la lista desplegable. Para Template, selecciona other:
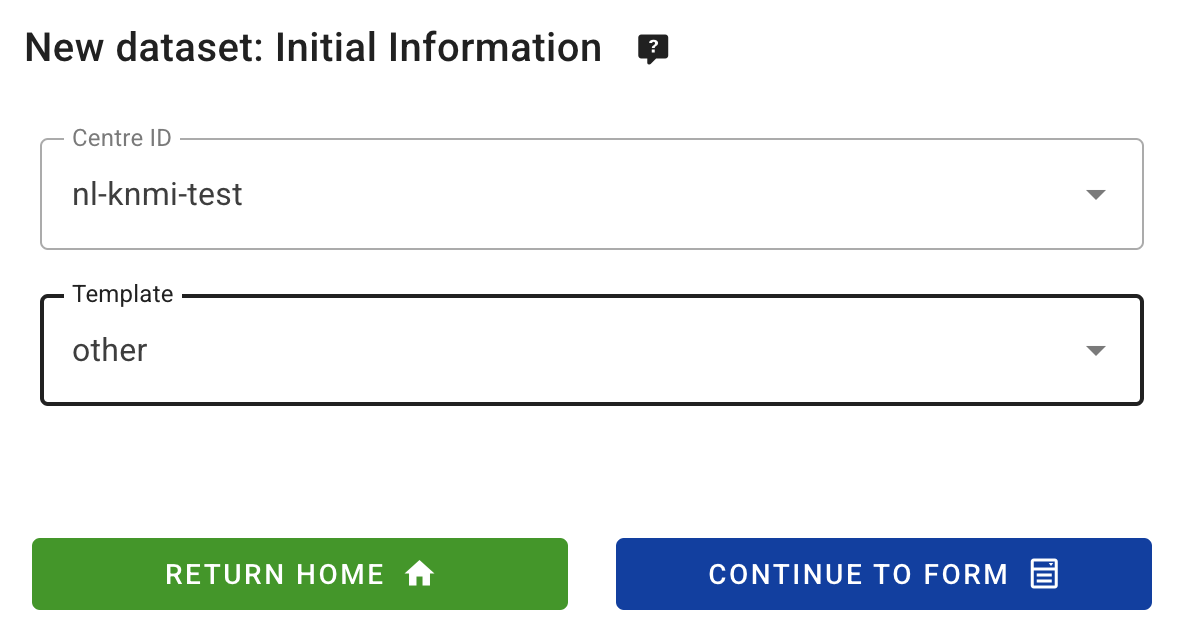
Haz clic en continue to form para continuar, ahora se te presentará nuevamente el Dataset Editor Form.
Crear metadatos de descubrimiento
Proporciona tus propios valores para los campos 'Title' y 'Description' y asegúrate de reemplazar el 'Local ID' generado automáticamente con un nombre descriptivo para tu conjunto de datos:
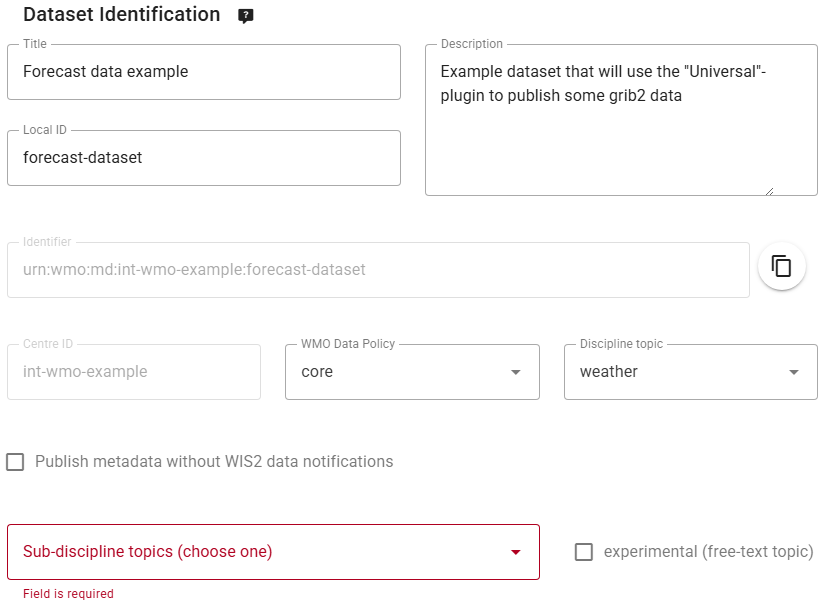
Ten en cuenta que, dado que seleccionaste Template=other, depende de ti definir la Jerarquía de Temas WIS2 utilizando las listas desplegables para 'Discipline' y 'Sub-Discipline'.
Para este ejercicio, selecciona el Tema de Sub-Disciplina "prediction/analysis/medium-range/deterministic/global":

Dado que utilizaste Template=other, no se predefinieron palabras clave. Asegúrate de añadir al menos 3 palabras clave de tu elección:

Después de completar los campos requeridos, completa las secciones restantes del formulario, incluyendo 'Temporal Properties', 'Spatial Properties' y 'Contact Information of the Data Provider', y asegúrate de validar el formulario.
Configurar asignaciones de datos
Cuando se utiliza Template=other, no se proporcionan asignaciones de datos predeterminadas. Como resultado, el Editor de Asignaciones de Conjuntos de Datos estará vacío y los usuarios deben configurar las asignaciones según sus requisitos específicos.

Haz clic en "ADD A PLUGIN +" para añadir un complemento de datos a tu conjunto de datos.
Selecciona el complemento con el nombre "Universal data without conversion". Este complemento está diseñado para publicar datos sin aplicar ninguna transformación.
Al añadir este complemento, deberás especificar la File Extension y un File Pattern (definido por una expresión regular) que coincida con el patrón de nombres de tus archivos de datos. En el caso del complemento "Universal", el File Pattern también se utiliza para determinar la propiedad "datetime" de los datos.
Analizar datetime desde el nombre del archivo
El complemento "Universal" asume que el primer grupo en la expresión regular corresponde al datetime de los datos.
El File Pattern predeterminado es ^.*?_(\d{8}).*?\..*$, que coincide con 8 dígitos precedidos por un guion bajo y seguidos por cualquier carácter y un punto antes de la extensión del archivo. Por ejemplo:
mydata_20250101.txtcoincidirá y extraerá el 25 de enero de 2025 como la propiedad datetime para los datosmydata_2025010112.txtno coincidirá, ya que hay 10 dígitos en lugar de 8mydata-20250101.txtno coincidirá, ya que hay un guion en lugar de un guion bajo antes de la fecha
Al ingerir datos utilizando el complemento "Universal", renombra tus archivos para que coincidan con el predeterminado o actualiza el File Pattern asegurándote de que el primer grupo en la expresión regular corresponda al datetime.
Mantén los valores predeterminados para "File Name" por ahora, ya que coinciden con los datos que ingerirás en la próxima sesión práctica:
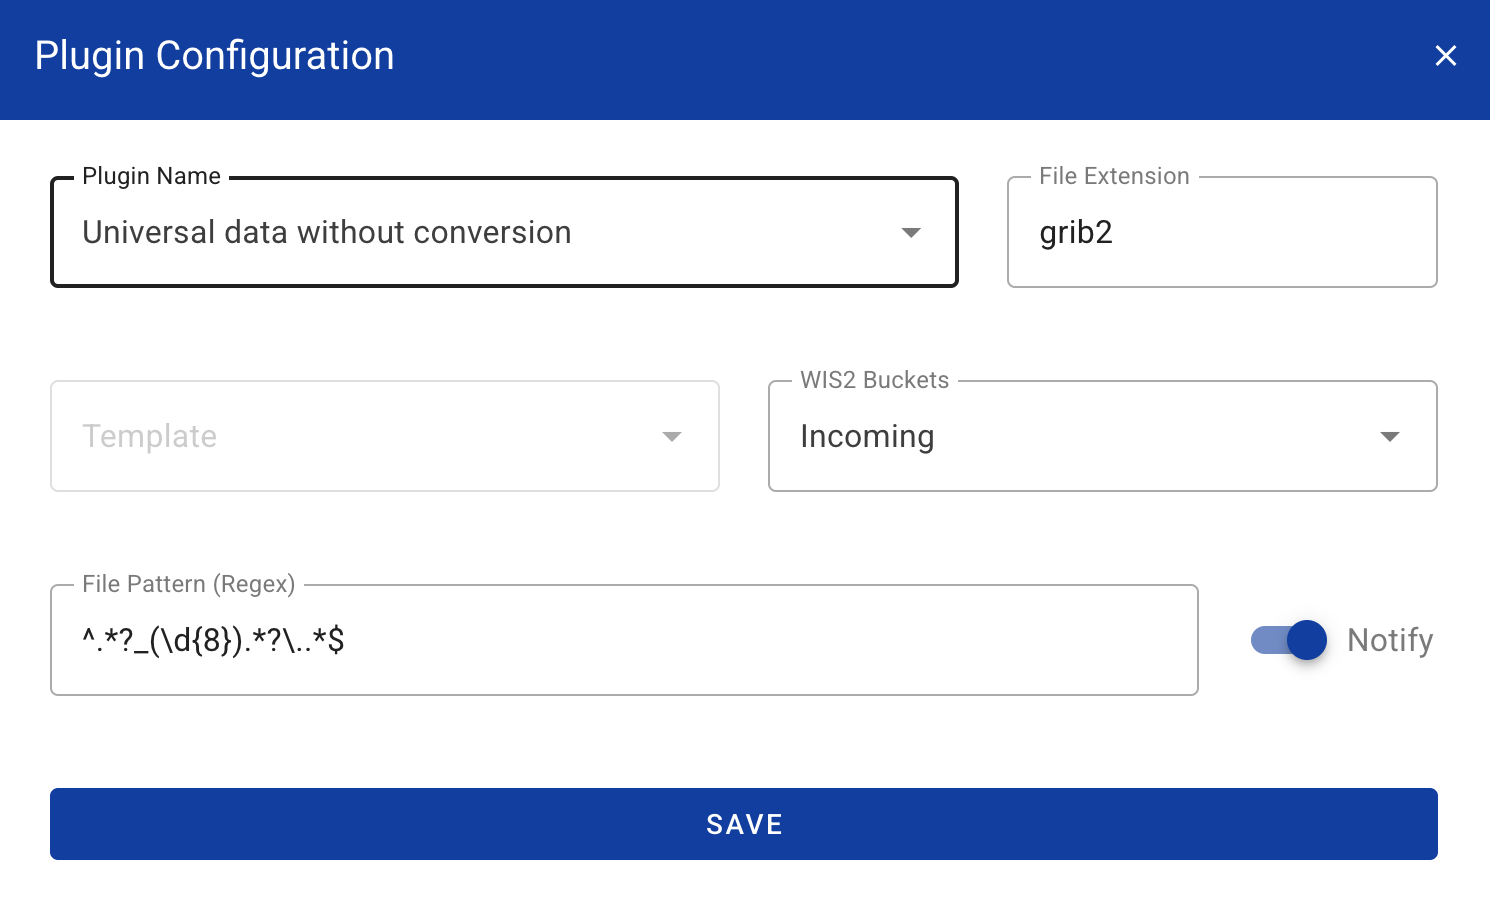
Haz clic en "SAVE" para guardar la configuración del complemento y verifica que ahora ves el complemento listado en el Editor de Asignaciones de Conjuntos de Datos:

Ten en cuenta que, cuando ingreses datos, la extensión de archivo y el patrón de archivo del nombre deben coincidir con la configuración que has proporcionado aquí; de lo contrario, los datos no serán procesados y el contenedor wis2box-management registrará mensajes de ERROR.
Enviar y revisar el resultado
Finalmente, proporciona el token de autorización para 'processes/wis2box' que creaste anteriormente y haz clic en 'submit' para publicar tu conjunto de datos.
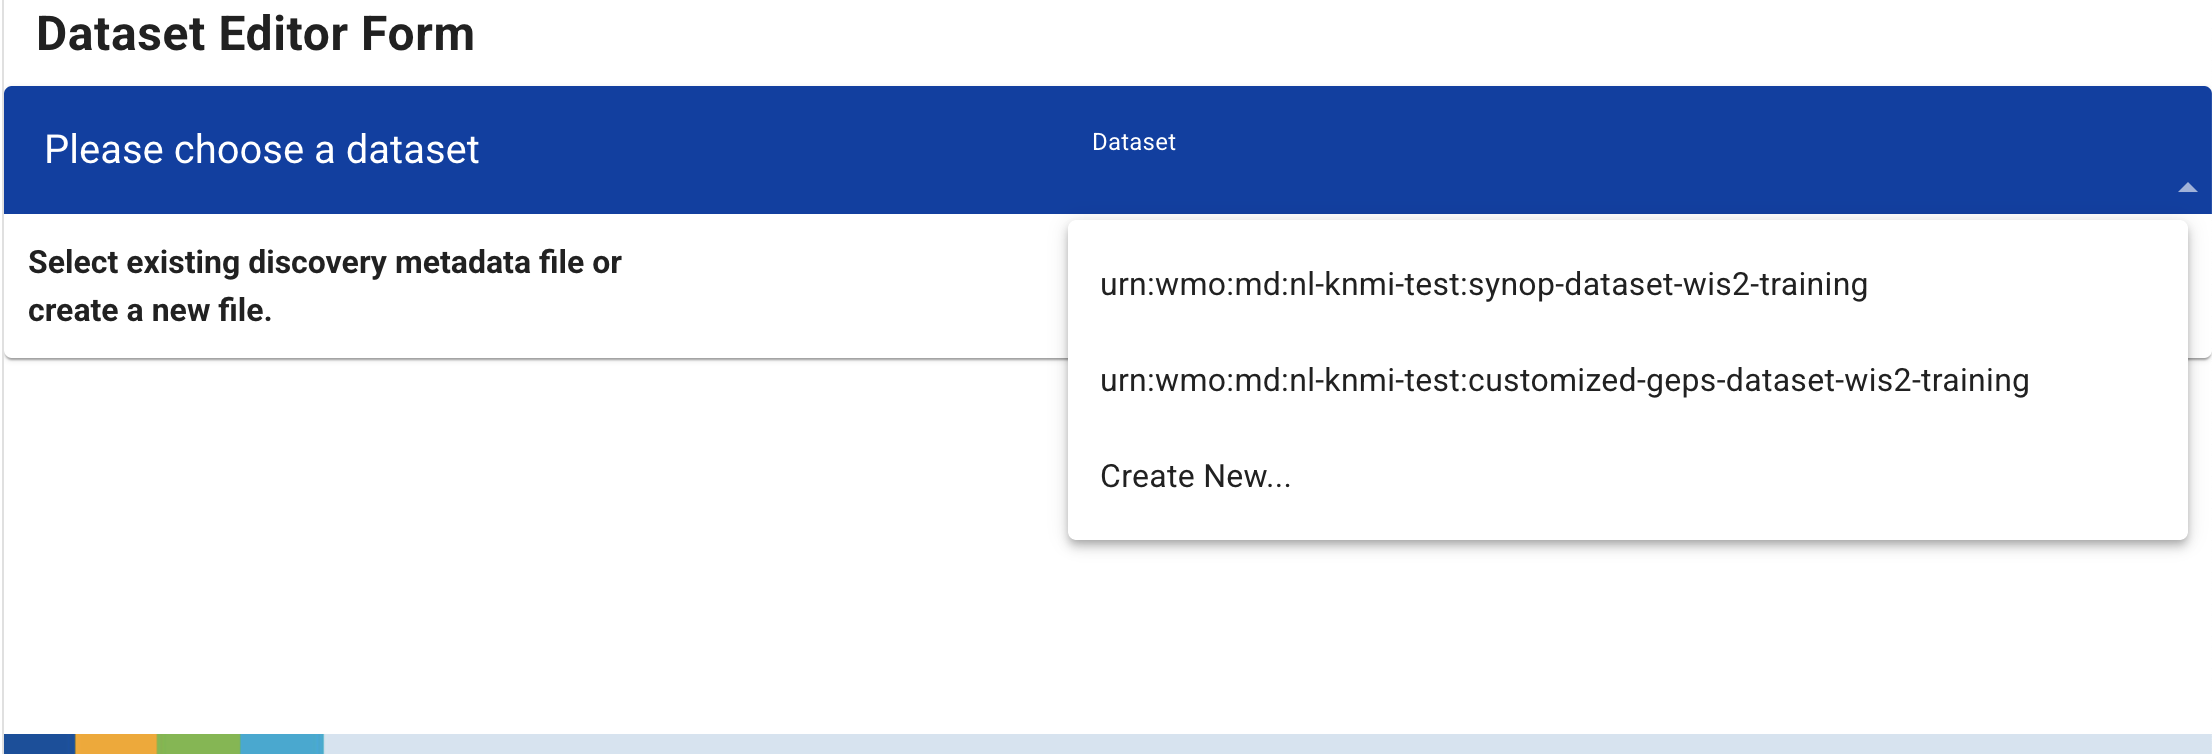
Después de una publicación exitosa, tu nuevo conjunto de datos aparecerá en la pestaña Dataset:
Ve a MQTT Explorer, si estabas conectado a tu broker, deberías ver otra nueva notificación WIS2 publicada en el tema origin/a/wis2/<your-centre-id>/metadata.
Question
Visita la interfaz de usuario de wis2box en http://YOUR-HOST.
¿Cuántos conjuntos de datos ves listados? ¿Cómo puedes ver la Jerarquía de Temas WIS2 utilizada para cada conjunto de datos y cómo puedes ver la descripción de cada conjunto de datos?
Haz clic para revelar la respuesta
Al abrir la interfaz de usuario de wis2box en http://YOUR-HOST, deberías ver 2 conjuntos de datos listados junto con su Jerarquía de Temas WIS2. Para ver la descripción de cada conjunto de datos, puedes hacer clic en "metadata", lo que redirigirá al elemento correspondiente 'discovery-metadata' servido por el wis2box-api.
Question
Intenta actualizar la descripción del último conjunto de datos que creaste. Después de actualizar la descripción, ¿ves una nueva notificación WIS2 publicada en el tema origin/a/wis2/<your-centre-id>/metadata? ¿Cuál es la diferencia entre la nueva notificación y la anterior?
Haz clic para revelar la respuesta
Deberías ver un nuevo mensaje de notificación de datos enviado después de actualizar tu conjunto de datos en el tema origin/a/wis2/<your-centre-id>/metadata.
En el mensaje, el valor de "rel": "canonical" cambiará a "rel": "update", indicando que los datos publicados previamente han sido modificados. Para ver la descripción actualizada, copia y pega la URL en tu navegador y deberías ver la descripción actualizada.
Question
Intenta actualizar la Jerarquía de Temas del último conjunto de datos que creaste cambiando la selección en "Sub-Discipline Topics". ¿Ves una nueva notificación WIS2 publicada en el tema origin/a/wis2/<your-centre-id>/metadata?
Haz clic para revelar la respuesta
No puedes actualizar la Jerarquía de Temas de un conjunto de datos existente. El campo de Jerarquía de Temas está deshabilitado en el Formulario de Edición de Conjuntos de Datos después de que el conjunto de datos ha sido creado. Si deseas usar una Jerarquía de Temas diferente, primero elimina el conjunto de datos existente y luego crea un nuevo conjunto de datos con la Jerarquía de Temas deseada.
Conclusión
¡Felicidades!
En esta sesión práctica, aprendiste a:
- usar el editor de conjuntos de datos de wis2box-webapp
- crear nuevos conjuntos de datos utilizando Template=weather/surface-based-observations/synop y Template=other
- definir tus metadatos de descubrimiento
- revisar tus mapeos de datos
- publicar metadatos de descubrimiento y revisar la notificación WIS2