Configuring datasets in wis2box
Learning outcomes
By the end of this practical session, you will be able to:
- use the wis2box-webapp dataset editor
- create new datasets using Template=weather/surface-based-observations/synop and Template=other
- define your discovery metadata
- review your data mappings
- publish a WIS2 notification for your discovery metadata
Introduction
wis2box uses datasets that are associated with discovery metadata and data mappings.
Discovery metadata is used to create a WMO Core Metadata Profile (WCMP2) record that is shared using a WIS2 notification published on your wis2box broker.
Data mappings are used to associate data plugins to your input data, allowing your data to be transformed prior to being published on WIS2.
In this practical session, you will learn how to create and configure datasets using the wis2box-webapp dataset editor.
Configuring datasets without using the wis2box-webapp
wis2box also supports configuring datasets using the metadata control file (MCF) format defined by the pygeometa tool.
Using MCF allows more flexibility and control but needs to be written precisely as you need to ensure that the MCF is correctly formatted and indented, adhering to the required schema.
MCF files can be published from the command line in the wis2box-management container. See the wis2box documentation for more information.
Preparation
Connect to your broker using MQTT Explorer.
Instead of using your internal broker credentials, use the public credentials everyone/everyone:
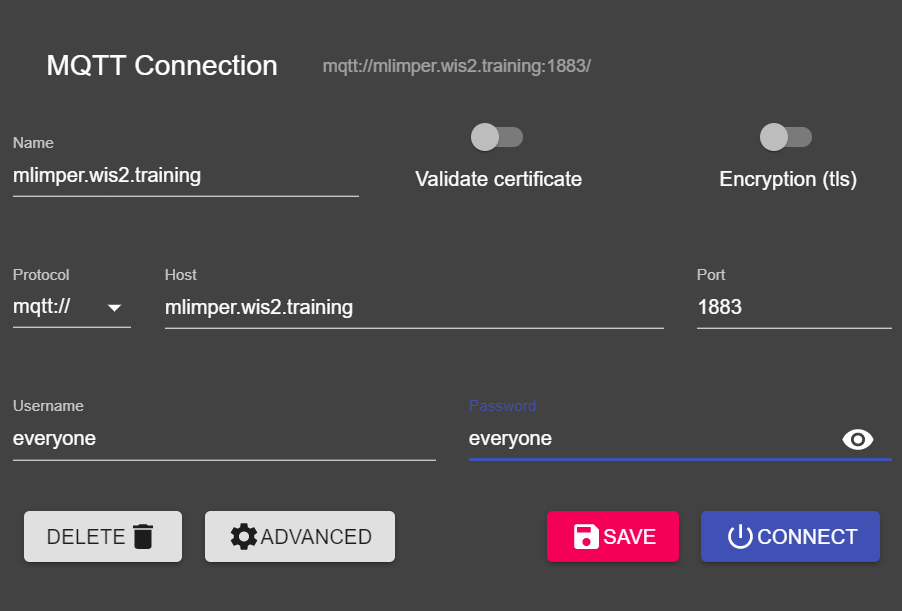
Note
You never need to share the credentials of your internal broker with external users. The 'everyone' user is a public user to enable sharing of WIS2 notifications.
The everyone/everyone credentials have read-only access on the topic 'origin/a/wis2/#'. This is the topic where the WIS2 notifications are published. The Global Broker can subscribe with these public credentials to receive the notifications.
The 'everyone' user will not see internal topics or be able to publish messages.
Open a browser and go to http://YOUR-HOST/wis2box-webapp. Make sure you are logged in and can access the 'dataset editor' page.
See the section on Initializing wis2box if you need to remember how to connect to the broker or access the wis2box-webapp.
Create an authorization token for processes/wis2box
You will need an authorization token for the 'processes/wis2box' endpoint to publish your dataset.
To create an authorization token, access your training VM over SSH and use the following commands:
cd ~/wis2box
python3 wis2box-ctl.py login
Then run the following command to create a randomly generated authorization token for the 'processes/wis2box' endpoint:
wis2box auth add-token --path processes/wis2box
You can also create a token with a specific value by providing the token as an argument to the command:
wis2box auth add-token --path processes/wis2box MyS3cretToken
Make sure to copy the token value and store it on your local machine, as you will need it later.
Once you have your token, you can exit the wis2box-management container:
exit
The wis2box-webapp dataset editor
Navigate to the 'dataset editor' page in the wis2box-webapp of your wis2box instance by going to http://YOUR-HOST/wis2box-webapp and selecting 'dataset editor' from the menu on the left-hand side.
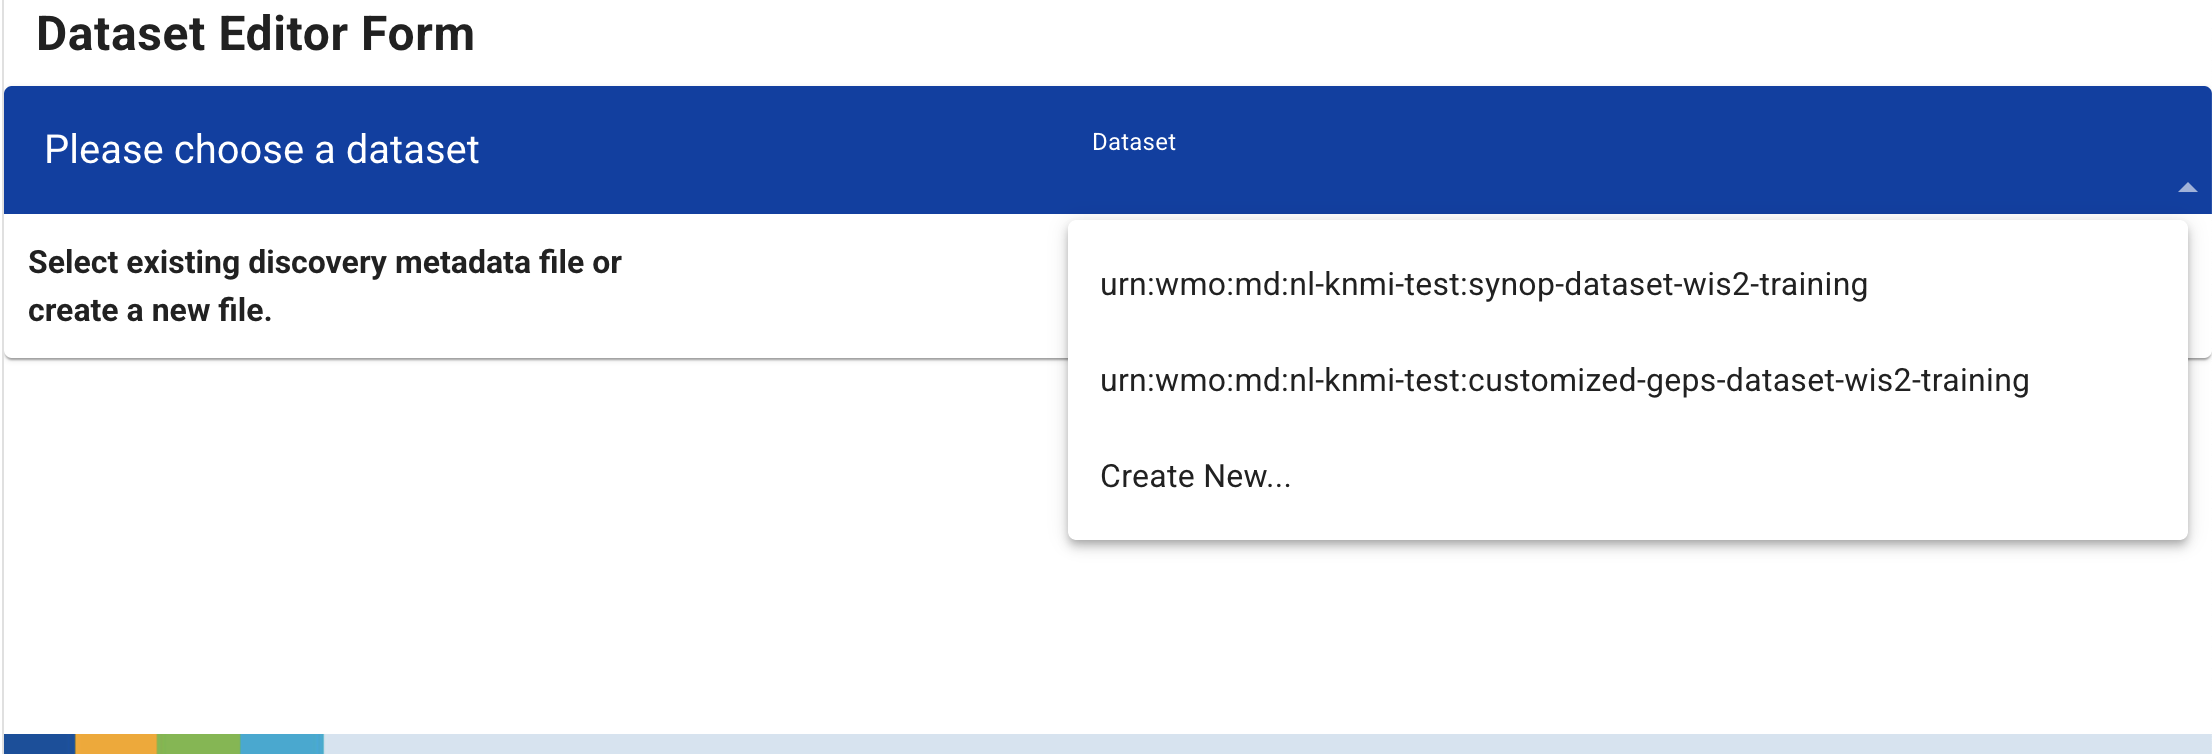
On the 'dataset editor' page, under the 'Datasets' tab, click on "Create New ...":
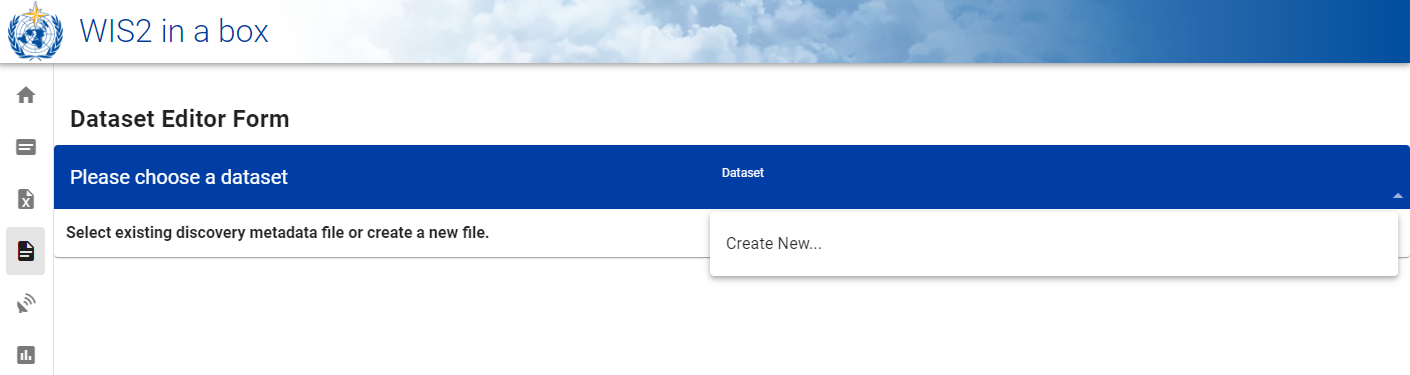
A pop-up window will appear, asking you to provide:
- Centre ID: this is the agency acronym (in lower case and no spaces), as specified by the WMO Member, that identifies the data centre responsible for publishing the data.
- Template: The type of data you are creating metadata for. You can choose between using a predefined template or selecting other.
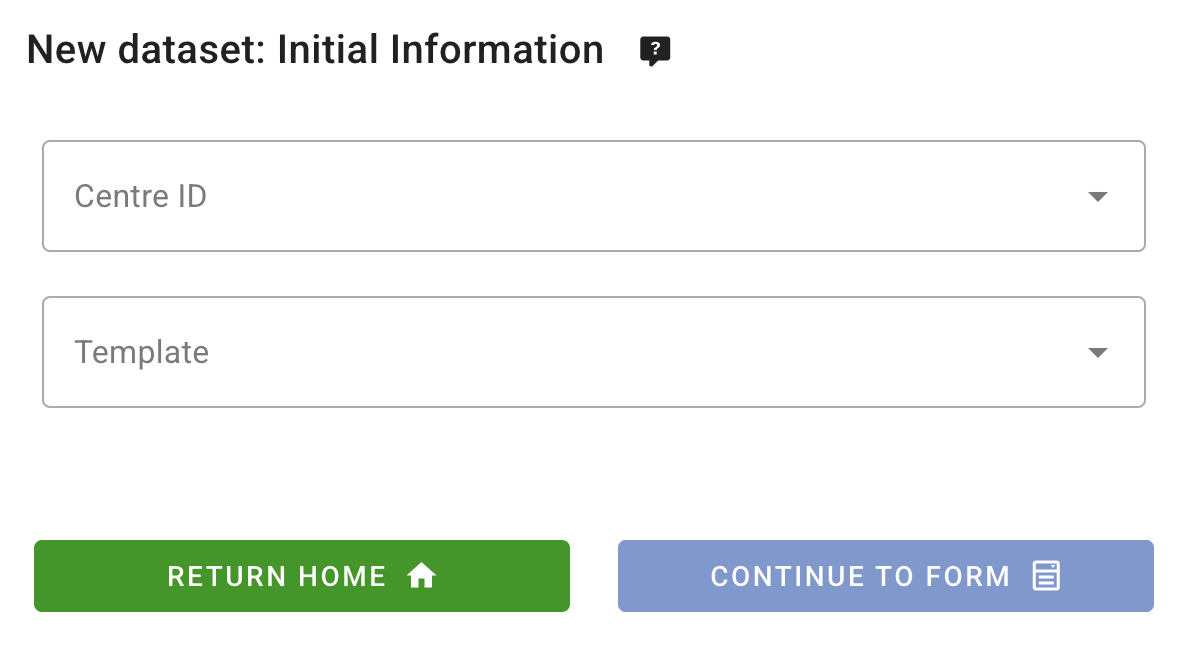
Centre ID
Your Centre ID should start with the TLD of your country, followed by a dash (-) and an abbreviated name of your organization (for example fr-meteofrance). The Centre ID must be lowercase and use alphanumeric characters only. The dropdown list shows all currently registered Centre IDs on WIS2 as well as any Centre ID you have already created in wis2box. Please choose a Centre ID appropriate for your organization.
Template
The Template field allows you to select from a list of templates available in the wis2box-webapp dataset editor. A template will pre-populate the form with suggested default values appropriate for the data type. This includes suggested title and keywords for the metadata and pre-configured data plugins.
The topic is automatically set to the default topic linked to the selected template unless you select other. If you select other, the topic can be defined from a dropdown list based on the WIS2 Topic Hierarchy.
For the purpose of the training, you will create two datasets:
- A dataset using Template=weather/surface-based-observations/synop, which includes data plugins that transform the data into BUFR format before publication.
- A dataset using Template=other, where you are responsible for defining the WIS2 Topic and where you will use the "Universal" plugin to publish the data without transformation.
Template=weather/surface-based-observations/synop
For Template, select weather/surface-based-observations/synop:

Click continue to form to proceed. You will now be presented with the Dataset Editor Form.
Since you selected the weather/surface-based-observations/synop template, the form will be pre-populated with some initial values related to this data type.
Creating discovery metadata
The Dataset Editor Form allows you to provide the Discovery Metadata for your dataset that the wis2box-management container will use to publish a WCMP2 record.
Since you have selected the 'weather/surface-based-observations/synop' template, the form will be pre-populated with some default values.
Please make sure to replace the auto-generated 'Local ID' with a descriptive name for your dataset, e.g., 'synop-dataset-wis2training':
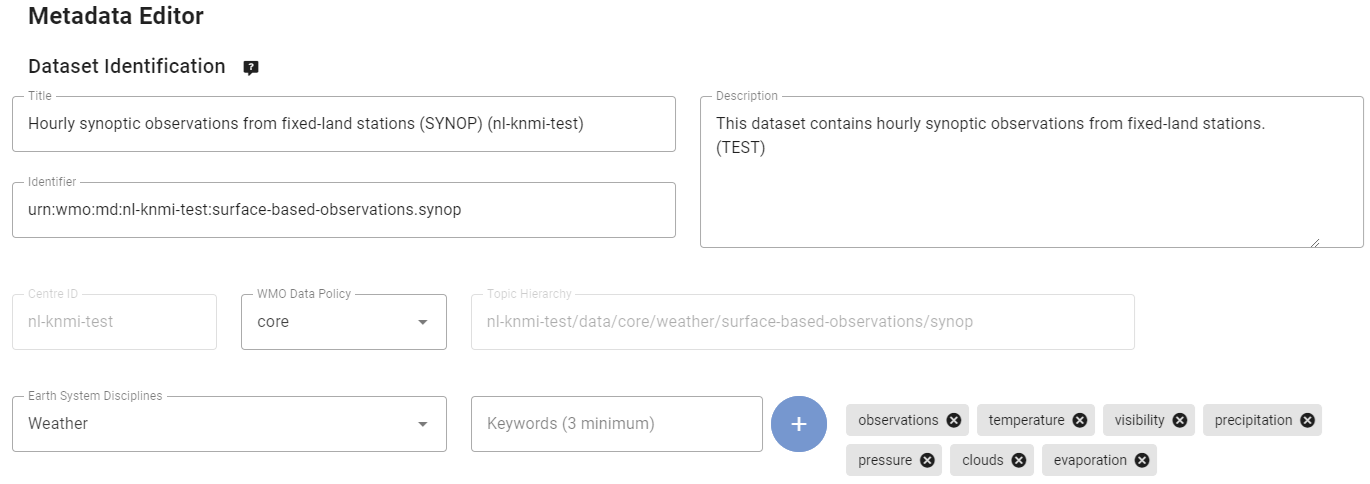
Review the title and keywords, update them as necessary, and provide a description for your dataset.
Note, there are options to change the 'WMO Data Policy' from 'core' to 'recommended' or to modify your default Metadata Identifier. Please keep data policy as 'core' and use the default Metadata Identifier.
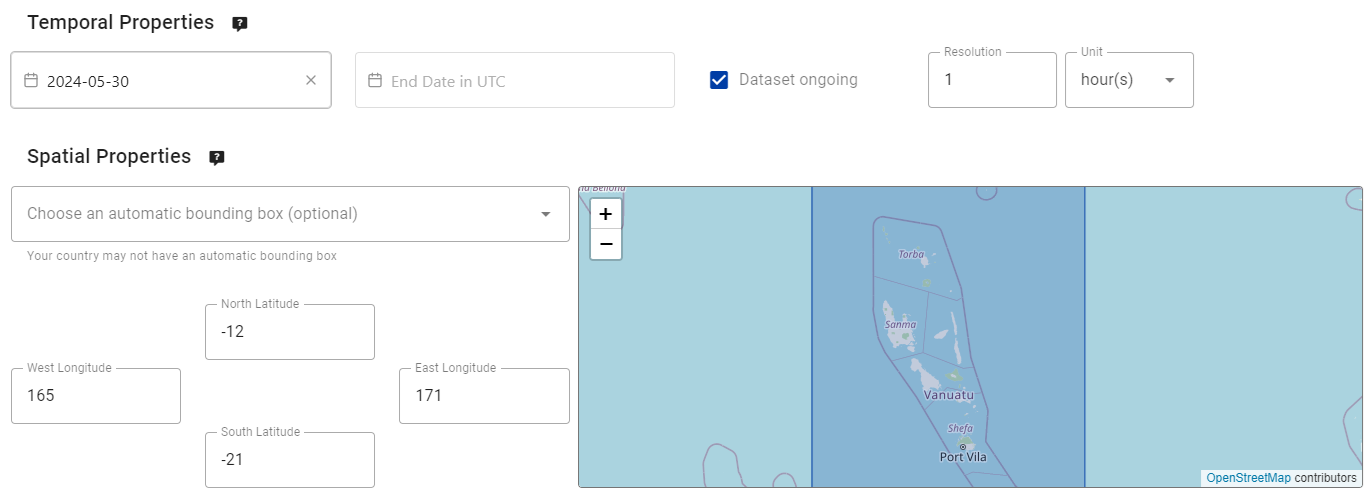
Next, review the section defining your 'Temporal Properties' and 'Spatial Properties'. You can adjust the bounding box by updating the 'North Latitude', 'South Latitude', 'East Longitude', and 'West Longitude' fields:
Next, fill out the section defining the 'Contact Information of the Data Provider':

Finally, fill out the section defining the 'Data Quality Information':
Once you are done filling out all the sections, click 'VALIDATE FORM' and check the form for any errors:
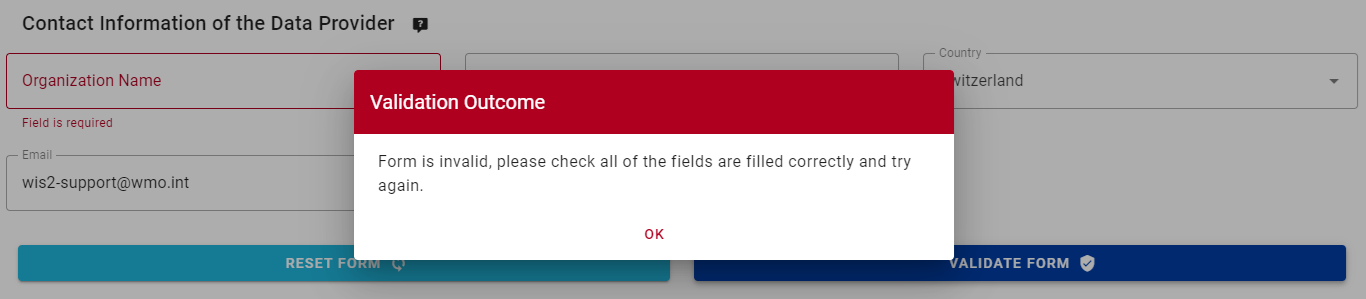
If there are any errors, correct them and click 'VALIDATE FORM' again.
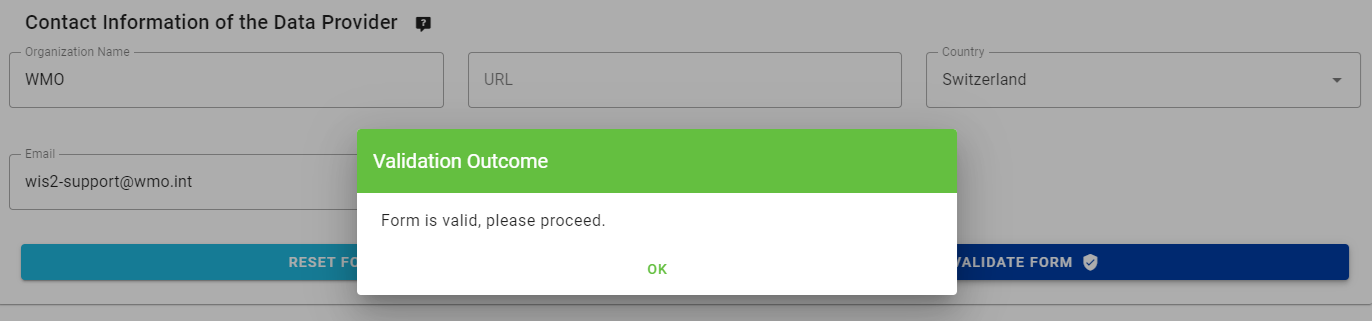
Make sure you have no errors and that you get a pop-up indicating your form has been validated:
Next, before submitting your dataset, review the data mappings for your dataset.
Configuring data mappings
Since you used a template to create your dataset, the dataset mappings have been pre-populated with the default plugins for the 'weather/surface-based-observations/synop' template. Data plugins are used in the wis2box to transform data before it is published using the WIS2 notification.
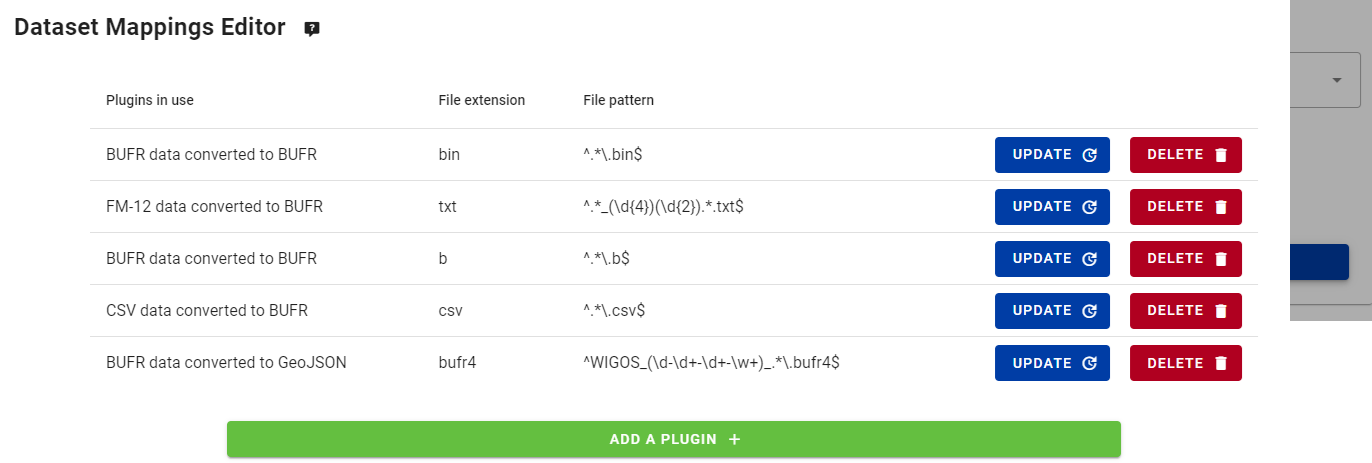
Note that you can click on the "Update" button to change settings for the plugin such as file extension and the file pattern. You can leave the default settings for now.
About the checkbox for caching core-data
You will see the following checkbox:

If you uncheck this checkbox, the wis2box will add properties.cache=False indicating that you do not wish the Global Cache to download and store a copy of your data. By default, this checkbox is checked, meaning that the Global Cache will cache your core data, which is the recommended setting for most datasets.
Submitting your dataset
Finally, you can click 'submit' to publish your dataset.
You will need to provide the authorization token for 'processes/wis2box' that you created earlier. If you have not done so, you can create a new token by following the instructions in the preparation section.
Check that you get the following message after submitting your dataset, indicating that the dataset was successfully submitted:
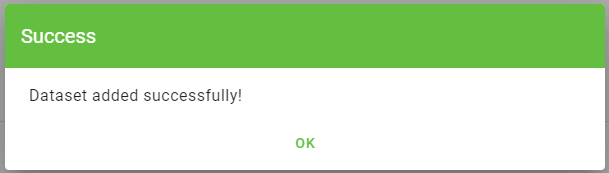
After you click 'OK', you are redirected to the Dataset Editor home page. Now if you click on the 'Dataset' tab, you should see your new dataset listed:

Reviewing the WIS2 notification for your discovery metadata
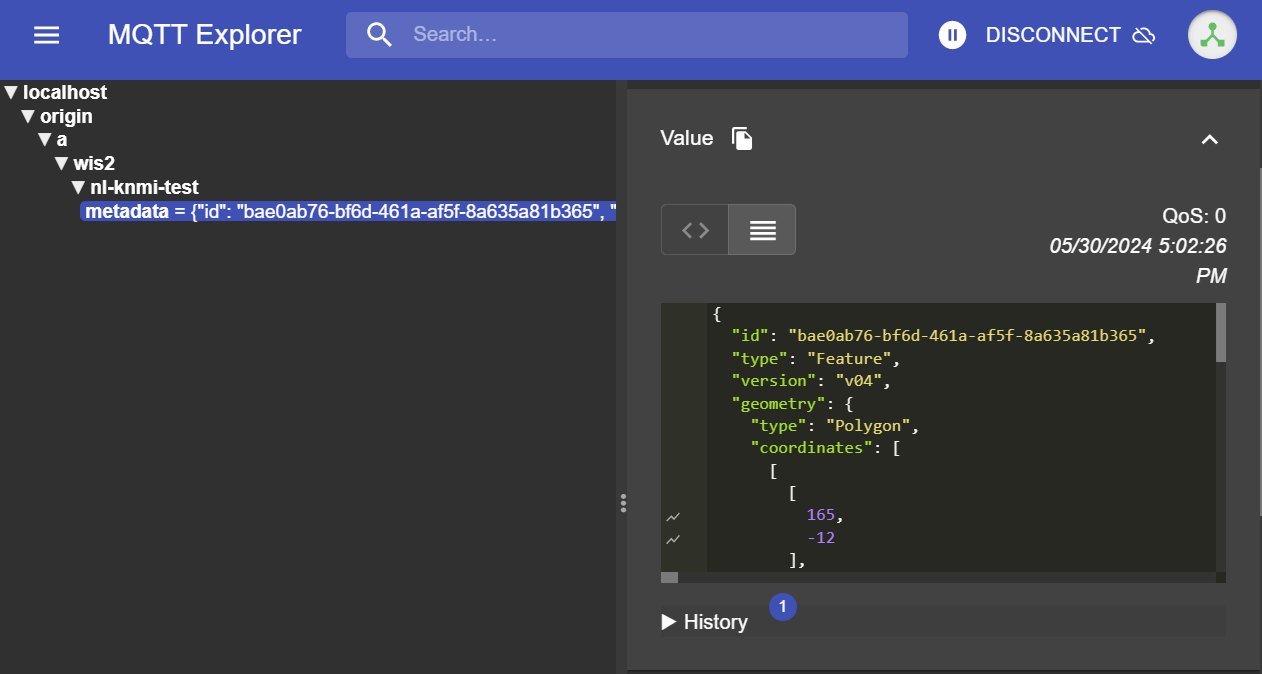
Go to MQTT Explorer. If you were connected to the broker, you should see a new WIS2 notification published on the topic origin/a/wis2/<your-centre-id>/metadata:
Triggering republishing of discovery metadata
The WIS2 notification is published as soon as the discovery metadata is successfully submitted. If you do not see the notification, it may be because you were not connected to the broker at the time of publishing.
If you do not see the WIS2 notification, you can manually trigger the republishing of the discovery metadata using the following command:
python3 wis2box-ctl.py execute wis2box metadata discovery republish
Inspect the content of the WIS2 notification you published. You should see a JSON with a structure corresponding to the WIS Notification Message (WNM) format.
Question
On what topic is the WIS2 notification published?
Click to reveal answer
The WIS2 notification is published on the topic origin/a/wis2/<your-centre-id>/metadata.
Question
Try to find the title, description, and keywords you provided in the discovery metadata in the WIS2 notification. Can you find them?
Click to reveal answer
The title, description, and keywords you provided in the discovery metadata are not present in the WIS2 notification payload!
Instead, try to look for the canonical link in the "links" section in the WIS2 notification:

The WIS2 notification contains a canonical link to the WCMP2 record that was published.
Copy-paste this canonical link into your browser to access the WCMP2 record. Depending on your browser settings, you may be prompted to download the file or it may be displayed directly in your browser.
You will find the title, description, and keywords you provided inside the WCMP2 record.
wis2box provides only a limited number of predefined templates. These templates are designed for common types of datasets, but they may not always match specialized data. For all other types of datasets, you can create your dataset by selecting Template=other.
Template=other
Next, we will create a 2nd dataset using Template=other.
Click on "Create New ..." again to create a new dataset. Use the same centre-id you used before, it should be available in the dropdown list. For Template, select other:

Click continue to form to proceed, you will now be presented with the Dataset Editor Form again.
Creating discovery metadata
Provide your own values for the 'Title' and 'Description' fields and make sure to replace the auto-generated 'Local ID' with a descriptive name for your dataset:
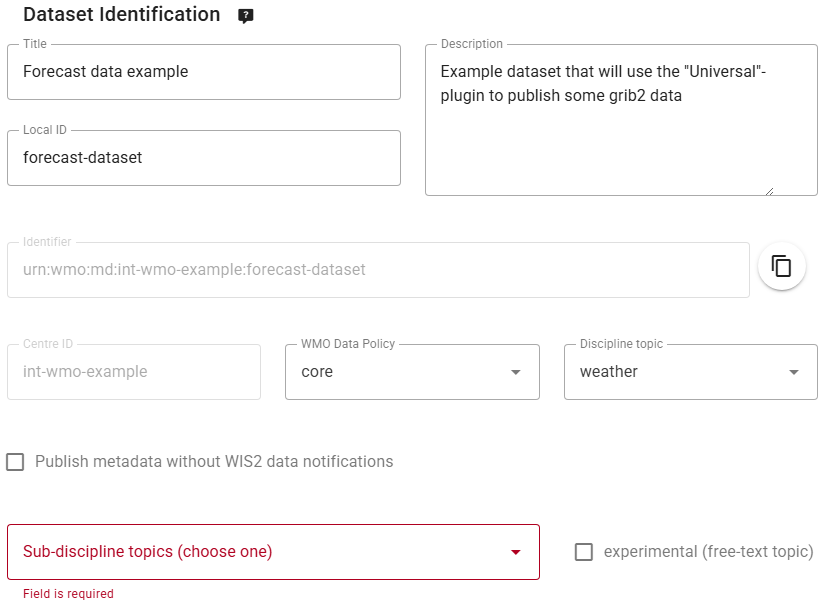
Note that since you selected Template=other it is up to you to define the WIS2 Topic Hierarchy using the dropdown lists for 'Discipline' and 'Sub-Discipline'.
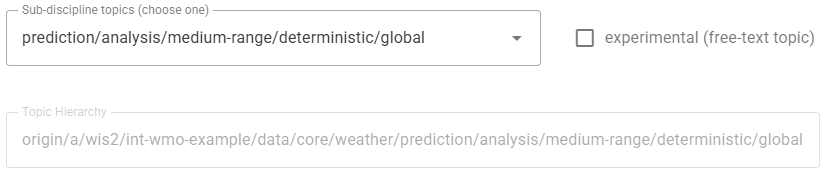
For this exercise please select Sub-Discipline Topic "prediction/analysis/medium-range/deterministic/global":
Since you used Template=other, no keywords were predefined. Make sure you add at least 3 keywords of your own choice:

After filling out the required fields, fill out the remaining sections of the form, including 'Temporal Properties', 'Spatial Properties' and 'Contact Information of the Data Provider' and make sure to validate the form.
Configuring data mappings
When Template=other is used, no default data mappings are provided. As a result, the Dataset Mappings Editor will be empty and users must configure the mappings according to their specific requirements.
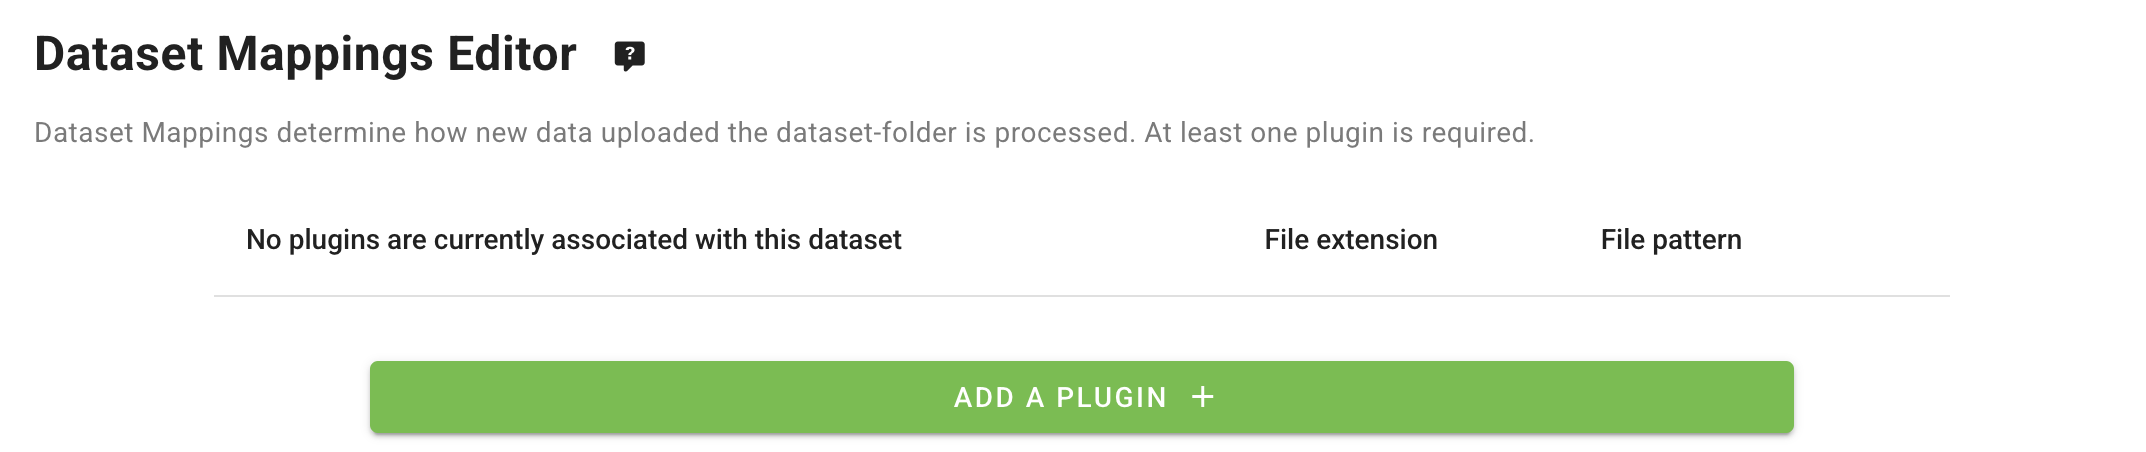
Click "ADD A PLUGIN +" to add a data plugin to your dataset.
Select the plugin with name "Universal data without conversion". This plugin is designed to publish data without applying any transformation.
When adding this plugin, you will need to specify the File Extension and a File Pattern (defined by a regular expression) that matches the naming pattern of your data files. In the case of the "Universal"-plugin, the File Pattern is also used to determine "datetime"-property for the data.
Parsing datetime from filename
The "Universal"-plugin assumes that the first group in the regular expression corresponds to the datetime of the data.
The default File Pattern is ^.*?_(\d{8}).*?\..*$ which matches on 8-digits preceded by an underscore and followed by any characters and a dot before the file extension. For example:
mydata_20250101.txtwill match and extract 25th January 2025 as the datetime-property for the datamydata_2025010112.txtwill not match, as there are 10 digits instead of 8mydata-20250101.txtwill not match, as there is a hyphen instead of an underscore before the date
When ingesting data using the "Universal"-plugin either rename your files to match the default or update the File Pattern ensuring that the first group in the regular expression corresponds to the datetime.
Keep the default values for "File Name" a for now as they match the data you will ingest in the next practical session:

Click "SAVE" to save the plugin settings and verify you now see the plugin listed in the Dataset Mappings Editor:

Note that when you will ingest data the File extension and File Pattern of the filename must match the settings you have provided here, otherwise the data will not be processed and the wis2box-management container will log ERROR messages.
Submit and review the result
Finally provide the authorization token for 'processes/wis2box' that you created earlier and click 'submit' to publish your dataset.
After a successful submission, your new dataset will appear in the Dataset tab:
Go to MQTT Explorer, if you were connected to your broker, you should see another new WIS2 notification published on the topic origin/a/wis2/<your-centre-id>/metadata.
Question
Visit the wis2box-UI at http://YOUR-HOST.
How many datasets do you see listed? How can you view the WIS2 Topic Hierarchy used for each dataset and how can you see the description of each dataset?
Click to reveal answer
By opening the wis2box UI at http://YOUR-HOST you should see 2 datasets listed along with their WIS2 Topic Hierarchy. To see the description of each dataset you can click on "metadata" which will redirect to the corresponding 'discovery-metadata'-item as served by the wis2box-api.
Question
Try to update the description of the last dataset you created. After updating the description, do you see a new WIS2 notification published on the topic origin/a/wis2/<your-centre-id>/metadata? What is the difference between the new notification and the previous one?
Click to reveal answer
You should see a new data notification message being sent after updating your dataset on the topic origin/a/wis2/<your-centre-id>/metadata.
In the message, the value of "rel": "canonical" will change to "rel": "update", indicating that previously published data has been modified. To view the updated description, copy-paste the URL into your browser and you should see the updated description.
Question
Try to update the Topic Hierarchy of the last dataset you created by changing the selection in "Sub-Discipline Topics". Do you see a new WIS2 notification published on the topic origin/a/wis2/<your-centre-id>/metadata?
Click to reveal answer
You are not able to update the Topic Hierarchy of an existing dataset. The Topic Hierarchy field is disabled in the Dataset Editor Form after the dataset has been created. If you want to use a different Topic Hierarchy, first delete the existing dataset and then create a new dataset with the desired Topic Hierarchy.
Conclusion
Congratulations!
In this practical session, you learned how to:
- use the wis2box-webapp dataset editor
- create new datasets using Template=weather/surface-based-observations/synop and Template=other
- define your discovery metadata
- review your data mappings
- publish discovery metadata and review the WIS2 notification