CSV-to-BUFR mapping templates
Learning outcomes
By the end of this practical session, you will be able to:
- create a new BUFR mapping template for your CSV data
- edit and debug your custom BUFR mapping template from the command line
- configure the CSV-to-BUFR data plugin to use a custom BUFR mapping template
- use the built-in AWS and DAYCLI templates for converting CSV data to BUFR
Introduction
Comma-separated values (CSV) data files are often used for recording observational and other data in a tabular format. Most data loggers used to record sensor output are able to export the observations in delimited files, including in CSV. Similarly, when data are ingested into a database it is easy to export the required data in CSV formatted files.
The wis2box csv2bufr module provides a command line tool to convert CSV data to BUFR format. When using csv2bufr you need to provide a BUFR mapping template that maps CSV-columns to corresponding BUFR elements. If you don't want to create your own mapping template, you can use the built-in AWS and DAYCLI templates for converting CSV data to BUFR, but you will need to ensure that the CSV data you are using is in the correct format for these templates. If you want to decode parameters that are not included in the AWS and DAYCLI templates, you will need to create your own mapping template.
In this session you will learn how to create your own mapping template for converting CSV data to BUFR. You will also learn how to use the built-in AWS and DAYCLI templates for converting CSV data to BUFR.
Preparation
Make sure the wis2box-stack has been started with python3 wis2box.py start
Make sure that you have a web browser open with the MinIO UI for your instance by going to http://YOUR-HOST:9000
If you don't remember your MinIO credentials, you can find them in the wis2box.env file in the wis2box directory on your student VM.
Make sure that you have MQTT Explorer open and connected to your broker using the credentials everyone/everyone.
Creating a mapping template
The csv2bufr module comes with a command line tool to create your own mapping template using a set of BUFR sequences and/or BUFR element as input.
To find specific BUFR sequences and elements you can refer to the BUFR tables at https://confluence.ecmwf.int/display/ECC/BUFR+tables.
csv2bufr mappings command line tool
To access the csv2bufr command line tool, you need to login to the wis2box-api container:
cd ~/wis2box
python3 wis2box-ctl.py login wis2box-api
To to print the help page for the command csv2bufr mapping:
csv2bufr mappings --help
The help page show 2 subcommands:
csv2bufr mappings create: Create a new mapping templatecsv2bufr mappings list: List the mapping templates available in the system
csv2bufr mapping list
The csv2bufr mapping list command will show you the mapping templates available in the system.
Default templates are stored in the directory /opt/wis2box/csv2bufr/templates in the container.
To share custom mapping templates with the system you can store them in the directory defined by $CSV2BUFR_TEMPLATES, which is set to /data/wis2box/mappings by default in the container. Since the directory /data/wis2box/mappings in the container is mounted to the directory $WIS2BOX_HOST_DATADIR/mappings on the host, you will find your custom mapping templates in the directory $WIS2BOX_HOST_DATADIR/mappings on the host.
Let's try to create a new custom mapping template using the csv2bufr mapping create command using as input BUFR sequence 301150 plus BUFR element 012101.
csv2bufr mappings create 301150 012101 --output /data/wis2box/mappings/my_custom_template.json
You can check the content of the mapping template you just created using the cat command:
cat /data/wis2box/mappings/my_custom_template.json
Inspection of the mapping template
How many CSV columns are being mapped to BUFR elements? What is the CSV-header for each BUFR element being mapped?
Click to reveal answer
The mapping template you created maps 5 CSV columns to BUFR elements, namely the 4 BUFR elements in sequence 301150 plus the BUFR element 012101.
The following CSV columns are being mapped to BUFR elements:
- wigosIdentifierSeries maps to
"eccodes_key": "#1#wigosIdentifierSeries"(BUFR element 001125) - wigosIssuerOfIdentifier maps to
"eccodes_key": "#1#wigosIssuerOfIdentifier(BUFR element 001126) - wigosIssueNumber maps to
"eccodes_key": "#1#wigosIssueNumber"(BUFR element 001127) - wigosLocalIdentifierCharacter maps to
"eccodes_key": "#1#wigosLocalIdentifierCharacter"(BUFR element 001128) - airTemperature maps to
"eccodes_key": "#1#airTemperature"(BUFR element 012101)
The mapping template you created misses important metadata about the observation that was made, the date and time of the observation, and the latitude and longitude of the station.
Next we will update the mapping template and add the following sequences :
- 301011 for Date (Year, month, day)
- 301012 for Time (Hour, minute)
- 301023 for Location (Latitude/longitude (coarse accuracy))
And the following elements :
- 010004 for Pressure
- 007031 for Barometer height above mean sea level
Execute the following command to update the mapping template:
csv2bufr mappings create 301150 301011 301012 301023 007031 012101 010004 --output /data/wis2box/mappings/my_custom_template.json
And inspect the content of the mapping template again:
cat /data/wis2box/mappings/my_custom_template.json
Inspection of the updated mapping template
How many CSV columns are now being mapped to BUFR elements? What is the CSV-header for each BUFR element being mapped?
Click to reveal answer
The mapping template you created now maps 18 CSV columns to BUFR elements: - 4 BUFR elements from BUFR sequence 301150 - 3 BUFR elements from BUFR sequence 301011 - 2 BUFR elements from BUFR sequence 301012 - 2 BUFR elements from BUFR sequence 301023 - BUFR element 007031 - BUFR element 012101
The following CSV columns are being mapped to BUFR elements:
- wigosIdentifierSeries maps to
"eccodes_key": "#1#wigosIdentifierSeries"(BUFR element 001125) - wigosIssuerOfIdentifier maps to
"eccodes_key": "#1#wigosIssuerOfIdentifier(BUFR element 001126) - wigosIssueNumber maps to
"eccodes_key": "#1#wigosIssueNumber"(BUFR element 001127) - wigosLocalIdentifierCharacter maps to
"eccodes_key": "#1#wigosLocalIdentifierCharacter"(BUFR element 001128) - year maps to
"eccodes_key": "#1#year"(BUFR element 004001) - month maps to
"eccodes_key": "#1#month"(BUFR element 004002) - day maps to
"eccodes_key": "#1#day"(BUFR element 004003) - hour maps to
"eccodes_key": "#1#hour"(BUFR element 004004) - minute maps to
"eccodes_key": "#1#minute"(BUFR element 004005) - latitude maps to
"eccodes_key": "#1#latitude"(BUFR element 005002) - longitude maps to
"eccodes_key": "#1#longitude"(BUFR element 006002) - heightOfBarometerAboveMeanSeaLevel" maps to
"eccodes_key": "#1#heightOfBarometerAboveMeanSeaLevel"(BUFR element 007031) - airTemperature maps to
"eccodes_key": "#1#airTemperature"(BUFR element 012101) - nonCoordinatePressure maps to
"eccodes_key": "#1#nonCoordinatePressure"(BUFR element 010004)
Check the content of the file custom_template_data.csv in the directory /wis2box-api/data-conversion-exercises:
cd /wis2box-api/data-conversion-exercises
cat custom_template_data.csv
Note that the headers of this CSV file are the same as the CSV headers in the mapping template you created.
To test the data conversion we can use the csv2bufr command line tool to convert the CSV file to BUFR using the mapping template we created:
csv2bufr data transform --bufr-template my_custom_template /wis2box-api/data-conversion-exercises/custom_template_data.csv
You should see the following output:
CLI:    ... Transforming /wis2box-api/data-conversion-exercises/custom_template_data.csv to BUFR ...
CLI:    ... Processing subsets:
CLI:    ..... 94 bytes written to ./WIGOS_0-20000-0-15015_20250412T210000.bufr4
CLI:    End of processing, exiting.
Check the content of the BUFR file
How can you check the content of the BUFR file you just created and verify that it has encoded the data correctly?
Click to reveal answer
You can use the bufr_dump -p command to check the content of the BUFR file you just created.
The command will show you the content of the BUFR file in a human readable format.
bufr_dump -p ./WIGOS_0-20000-0-15015_20250412T210000.bufr4
In the output you will see values for the BUFR elements you mapped in the template, for example the "airTemperature" will show:
airTemperature=298.15
You can now exit the container:
exit
Using the mapping template in the wis2box
To ensure the new mapping template is recognized by the wis2box-api container, you need to restart the container:
docker restart wis2box-api
You can now configure your dataset in the wis2box-webapp to use the custom mapping template for the CSV to BUFR conversion plugin.
The wis2box-webapp will automatically detect the mapping template you created and make it available in the list of templates for the CSV to BUFR conversion plugin.
Click on the dataset you created in the previous practical session and click on "UPDATE" next to the plugin with name "CSV data converted to BUFR":

You should see the new template you created in the list of available templates:
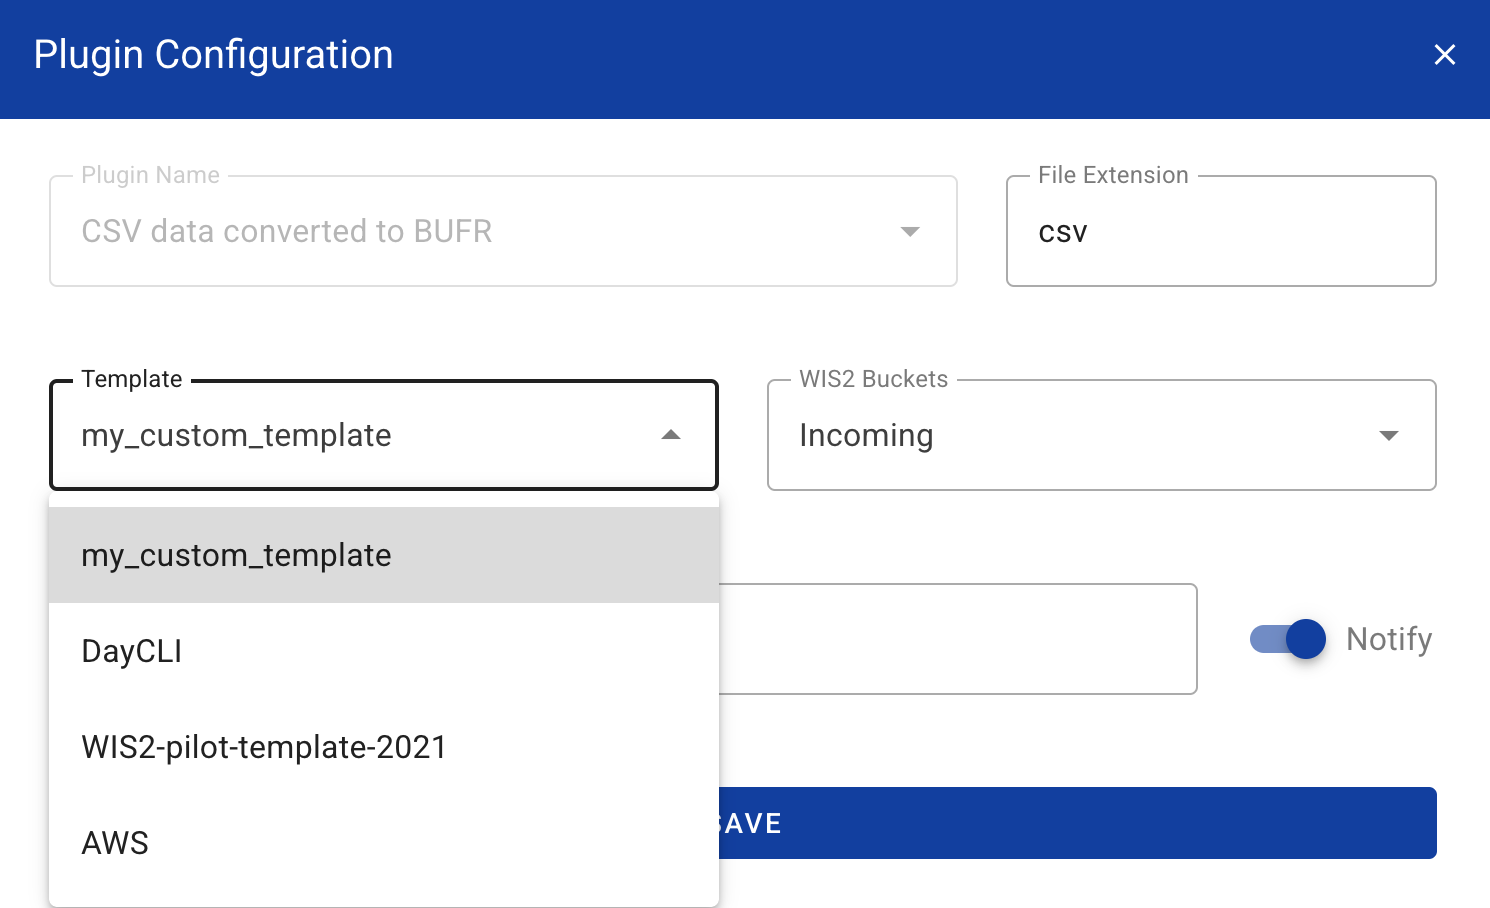
Hint
Note that if you don’t see the new template you created, try refreshing the page or opening it in a new incognito window.
For now keep the default selection of the AWS template (click on the top right to close the plugin configuration).
Using the 'AWS' template
The 'AWS' template provides mapping template for converting CSV data to BUFR sequence 301150, 307096, in support of minimum GBON requirements.
The description of the AWS template can be found here aws-template.
Review the aws-example input data
Download the example for this exercise from the link below:
Open the file you downloaded in an editor and inspect the content:
Question
Examining the date, time and identify fields (WIGOS and traditional identifiers) what do you notice? How would today's date be represented?
Click to reveal answer
Each column contains a single piece of information. For example the date is split into year, month and day, mirroring how the data are stored in BUFR. Todays date would be split across the columns "year", "month" and "day". Similarly, the time needs to be split into "hour" and "minute" and the WIGOS station identifier into its respective components.
Question
Looking at the data file how are missing data encoded?
Click to reveal answer
Missing data within the file are represented by empty cells. In a CSV file this would be
encoded by ,,. Note that this is an empty cell and not encoded as a zero length string,
e.g. ,"",.
Missing data
It is recognized that data may be missing for a variety of reasons, whether due to sensor failure or the parameter not being observed. In these cases missing data can be encoded as per the above answer, the other data in the report remain valid.
Update the example file
Update the example file you downloaded to use today's date and time and change the WIGOS station identifiers to use stations you have registered in the wis2box-webapp.
Upload the data to MinIO and check the result
Navigate to the MinIO UI and log in using the credentials from the wis2box.env file.
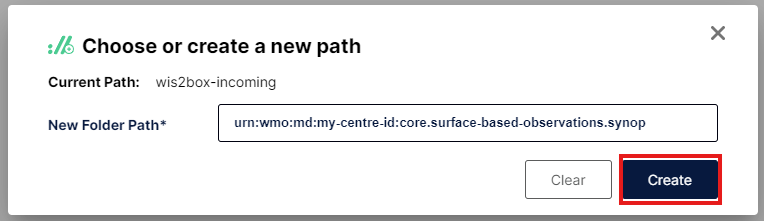
Navigate to the wis2box-incoming and click the button "Create new path":

Create a new folder in the MinIO bucket that matches the dataset-id for the dataset you created with the template='weather/surface-weather-observations/synop':
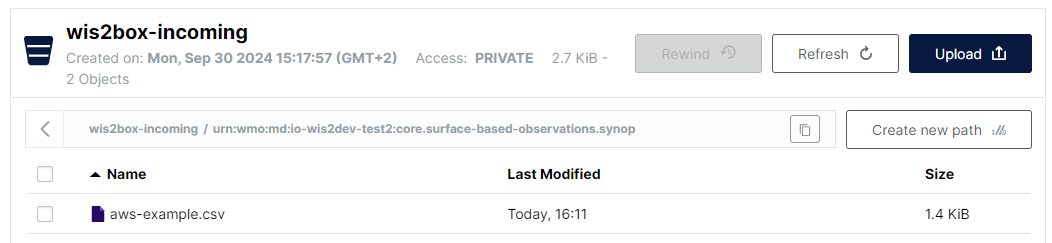
Upload the example file you downloaded to the folder you created in the MinIO bucket:
Check the Grafana dashboard at http://YOUR-HOST:3000 to see if there are any WARNINGS or ERRORS. If you see any, try to fix them and repeat the exercise.
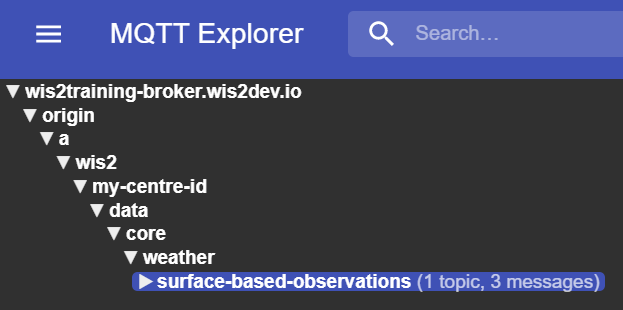
Check the MQTT Explorer to see if you receive WIS2 data-notifications.
If you successfully ingested the data you should see 3 notifications in MQTT explorer on the topic origin/a/wis2/<centre-id>/data/weather/surface-weather-observations/synop for the 3 stations you reported data for:
Using the 'DayCLI' template
The DayCLI template provides a mapping template for converting daily climate CSV data to BUFR sequence 307075, in support of reporting daily climate data.
The description of the DAYCLI template can be found here daycli-template.
To share this data on WIS2 you will need to create a new dataset in the wis2box-webapp that has the correct WIS2 Topic Hierarchy and that uses the DAYCLI template for converting CSV data to BUFR.
Creating a wis2box dataset for publishing DAYCLI messages
Go to the dataset editor in the wis2box-webapp and create a new dataset. Use the same centre-id as in the previous practical sessions and select Data Type='climate/surface-based-observations/daily':
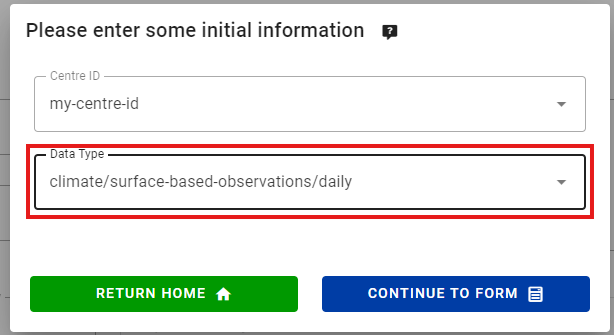
Click "CONTINUE TO FORM" and add a description for your dataset, set the bounding box and provide the contact information for the dataset. Once you are done filling out all the sections, click 'VALIDATE FORM' and check the form.
Review the data-plugins for the datasets. Click on "UPDATE" next to the plugin with name "CSV data converted to BUFR" and you will see the template is set to DayCLI:
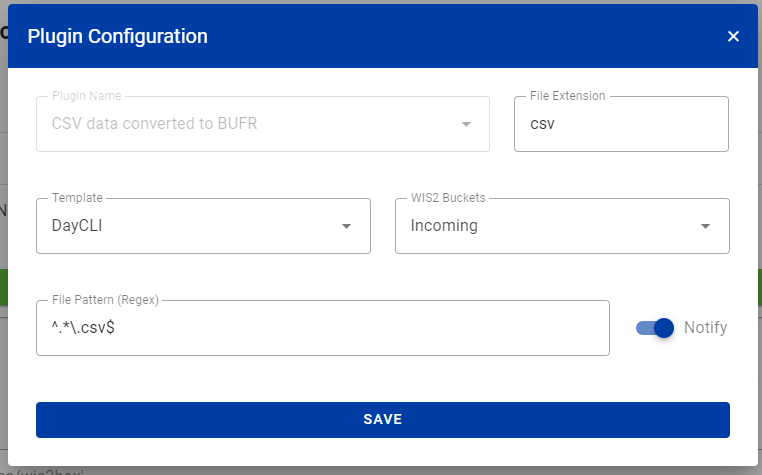
Close the plugin configuration and submit the form using the authentication token you created in the previous practical session.
You should know have a second dataset in the wis2box-webapp that is configured to use the DAYCLI template for converting CSV data to BUFR.
Review the daycli-example input data
Download the example for this exercise from the link below:
Open the file you downloaded in an editor and inspect the content:
Question
What additional variables are included in the daycli template?
Click to reveal answer
The daycli template includes important metadata on the instrument siting and measurement quality classifications for temperature and humidity, quality control flags and information on how the daily average temperature has been calculated.
Update the example file
The example file contains one row of data for each day in a month, and reports data for one station. Update the example file you downloaded to use today's date and time and change the WIGOS station identifiers to use a station you have registered in the wis2box-webapp.
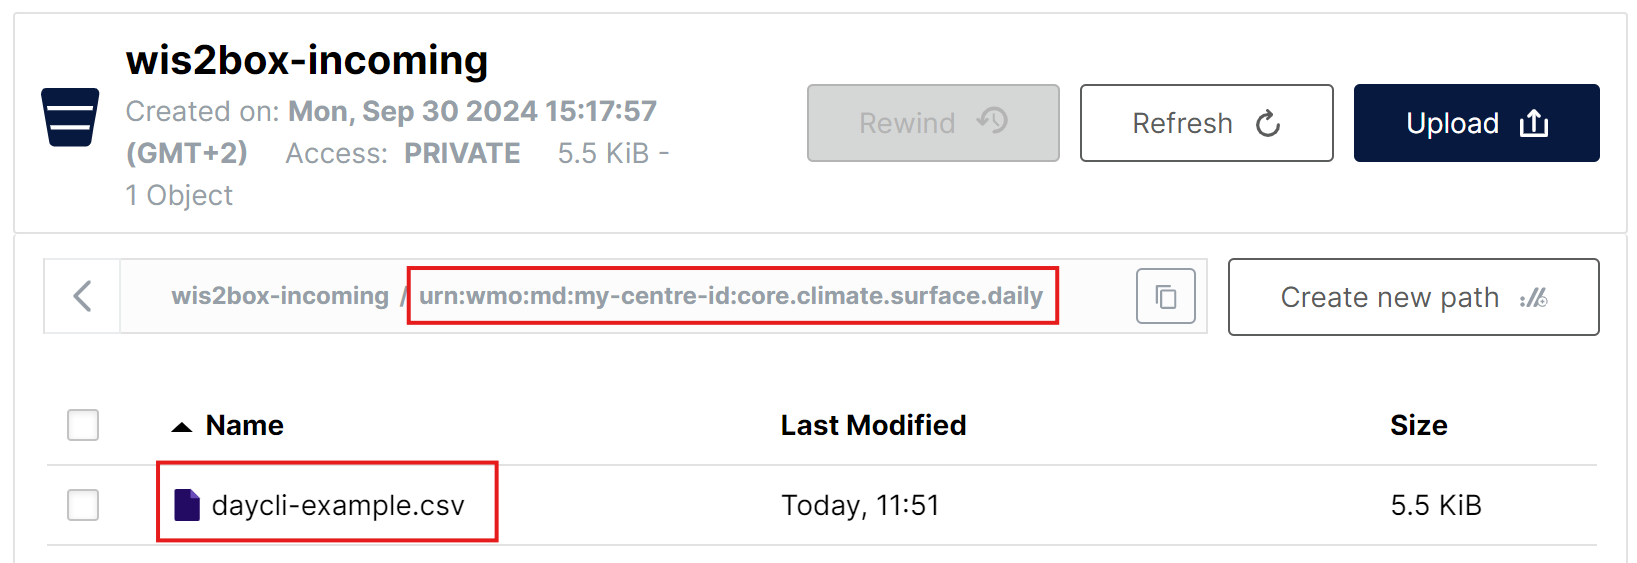
Upload the data to MinIO and check the result
As before, you will need to upload the data to the 'wis2box-incoming' bucket in MinIO to be processed by the csv2bufr converter. This time you will need to create a new folder in the MinIO bucket that matches the dataset-id for the dataset you created with the template='climate/surface-based-observations/daily' which will be different from the dataset-id you used in the previous exercise:
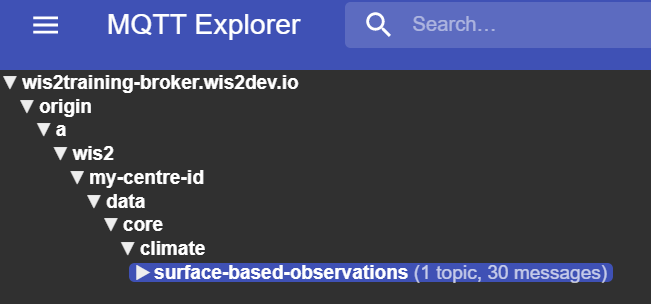
After uploading the data check there are no WARNINGS or ERRORS in the Grafana dashboard and check the MQTT Explorer to see if you receive WIS2 data-notifications.
If you successfully ingested the data you should see 30 notifications in MQTT explorer on the topic origin/a/wis2/<centre-id>/data/climate/surface-based-observations/daily for the 30 days in the month you reported data for:
Conclusion
Congratulations
In this practical session you have learned:
- how to create a custom mapping template for converting CSV data to BUFR
- how to use the built-in AWS and DAYCLI templates for converting CSV data to BUFR