Data Conversion Tools
Learning Outcomes
By the end of this practical session, you will be able to:
- Access ecCodes command-line tools within the wis2box-api container
- Use the synop2bufr tool to convert FM-12 SYNOP reports to BUFR from the command line
- Trigger synop2bufr conversion via the wis2box-webapp
- Use the csv2bufr tool to convert CSV data to BUFR from the command line
Introduction
Data published on WIS2 should meet the requirements and standards defined by the various Earth system discipline / domain expert communities. To lower the barrier to data publication for land-based surface observations, wis2box provides tools to convert data to BUFR format. These tools are available via the wis2box-api container and can be used from the command line to test the data conversion process.
The main conversions currently supported by wis2box are FM-12 SYNOP reports to BUFR and CSV data to BUFR. FM-12 data is supported as it is still widely used and exchanged in the WMO community, while CSV data is supported to allow the mapping of data produced by automatic weather stations to BUFR format.
About FM-12 SYNOP
Surface weather reports from land surface stations have historically been reported hourly or at the main (00, 06, 12, and 18 UTC) and intermediate (03, 09, 15, 21 UTC) synoptic hours. Prior to the migration to BUFR, these reports were encoded in the plain text FM-12 SYNOP code form. While the migration to BUFR was scheduled to be complete by 2012, a large number of reports are still exchanged in the legacy FM-12 SYNOP format. Further information on the FM-12 SYNOP format can be found in the WMO Manual on Codes, Volume I.1 (WMO-No. 306, Volume I.1).
About ecCodes
The ecCodes library is a set of software libraries and utilities designed to decode and encode meteorological data in the GRIB and BUFR formats. It is developed by the European Centre for Medium-Range Weather Forecasts (ECMWF), see the ecCodes documentation for more information.
The wis2box software includes the ecCodes library in the base image of the wis2box-api container. This allows users to access the command-line tools and libraries from within the container. The ecCodes library is used within the wis2box-stack to decode and encode BUFR messages.
About csv2bufr and synop2bufr
In addition to ecCodes, the wis2box uses the following Python modules that work with ecCodes to convert data to BUFR format:
- synop2bufr: to support the legacy FM-12 SYNOP format traditionally used by manual observers. The synop2bufr module relies on additional station metadata to encode additional parameters in the BUFR file. See the synop2bufr repository at GitHub
- csv2bufr: to enable the conversion of CSV-extract produced by automated weather stations to BUFR format. The csv2bufr module is used to convert CSV data to BUFR format using a mapping template that defines how the CSV data should be mapped to the BUFR format. See the csv2bufr repository at GitHub
These modules can be used standalone or as part of the wis2box stack.
Preparation
Prerequisites
- Ensure that your wis2box has been configured and started
- Ensure you have set up a dataset and configured at least one station in your wis2box
- Connect to the MQTT broker of your wis2box instance using MQTT Explorer
- Open the wis2box web application (
http://YOUR-HOST/wis2box-webapp) and ensure you are logged in - Open the Grafana dashboard for your instance by going to
http://YOUR-HOST:3000
To use the BUFR command-line tools, you will need to be logged in to the wis2box-api container. Unless specified otherwise, all commands should be run on this container. You will also need to have MQTT Explorer open and connected to your broker.
First, connect to your student VM via your SSH client and copy the exercise materials to "/wis2box-api"-directory inside the wis2box-api container:
docker cp ~/exercise-materials/data-conversion-exercises wis2box-api:/wis2box-api
Then log in to the wis2box-api container and change to the directory where the exercise materials are located:
cd ~/wis2box
python3 wis2box-ctl.py login wis2box-api
Confirm that the tools are available, starting with ecCodes:
bufr_dump -V
You should get the following response:
ecCodes Version 2.44.1
Next, check the synop2bufr version:
synop2bufr --version
You should get the following response:
synop2bufr, version 0.7.0
Next, check csv2bufr:
csv2bufr --version
You should get the following response:
csv2bufr, version 0.8.6
ecCodes command-line tools
The ecCodes library included in the wis2box-api container provides a number of command-line tools for working with BUFR files.
The next exercises demonstrate how to use bufr_ls and bufr_dump to check the content of a BUFR file.
bufr_ls
Make sure you are in the directory /wis2box-api/data-conversion-exercises:
cd /wis2box-api/data-conversion-exercises
In this first exercise, you will use the bufr_ls command to inspect the headers of a BUFR file and determine the type of the contents of the file.
Use the following command to run bufr_ls on the file bufr-cli-ex1.bufr4:
bufr_ls bufr-cli-ex1.bufr4
You should see the following output:
bufr-cli-ex1.bufr4
centre                     masterTablesVersionNumber  localTablesVersionNumber   typicalDate                typicalTime                numberOfSubsets
cnmc                       29                         0                          20231002                   000000                     1
1 of 1 messages in bufr-cli-ex1.bufr4

1 of 1 total messages in 1 file
Various options can be passed to bufr_ls to change both the format and header fields printed.
Question
What would be the command to list the previous output in JSON format?
You can run the command bufr_ls with the -h flag to see the available options.
Click to reveal answer
You can change the output format to JSON using the -j flag, i.e.
bufr_ls -j bufr-cli-ex1.bufr4
When run, this should give you the following output:
{ "messages" : [
  {
    "centre": "cnmc",
    "masterTablesVersionNumber": 29,
    "localTablesVersionNumber": 0,
    "typicalDate": 20231002,
    "typicalTime": "000000",
    "numberOfSubsets": 1
  }
]}
The output printed represents the values of some of the header keys in the BUFR file.
On its own, this information is not very informative, with only limited information on the file contents provided.
When examining a BUFR file, we often want to determine the type of data contained in the file and the typical date/time of the data in the file. This information can be listed using the -p flag to select the headers to output. Multiple headers can be included using a comma-separated list.
You can use the following command to list the data category, sub-category, typical date, and time:
bufr_ls -p dataCategory,internationalDataSubCategory,typicalDate,typicalTime -j bufr-cli-ex1.bufr4
Question
Execute the previous command and interpret the output using Common Code Table C-13 to determine the data category and sub-category.
What type of data (data category and sub-category) is contained in the file? What is the typical date and time for the data?
Click to reveal answer
{ "messages" : [
  {
    "dataCategory": 2,
    "internationalDataSubCategory": 4,
    "typicalDate": 20231002,
    "typicalTime": "000000"
  }
]}
From this, we see that:
- The data category is 2, indicating "Vertical soundings (other than satellite)" data.
- The international sub-category is 4, indicating "Upper-level temperature/humidity/wind reports from fixed-land stations (TEMP)" data.
- The typical date and time are 2023-10-02 and 00:00:00z, respectively.
bufr_dump
The bufr_dump command can be used to list and examine the contents of a BUFR file, including the data itself.
Try to run the bufr_dump command on the second example file bufr-cli-ex2.bufr4:
bufr_dump bufr-cli-ex2.bufr4
This results a JSON that can be hard to parse, try using the -p flag to output the data in plain text (key=value format):
bufr_dump -p bufr-cli-ex2.bufr4
You should will see a large number of keys as output, many of which are missing. This is typical with real world data as not all the eccodes keys are populated with reported data.
You can use the grep command to filter the output and only show the keys that are not missing. For example, to show all the keys that are not missing, you can use the following command:
bufr_dump -p bufr-cli-ex2.bufr4 | grep -v MISSING
Question
What is the pressured reduced to mean sea level reported in the BUFR file bufr-cli-ex2.bufr4?
Click to reveal answer
Using the following command:
bufr_dump -p bufr-cli-ex2.bufr4 | grep -i 'pressureReducedToMeanSeaLevel'
You should see the following output:
pressureReducedToMeanSeaLevel=105590
Question
What is the WIGOS station identifier of the station that reported the data in the BUFR file bufr-cli-ex2.bufr4?
Click to reveal answer
Using the following command:
bufr_dump -p bufr-cli-ex2.bufr4 | grep -i 'wigos'
You should see the following output:
wigosIdentifierSeries=0
wigosIssuerOfIdentifier=20000
wigosIssueNumber=0
wigosLocalIdentifierCharacter="99100"
This indicates that the WIGOS station identifier is 0-20000-0-99100.
synop2bufr conversion
Next, let's look at how to convert FM-12 SYNOP data to BUFR format using the synop2bufr module. The synop2bufr module is used to convert FM-12 SYNOP data to BUFR format. The module is installed in the wis2box-api container and can be used from the command line as follows:
synop2bufr data transform \
    --metadata <station-metadata.csv> \
    --output-dir <output-directory-path> \
    --year <year-of-observation> \
    --month <month-of-observation> \
    <input-fm12.txt>
The --metadata argument is used to specify the station metadata file, that provide additional information to be encoded in the BUFR file.
The --output-dir argument is used to specify the directory where the converted BUFR files will be written. The --year and --month arguments are used to specify the year and month of the observation.
The synop2bufr module is also used in the wis2box-webapp to convert FM-12 SYNOP data to BUFR format using a web-based input form.
The next few exercises will demonstrate how the synop2bufr-module works and how to use it to convert FM-12 SYNOP data to BUFR format.
review the example SYNOP message
Inspect the example SYNOP message file for this exercise synop_message.txt:
cd /wis2box-api/data-conversion-exercises
more synop_message.txt
Question
How many SYNOP reports are in this file?
Click to reveal answer
The output shows the following:
AAXX 21121
15015 02999 02501 10103 21090 39765 42952 57020 60001=
15020 02997 23104 10130 21075 30177 40377 58020 60001 81041=
15090 02997 53102 10139 21075 30271 40364 58031 60001 82046=
There are 3 SYNOP reports in the file, corresponding to 3 different stations (identified by the 5-digit traditional station identifiers: 15015, 15020, and 15090).
Note that the end of each report is marked by the = character.
review the station list
The --metadata argument requires a CSV file using a pre-defined format, a working example is provided in the file station_list.csv:
Use the following command to inspect the contents of the station_list.csv file:
more station_list.csv
Question
How many stations are listed in the station list? What are the WIGOS station identifiers of the stations?
Click to reveal answer
The output shows the following:
station_name,wigos_station_identifier,traditional_station_identifier,facility_type,latitude,longitude,elevation,barometer_height,territory_name,wmo_region
OCNA SUGATAG,0-20000-0-15015,15015,landFixed,47.7770616258,23.9404602638,503.0,504.0,ROU,europe
BOTOSANI,0-20000-0-15020,15020,landFixed,47.7356532437,26.6455501701,161.0,162.1,ROU,europe
This corresponds to the station metadata for 2 stations: for the WIGOS station identifiers 0-20000-0-15015 and 0-20000-0-15020.
convert SYNOP to BUFR
Next, use the following command to convert the FM-12 SYNOP message to BUFR format:
synop2bufr data transform --metadata station_list.csv --output-dir ./ --year 2024 --month 09 synop_message.txt
Question
How many BUFR files were created ? What does the WARNING message in the output mean?
Click to reveal answer
The output shows the following:
[WARNING] Station 15090 not found in station file
If you check the content of your directory with the ls -lh, you should see 2 new BUFR files were created: WIGOS_0-20000-0-15015_20240921T120000.bufr4 and WIGOS_0-20000-0-15020_20240921T120000.bufr4.
The warning message indicates that the station with the traditional station identifier 15090 was not found in the station list file station_list.csv. This means that the SYNOP report for this station was not converted to BUFR format.
Question
Check the content of the BUFR file WIGOS_0-20000-0-15015_20240921T120000.bufr4 using the bufr_dump command.
Can you verify the information provided in the station_list.csv file is present in the BUFR file?
Click to reveal answer
You can use the following command to check the content of the BUFR file:
bufr_dump -p WIGOS_0-20000-0-15015_20240921T120000.bufr4 | grep -v MISSING
You will note the following output:
wigosIdentifierSeries=0
wigosIssuerOfIdentifier=20000
wigosIssueNumber=0
wigosLocalIdentifierCharacter="15015"
blockNumber=15
stationNumber=15
stationOrSiteName="OCNA SUGATAG"
stationType=1
year=2024
month=9
day=21
hour=12
minute=0
latitude=47.7771
longitude=23.9405
heightOfStationGroundAboveMeanSeaLevel=503
heightOfBarometerAboveMeanSeaLevel=504
...
Note that this includes the data provided by the station_list.csv file.
SYNOP Form in wis2box-webapp
The synop2bufr module is also used in the wis2box-webapp to convert FM-12 SYNOP data to BUFR format using a web-based input form.
To test this, go to the http://YOUR-HOST/wis2box-webapp and log in.
Select the SYNOP Form from the menu on the left and copy paste the contents of the synop_message.txt file:
AAXX 21121
15015 02999 02501 10103 21090 39765 42952 57020 60001=
15020 02997 23104 10130 21075 30177 40377 58020 60001 81041=
15090 02997 53102 10139 21075 30271 40364 58031 60001 82046=
Into the SYNOP message text area:
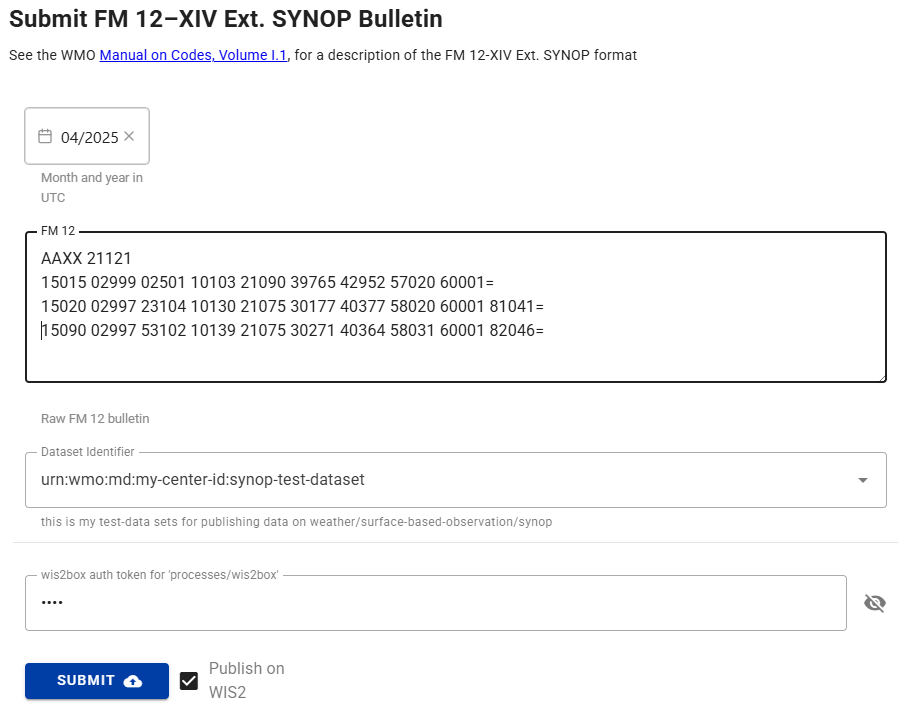
Question
Are you able to submit the form? What is the result?
Click to reveal answer
You need to select a dataset and provide the token for "processes/wis2box" you created in the previous exercise to submit the form.
If you provide an invalid token, you will see:
- Result: Unauthorized, please provide a valid 'processes/wis2box' token
If you provide a valid token, you will see "WARNINGS: 3". Click on the "WARNINGS" to open the dropdown which will show:
- Station 15015 not found in station file
- Station 15020 not found in station file
- Station 15090 not found in station file
To convert this data to BUFR format you would need to configure the corresponding stations in your wis2box and ensure that the stations are associated to the topic for your dataset.
Note
In the exercise for ingesting-data-for-publication you ingested the file "synop_202412030900.txt" and it was converted to BUFR format by the synop2bufr module.
In the automated workflow in the wis2box, the year and month are automatically extracted from the filename and used to populate the --year and --month arguments required by synop2bufr, while the station metadata is automatically extracted from the station configuration in the wis2box.
csv2bufr conversion
Note
Make sure you are still logged in the wis2box-api container and in the directory /wis2box-api/data-conversion-exercises, if you exited the container in the previous exercise, you can log in again as follows:
cd ~/wis2box
python3 wis2box-ctl.py login wis2box-api
cd /wis2box-api/data-conversion-exercises
Now let's look at how the convert CSV data to BUFR format using the csv2bufr module. The module is installed in the wis2box-api container and can be used from the command line as follows:
csv2bufr data transform \
    --bufr-template <bufr-mapping-template> \
    <input-csv-file>
The --bufr-template argument is used to specify the BUFR mapping template file, which provides mapping between the input CSV data and the output BUFR data is specified in a JSON file. Default mapping templates are installed in the directory /opt/csv2bufr/templates in the wis2box-api container.
review the example CSV file
Review the content of the example CSV file aws-example.csv:
more aws-example.csv
Question
How many rows of data are in the CSV file? What is the WIGOS station identifier of the stations reporting in the CSV file?
Click to reveal answer
The output shows the following:
wsi_series,wsi_issuer,wsi_issue_number,wsi_local,wmo_block_number,wmo_station_number,station_type,year,month,day,hour,minute,latitude,longitude,station_height_above_msl,barometer_height_above_msl,station_pressure,msl_pressure,geopotential_height,thermometer_height,air_temperature,dewpoint_temperature,relative_humidity,method_of_ground_state_measurement,ground_state,method_of_snow_depth_measurement,snow_depth,precipitation_intensity,anemometer_height,time_period_of_wind,wind_direction,wind_speed,maximum_wind_gust_direction_10_minutes,maximum_wind_gust_speed_10_minutes,maximum_wind_gust_direction_1_hour,maximum_wind_gust_speed_1_hour,maximum_wind_gust_direction_3_hours,maximum_wind_gust_speed_3_hours,rain_sensor_height,total_precipitation_1_hour,total_precipitation_3_hours,total_precipitation_6_hours,total_precipitation_12_hours,total_precipitation_24_hours
0,20000,0,60355,60,355,1,2024,3,31,1,0,47.77706163,23.94046026,503,504.43,100940,101040,1448,5,298.15,294.55,80,3,1,1,0,0.004,10,-10,30,3,30,5,40,9,20,11,2,4.7,5.3,7.9,9.5,11.4
0,20000,0,60355,60,355,1,2024,3,31,2,0,47.77706163,23.94046026,503,504.43,100940,101040,1448,5,25.,294.55,80,3,1,1,0,0.004,10,-10,30,3,30,5,40,9,20,11,2,4.7,5.3,7.9,9.5,11.4
0,20000,0,60355,60,355,1,2024,3,31,3,0,47.77706163,23.94046026,503,504.43,100940,101040,1448,5,298.15,294.55,80,3,1,1,0,0.004,10,-10,30,3,30,5,40,9,20,11,2,4.7,5.3,7.9,9.5,11.4
The first row of the CSV file contains the column headers, which are used to identify the data in each column.
After the header row, there are 3 rows of data, representing 3 weather observation from the same station with WIGOS station identifier 0-20000-0-60355 at three different timestamps 2024-03-31 01:00:00, 2024-03-31 02:00:00, and 2024-03-31 03:00:00.
review the aws-template
The wis2box-api includes a set of predefined BUFR mapping templates that are installed in the directory /opt/csv2bufr/templates.
Check the content of the directory /opt/csv2bufr/templates:
ls /opt/csv2bufr/templates
CampbellAfrica-v1-template.json aws-template.json daycli-template.json
Let's check the content of the aws-template.json file:
cat /opt/csv2bufr/templates/aws-template.json
This returns a large JSON file, providing the mapping for 43 CSV columns.
Question
What CSV column is mapped to the eccodes key airTemperature? What are the valid minimum and maximum values for this key?
Click to reveal answer
Using the following command to filter the output:
cat /opt/csv2bufr/templates/aws-template.json | grep -i airTemperature
{"eccodes_key": "#1#airTemperature", "value": "data:air_temperature", "valid_min": "const:193.15", "valid_max": "const:333.15"},
The value that will be encoded for the eccodes key airTemperature will be taken from the data in the CSV column: air_temperature.
The minimum and maximum values for this key are 193.15 and 333.15, respectively.
Question
What CSV column is mapped to the eccodes key internationalDataSubCategory? What is the value of this key?
Click to reveal answer
Using the following command to filter the output:
cat /opt/csv2bufr/templates/aws-template.json | grep -i internationalDataSubCategory
{"eccodes_key": "internationalDataSubCategory", "value": "const:2"},
There is no CSV column mapped to the eccodes key internationalDataSubCategory, instead the constant value 2 is used and will be encoded in all BUFR files produced with this mapping template.
convert CSV to BUFR
Let's attempt to convert the file to BUFR format using the csv2bufr command:
csv2bufr data transform --bufr-template aws-template ./aws-example.csv
Question
How many BUFR files were created?
Click to reveal answer
The output shows the following:
CLI:    ... Transforming ./aws-example.csv to BUFR ...
CLI:    ... Processing subsets:
CLI:    ..... 384 bytes written to ./WIGOS_0-20000-0-60355_20240331T010000.bufr4
#1#airTemperature: Value (25.0) out of valid range (193.15 - 333.15).; Element set to missing
CLI:    ..... 384 bytes written to ./WIGOS_0-20000-0-60355_20240331T020000.bufr4
CLI:    ..... 384 bytes written to ./WIGOS_0-20000-0-60355_20240331T030000.bufr4
CLI:    End of processing, exiting.
The output indicates that 3 BUFR files were created: WIGOS_0-20000-0-60355_20240331T010000.bufr4, WIGOS_0-20000-0-60355_20240331T020000.bufr4, and WIGOS_0-20000-0-60355_20240331T030000.bufr4.
To check the content of the BUFR files while ignoring the missing values, you can use the following command:
bufr_dump -p WIGOS_0-20000-0-60355_20240331T010000.bufr4 | grep -v MISSING
Question
What is the value of the eccodes key airTemperature in the BUFR file WIGOS_0-20000-0-60355_20240331T010000.bufr4? How about in the BUFR file WIGOS_0-20000-0-60355_20240331T020000.bufr4?
Click to reveal answer
To filter the output, you can use the following command:
bufr_dump -p WIGOS_0-20000-0-60355_20240331T010000.bufr4 | grep -v MISSING | grep airTemperature
#1#airTemperature=298.15
While for the second file:
bufr_dump -p WIGOS_0-20000-0-60355_20240331T020000.bufr4 | grep -v MISSING | grep airTemperature
You get no result, indicating that the value for the key airTemperature is missing in the BUFR file WIGOS_0-20000-0-60355_20240331T020000.bufr4. The csv2bufr refused to encode the value 25.0 from the CSV-data as it is outside the valid range of 193.15 and 333.15 as defined in the mapping template.
Note that converting CSV to BUFR using one of the predefined BUFR mapping template has limitations:
- the CSV file must be in the format defined in the mapping template, i.e. the CSV column names must match the names defined in the mapping template
- you can only encode the keys defined in the mapping template
- the quality control checks are limited to the checks defined in the mapping template
For information on how to create and use custom BUFR-mapping-templates see the next practical exercise csv2bufr-templates.
Conclusion
Congratulations!
In this practical session you have learned:
- how to access ecCodes command-line tools within the wis2box-api container
- how to use
synop2bufrto convert FM-12 SYNOP reports to BUFR from the command line - how to use the SYNOP Form in the wis2box-webapp to convert FM-12 SYNOP reports to BUFR
- how to use
csv2bufrto convert CSV data to BUFR from the command line