Настройка рекомендованного набора данных
Результаты обучения
К концу этой практической сессии вы сможете:
- создать новый набор данных с политикой данных 'recommended'
- добавить токен доступа к набору данных
- проверить, что доступ к набору данных невозможен без токена доступа
- добавить токен доступа в HTTP-заголовки для доступа к набору данных
- добавить пользовательский лицензионный файл, размещенный на вашем экземпляре wis2box
Введение
Данные распространяются в рамках WIS2 в соответствии с Единой политикой данных ВМО, которая определяет две категории данных.
core : данные, предоставляемые на бесплатной и неограниченной основе, без оплаты и без условий использования
recommended : данные, которые могут предоставляться с условиями использования и/или подлежать лицензированию
Данные, распространяемые как recommended:
- могут быть предоставлены с условиями использования и повторного использования
- могут иметь ограничения доступа
- не кэшируются глобальными кэшами WIS2
- должны иметь метаданные, включающие URL лицензии
Загрузка рекомендованных данных
Поскольку глобальные кэши WIS не кэшируют рекомендованные данные, вы не увидите уведомлений по теме cache/a/wis2/<centre-id>/data/recommended/..
Потребитель данных должен загрузить данные с сервера данных, размещенного поставщиком данных, используя канонический URL, предоставленный в уведомлениях по теме origin/a/wis2/<centre-id>/data/recommended/...
В этой практической сессии вы создадите новый набор данных с политикой данных 'recommended', используя редактор наборов данных в wis2box-webapp. Вы также узнаете, как предоставить самохостируемую лицензию и, при необходимости, добавить контроль доступа.
Авиационные данные в WIS2
Для этого упражнения вам предлагается создать набор данных для обмена данными METAR, стандартным форматом для отчетов об авиационных метеорологических наблюдениях.
Поскольку данные аэрометеорологии подлежат ограничениям использования, применяется политика данных Recommended.
Для получения дополнительной информации см. раздел о публикации данных аэрометеорологии в WIS2 Cookbook.
Подготовка
Убедитесь, что у вас есть SSH-доступ к вашей виртуальной машине студента и что ваш экземпляр wis2box запущен и работает.
Убедитесь, что вы подключены к брокеру MQTT вашего экземпляра wis2box с использованием MQTT Explorer. Вы можете использовать публичные учетные данные everyone/everyone для подключения к брокеру.
Убедитесь, что у вас открыт веб-браузер с wis2box-webapp для вашего экземпляра, перейдя по адресу http://YOUR-HOST/wis2box-webapp.
Создание нового набора данных с политикой данных 'recommended'
Перейдите на страницу 'dataset editor' в wis2box-webapp и создайте новый набор данных.
Для "Centre ID" используйте тот же, что и в предыдущих практических сессиях.
Выберите Template = 'other', чтобы указать, что вы не будете использовать предопределенный шаблон для набора данных:
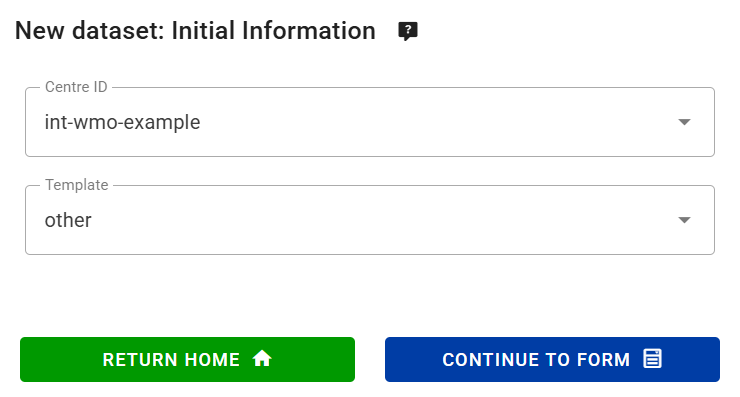
Нажмите 'CONTINUE TO FORM', чтобы продолжить.
Для этого упражнения создайте набор данных для авиационных данных METAR;
- выберите подходящий 'Local ID' для набора данных, например 'aviation-metar'
- укажите заголовок и описание для набора данных
- выберите WMO Data Policy = 'recommended'
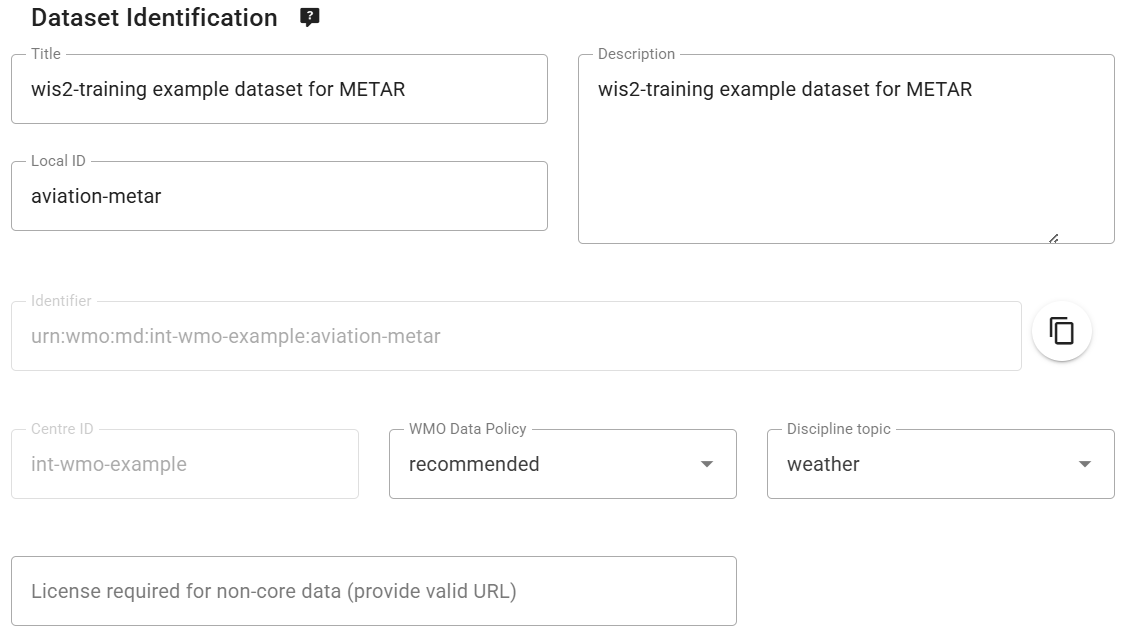
Обратите внимание, что при выборе WMO Data Policy = 'recommended' редактор наборов данных автоматически добавляет поле для 'License URL', которое является обязательным для рекомендованных наборов данных.
Далее:
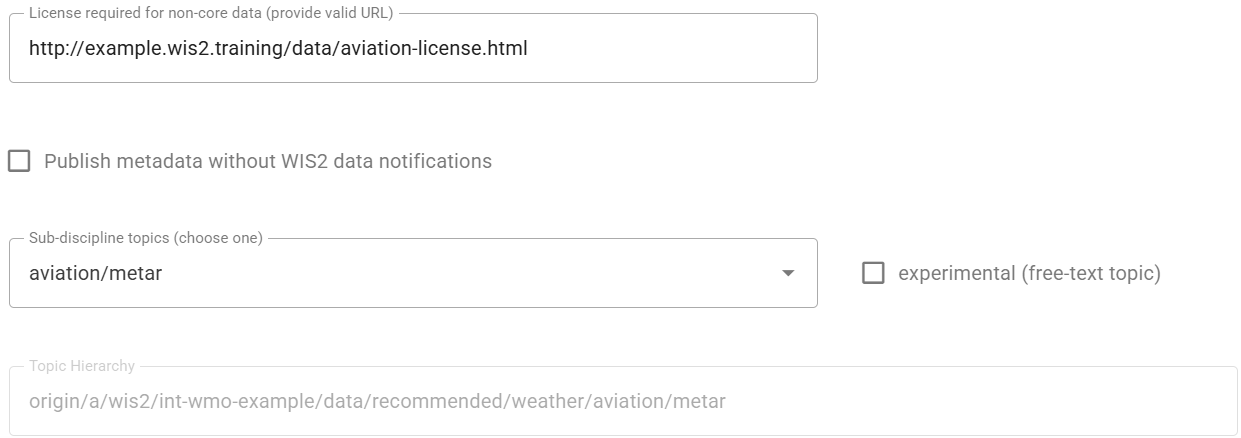
- Используйте
WIS2BOX_URL/data/aviation-license.html, чтобы указать на пользовательский лицензионный файл, размещенный на вашем экземпляре, заменивWIS2BOX_URLна URL вашего экземпляра wis2box. - Выберите 'Sub Disciple Topic' = 'aviation/metar', чтобы определить правильную тему для этого набора данных.
О URL лицензии
URL лицензии, связанный с рекомендованным набором данных, информирует потребителей данных об условиях использования данных.
Вы можете использовать URL, указывающий на лицензионный файл, размещенный на вашем экземпляре wis2box, или URL, указывающий на лицензионный файл, размещенный на внешнем веб-сайте.
Для этого упражнения мы будем использовать самохостируемый лицензионный файл. Вы добавите файл 'aviation-license.html' в ваш экземпляр wis2box позже в этой практической сессии, чтобы убедиться, что URL лицензии действителен.
Поскольку вы выбрали Template = 'other', ключевые слова для набора данных не заполняются автоматически. Добавьте минимум 3 ключевых слова, относящихся к набору данных:

Продолжайте заполнять обязательные поля для пространственных свойств и контактной информации. Нажмите 'Validate form', чтобы проверить, что все обязательные поля заполнены.
Поскольку вы выбрали Template = 'other', сопоставления набора данных не определены.
Добавьте плагин для 'Universal data without conversion' и убедитесь, что расширение файла установлено на .txt, чтобы соответствовать файлам данных METAR, которые вы опубликуете в этом наборе данных позже в этой практической сессии:

Отправьте набор данных, используя ранее созданный токен аутентификации, и проверьте, что новый набор данных создан в wis2box-webapp.
Проверьте MQTT Explorer, чтобы убедиться, что вы получили сообщение уведомления WIS2, объявляющее о новой записи метаданных обнаружения по теме origin/a/wis2/<your-centre-id>/metadata.
Просмотр нового набора данных в wis2box-api
Просмотрите список наборов данных в wis2box-api, открыв URL WIS2BOX_URL/oapi/collections/discovery-metadata/items в вашем веб-браузере, заменив WIS2BOX_URL на URL вашего экземпляра wis2box.
Откройте ссылку на только что созданный набор данных и прокрутите вниз до раздела 'links' в JSON-ответе:
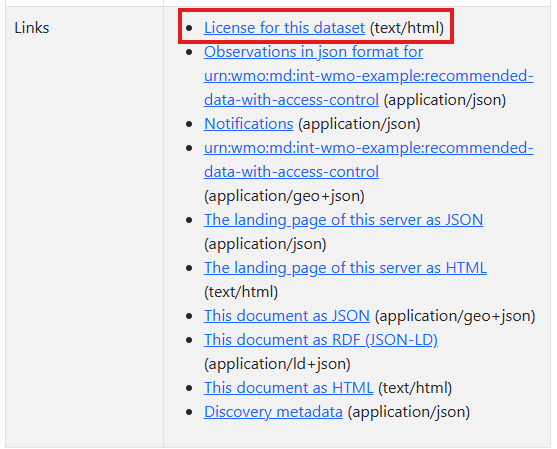
Вы должны увидеть ссылку "License for this dataset", указывающую на URL, предоставленный в редакторе наборов данных.
Если вы нажмете на ссылку, вы получите ошибку, так как лицензионный файл еще не добавлен в ваш экземпляр wis2box.
Добавление лицензионного файла в ваш экземпляр wis2box
Убедитесь, что ссылка "License for this dataset" в метаданных вашего рекомендованного набора данных работает как ожидается.
Скачайте этот пример лицензионного файла для авиации: aviation-license.html.
О примерном лицензионном файле для авиации
Это пример лицензионного файла для авиационных данных. Возможно, вы захотите отредактировать файл, чтобы включить информацию, относящуюся к вашей организации.
Чтобы загрузить этот файл, используйте консоль MinIO, доступную на порту 9001 вашего экземпляра wis2box, перейдя в веб-браузере по адресу http://YOUR-HOST:9001.
Учетные данные для доступа к консоли MinIO определены в файле wis2box.env переменными окружения WIS2BOX_STORAGE_USERNAME и WIS2BOX_STORAGE_PASSWORD.
Вы можете найти их в файле wis2box.env, выполнив следующие команды:
cat wis2box.env | grep WIS2BOX_STORAGE_USERNAME
cat wis2box.env | grep WIS2BOX_STORAGE_PASSWORD
После входа в консоль MinIO загрузите лицензионный файл в базовый путь корзины wis2box-public с помощью кнопки “Upload”:
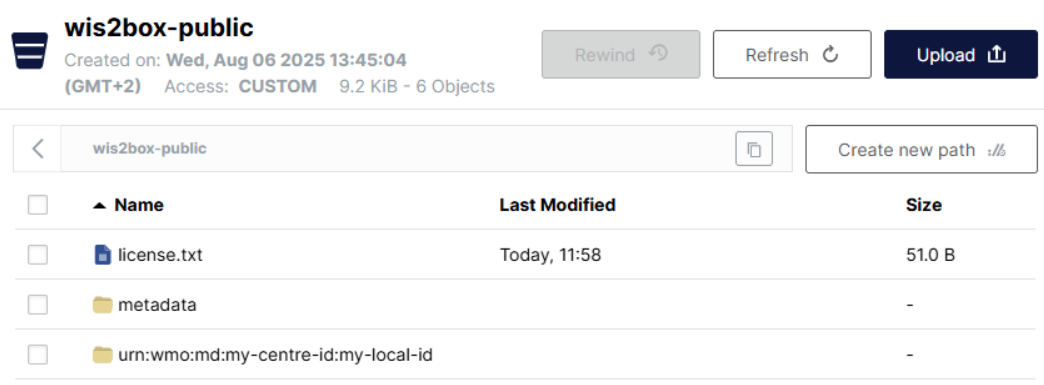
После загрузки лицензионного файла проверьте, доступен ли файл, перейдя по адресу WIS2BOX_URL/data/aviation-license.html в вашем веб-браузере, заменив WIS2BOX_URL на URL вашего экземпляра wis2box.
Note
Веб-прокси в wis2box проксирует все файлы, хранящиеся в корзине "wis2box-public", по пути WIS2BOX_URL/data/
Ссылка "License for this dataset", включенная в метаданные вашего рекомендованного набора данных, теперь должна работать как ожидается.
Добавление токена доступа к набору данных
Войдите в контейнер wis2box-management,
cd ~/wis2box
python3 wis2box-ctl.py login
Из командной строки внутри контейнера вы можете защитить набор данных, используя команду wis2box auth add-token, с флагом --metadata-id для указания идентификатора метаданных набора данных и токеном доступа в качестве аргумента.
Например, чтобы добавить токен доступа S3cr3tT0k3n к набору данных с идентификатором метаданных urn:wmo:md:my-centre-id:core.surface-based-observations.synop:
wis2box auth add-token --metadata-id urn:wmo:md:my-centre-id:aviation-metar S3cr3tT0k3n
Выйдите из контейнера wis2box-management:
exit
Публикация данных в набор данных
Скачайте следующий пример файла данных METAR на ваш локальный компьютер:
A_SAKO31RKSL290000_C_RKSL_20250729000055.txt
Затем добавьте этот файл в ваш набор данных, используя MinIO Console. Чтобы получить доступ к MinIO Console, откройте веб-браузер и перейдите по адресу http://YOUR-HOST:9001, затем войдите в систему, используя учетные данные, указанные в файле wis2box.env в переменных окружения WIS2BOX_STORAGE_USERNAME и WIS2BOX_STORAGE_PASSWORD.
Чтобы добавить файл в ваш набор данных, перейдите в корзину wis2box-incoming, создайте новую папку с именем, соответствующим идентификатору метаданных вашего набора данных, и загрузите пример файла данных METAR в эту папку, используя кнопку «Upload»:

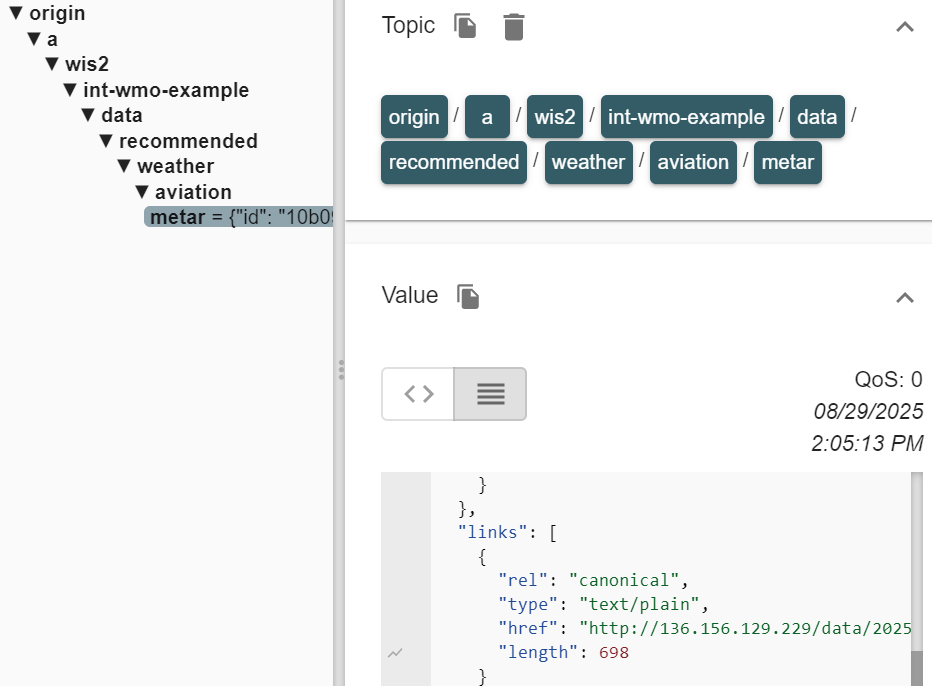
Убедитесь, что имя папки совпадает с идентификатором метаданных вашего набора данных, и проверьте, что вы получаете уведомления WIS2 о данных в MQTT Explorer по теме origin/a/wis2/<your-centre-id>/data/recommended/aviation/metar:
Устранение неполадок
Если вы не получили уведомление после загрузки данных, вы можете проверить последние логи контейнера wis2box-management, чтобы устранить проблему:
docker logs -n100 wis2box-management
Скопируйте и вставьте URL для канонической ссылки из уведомления WIS2 в ваш веб-браузер. URL должен выглядеть примерно так:
http://example.training.wis2dev.io/data/2025-07-29/wis/urn:wmo:md:int-wmo-example:aviation-metar/A_SAKO31RKSL290000_C_RKSL_20250729000055.txt
Если вы правильно добавили токен доступа к набору данных, вы не сможете получить доступ к данным через веб-браузер, вместо этого вы увидите ошибку 401 Authorization Required.
Добавление токена доступа в HTTP-заголовки для доступа к набору данных
Чтобы продемонстрировать, что для доступа к набору данных требуется токен доступа, мы воспроизведем ошибку, которую вы видели в браузере, используя команду wget.
Из командной строки в вашей виртуальной машине (VM) выполните команду wget с канонической ссылкой, которую вы скопировали из уведомления WIS2.
wget http://example.training.wis2dev.io/data/2025-07-29/wis/urn:wmo:md:int-wmo-example:aviation-metar/A_SAKO31RKSL290000_C_RKSL_20250729000055.txt
Вы должны увидеть, что HTTP-запрос возвращает 401 Unauthorized, и данные не загружаются.
Теперь добавьте токен доступа в HTTP-заголовки, чтобы получить доступ к набору данных.
wget --header="Authorization: Bearer S3cr3tT0k3n" <canonical-link>
Теперь данные должны быть успешно загружены.
Удаление токена доступа из набора данных
Чтобы удалить токен доступа из набора данных, войдите в контейнер wis2box-management:
cd ~/wis2box
python3 wis2box-ctl.py login
И используйте команду wis2box auth remove-token, чтобы удалить токен доступа из набора данных, используя флаг --metadata-id для указания идентификатора метаданных набора данных и сам токен доступа в качестве аргумента:
wis2box auth remove-token --metadata-id urn:wmo:md:my-centre-id:aviation-metar S3cr3tT0k3n
Убедитесь, что вы заменили urn:wmo:md:my-centre-id:aviation-metar на идентификатор метаданных вашего набора данных.
Выйдите из контейнера wis2box-management:
exit
И проверьте, что токен доступа был удален, попытавшись снова загрузить данные с использованием wget с токеном доступа в HTTP-заголовках или попытавшись получить доступ к данным через веб-браузер.
Контроль доступа является необязательным и применяется только к рекомендованным наборам данных
WIS2 указывает, что к рекомендованным наборам данных может быть применен контроль доступа. Добавление контроля доступа к рекомендованному набору данных не является обязательным, и вы можете полагаться только на URL лицензии, чтобы информировать потребителей данных об условиях использования данных. Если вы применяете контроль доступа, вы несете ответственность за предоставление токена доступа всем потребителям данных, которым требуется доступ к этим данным.
Если вы примените wis2box auth add-token к набору данных с политикой данных WMO 'core', то Global Caches сообщат об ошибке в Global Monitoring, так как они не смогут загрузить данные, и ваш набор данных будет считаться несоответствующим техническим регламентам WIS2.
Заключение
Поздравляем!
В ходе этой практической сессии вы узнали, как:
- создать новый набор данных с политикой данных 'recommended'
- добавить пользовательский файл лицензии в вашу установку wis2box
- добавить токен доступа к набору данных
- проверить, что набор данных недоступен без токена доступа
- добавить токен доступа в HTTP-заголовки для доступа к набору данных