Загрузка данных из WIS2 с использованием wis2downloader
Результаты обучения!
К концу этой практической сессии вы сможете:
- использовать "wis2downloader" для подписки на уведомления о данных WIS2 и загрузки данных на вашу локальную систему
- просматривать статус загрузок на панели мониторинга Grafana
- узнать, как настроить wis2downloader для подписки на брокер, отличный от брокера по умолчанию
Введение
В этой сессии вы научитесь настраивать подписку на WIS2 Broker и автоматически загружать данные на вашу локальную систему с использованием сервиса "wis2downloader", включенного в wis2box.
О wis2downloader
Сервис wis2downloader также доступен как отдельный сервис, который можно запускать на другой системе, отличной от той, которая публикует уведомления WIS2. Подробнее о использовании wis2downloader как отдельного сервиса смотрите на wis2downloader.
Если вы хотите разработать собственный сервис для подписки на уведомления WIS2 и загрузки данных, вы можете использовать исходный код wis2downloader в качестве примера.
Подготовка
Перед началом, пожалуйста, войдите в вашу виртуальную машину (VM) для студентов и убедитесь, что ваш экземпляр wis2box запущен и работает.
Основы wis2downloader
Сервис wis2downloader включен в качестве отдельного контейнера в wis2box, как это определено в файлах Docker Compose. Контейнер Prometheus в wis2box настроен для сбора метрик из контейнера wis2downloader, и эти метрики можно визуализировать на панели мониторинга Grafana.
Просмотр панели мониторинга wis2downloader в Grafana
Откройте веб-браузер и перейдите на панель мониторинга Grafana для вашего экземпляра wis2box, используя адрес http://YOUR-HOST:3000.
Нажмите на "dashboards" в левом меню:

и выберите wis2downloader dashboard:

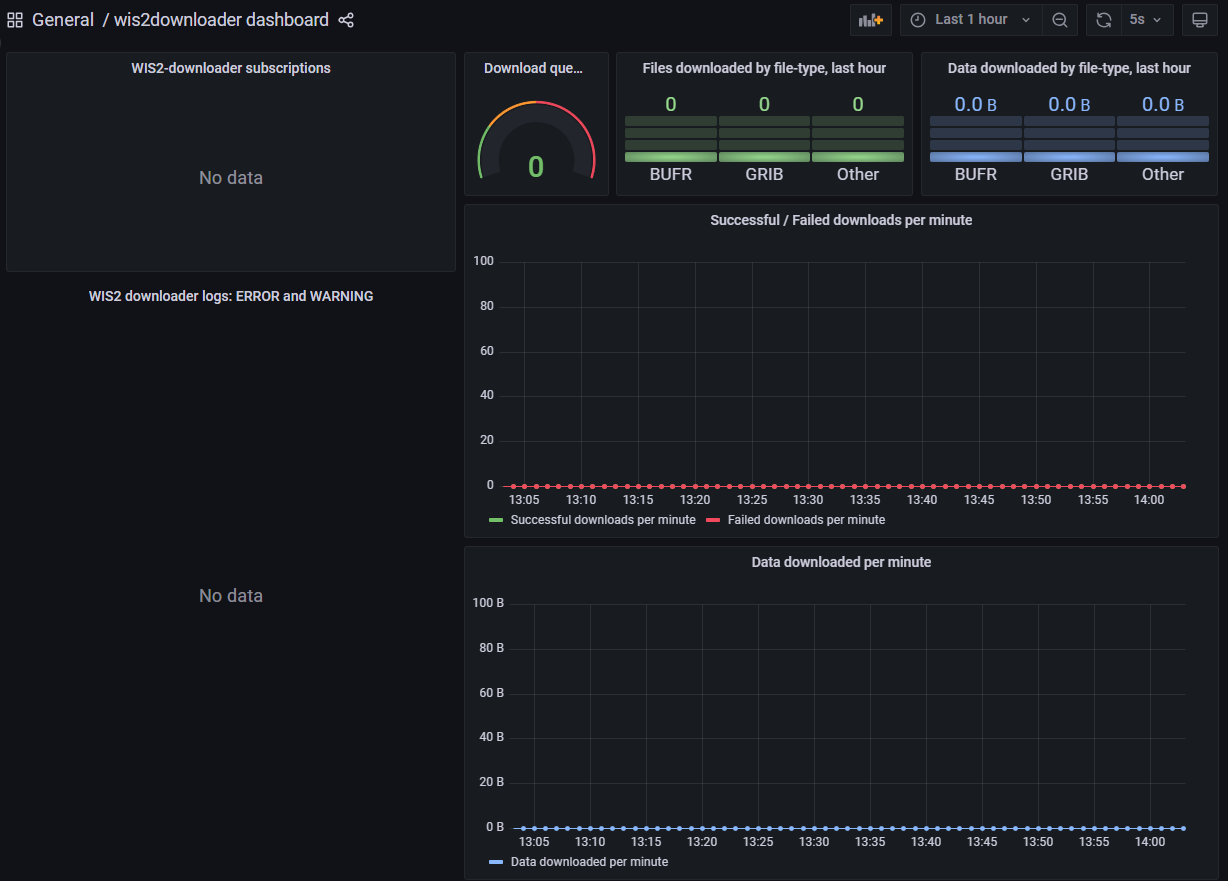
Вы должны увидеть следующую панель мониторинга:

Эта панель мониторинга основана на метриках, публикуемых сервисом wis2downloader, и показывает статус загрузок, которые выполняются в данный момент.
В левом верхнем углу вы можете увидеть активные подписки.
Оставьте эту панель мониторинга открытой, так как вы будете использовать её для мониторинга прогресса загрузки в следующем упражнении.
Обзор конфигурации wis2downloader
Сервис wis2downloader в wis2box можно настроить с использованием переменных окружения, определенных в вашем файле wis2box.env.
Следующие переменные окружения используются сервисом wis2downloader:
- DOWNLOAD_BROKER_HOST: Имя хоста MQTT брокера для подключения. По умолчанию: globalbroker.meteo.fr
- DOWNLOAD_BROKER_PORT: Порт MQTT брокера для подключения. По умолчанию: 443 (HTTPS для веб-сокетов)
- DOWNLOAD_BROKER_USERNAME: Имя пользователя для подключения к MQTT брокеру. По умолчанию: everyone
- DOWNLOAD_BROKER_PASSWORD: Пароль для подключения к MQTT брокеру. По умолчанию: everyone
- DOWNLOAD_BROKER_TRANSPORT: websockets или tcp, механизм передачи для подключения к MQTT брокеру. По умолчанию: websockets
- DOWNLOAD_RETENTION_PERIOD_HOURS: Период хранения загруженных данных в часах. По умолчанию: 24
- DOWNLOAD_WORKERS: Количество потоков загрузки. По умолчанию: 8. Определяет количество параллельных загрузок.
- DOWNLOAD_MIN_FREE_SPACE_GB: Минимальный объем свободного пространства в ГБ на томе, где хранятся загрузки. По умолчанию: 1.
Чтобы просмотреть текущую конфигурацию wis2downloader, используйте следующую команду:
cat ~/wis2box/wis2box.env | grep DOWNLOAD
Просмотр конфигурации wis2downloader
Какой MQTT брокер используется по умолчанию для подключения wis2downloader?
Каков период хранения загруженных данных по умолчанию?
Нажмите, чтобы увидеть ответ
MQTT брокер по умолчанию для подключения wis2downloader — это globalbroker.meteo.fr.
Период хранения загруженных данных по умолчанию составляет 24 часа.
Обновление конфигурации wis2downloader
Чтобы обновить конфигурацию wis2downloader, вы можете отредактировать файл wis2box.env. Чтобы применить изменения, выполните команду для перезапуска стека wis2box:
python3 wis2box-ctl.py start
После этого вы увидите, как сервис wis2downloader перезапустится с новой конфигурацией.
Вы можете оставить конфигурацию по умолчанию для следующего упражнения.
Интерфейс командной строки wis2downloader
Чтобы получить доступ к интерфейсу командной строки wis2downloader внутри wis2box, войдите в контейнер wis2downloader, используя следующую команду:
python3 wis2box-ctl.py login wis2downloader
Используйте следующую команду, чтобы отобразить список активных подписок:
wis2downloader list-subscriptions
Эта команда вернет пустой список, так как подписки еще не настроены.
Загрузка данных GTS с использованием WIS2 Global Broker
Если вы оставили конфигурацию wis2downloader по умолчанию, он в настоящее время подключен к WIS2 Global Broker, размещенному Météo-France.
Настройка подписки
Используйте следующую команду cache/a/wis2/de-dwd-gts-to-wis2/#, чтобы подписаться на данные, публикуемые шлюзом GTS-to-WIS2, размещенным DWD, и доступные через Global Caches:
wis2downloader add-subscription --topic cache/a/wis2/de-dwd-gts-to-wis2/#
Затем выйдите из контейнера wis2downloader, введя exit:
exit
Проверка загруженных данных
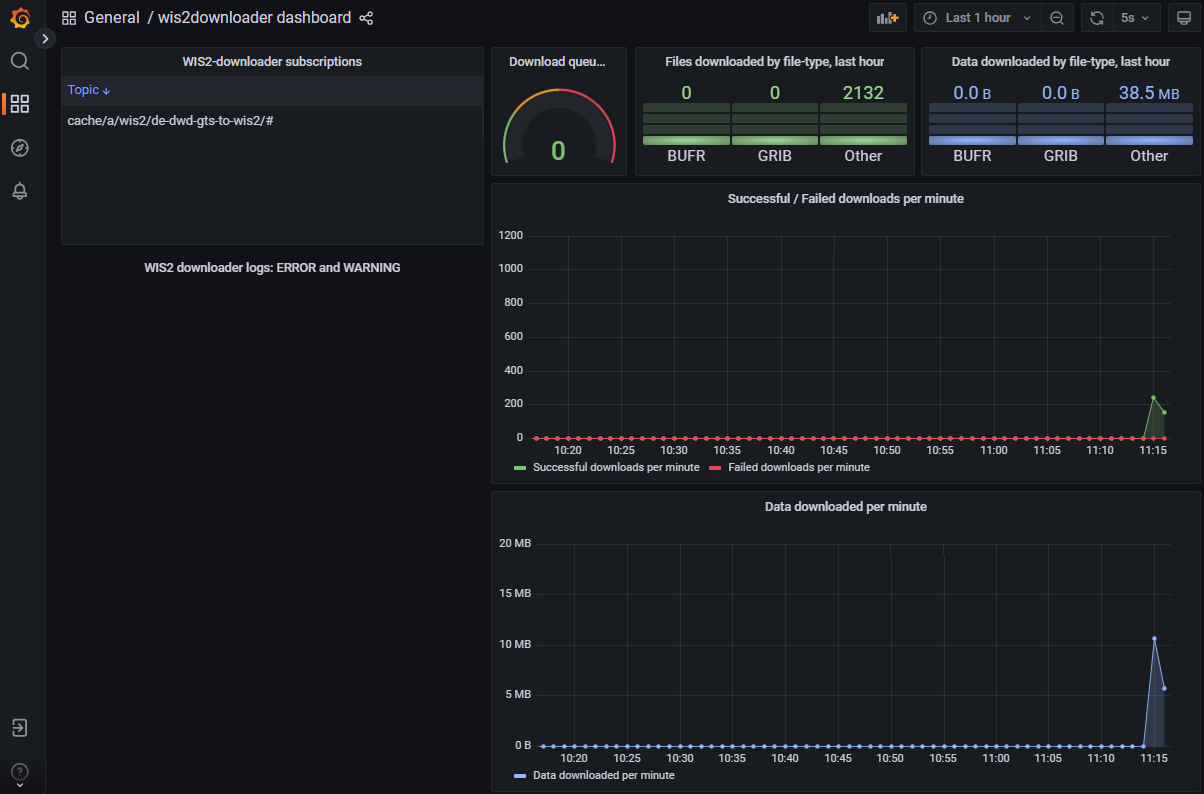
Проверьте панель мониторинга wis2downloader в Grafana, чтобы увидеть добавленную подписку. Подождите несколько минут, и вы должны увидеть начало загрузок. Перейдите к следующему упражнению, как только убедитесь, что загрузки начались.
Сервис wis2downloader в wis2box загружает данные в каталог 'downloads' в директории, которую вы указали как WIS2BOX_HOST_DATADIR в вашем файле wis2box.env. Чтобы просмотреть содержимое каталога загрузок, используйте следующую команду:
ls -R ~/wis2box-data/downloads
Обратите внимание, что загруженные данные хранятся в каталогах, названных в соответствии с темой, на которой было опубликовано уведомление WIS2.
Просмотр загруженных данных
Какие каталоги вы видите в каталоге загрузок?
Видите ли вы какие-либо загруженные файлы в этих каталогах?
Нажмите, чтобы увидеть ответ
Вы должны увидеть структуру каталогов, начинающуюся с cache/a/wis2/de-dwd-gts-to-wis2/, под которой будут находиться дополнительные каталоги, названные в соответствии с заголовками GTS-бюллетеней загруженных данных.
В зависимости от времени начала подписки, вы можете не увидеть загруженные файлы в этих каталогах. Если файлов пока нет, подождите еще несколько минут и проверьте снова.
Проверьте панель мониторинга wis2downloader в Grafana, чтобы увидеть прогресс загрузки. Вы увидите добавленную подписку в левом верхнем углу панели мониторинга, а также увеличение числа загрузок по мере загрузки данных:

Удаление подписки и загруженных данных
Давайте очистим подписку и загруженные данные перед переходом к следующему упражнению.
Снова войдите в контейнер wis2downloader:
python3 wis2box-ctl.py login wis2downloader
и удалите подписку, используя следующую команду:
wis2downloader remove-subscription --topic cache/a/wis2/de-dwd-gts-to-wis2/#
Посетите панель мониторинга Grafana, чтобы убедиться, что подписка удалена и загрузки остановлены. Вы должны увидеть, как подписка исчезает из верхнего левого угла панели мониторинга.
Подождите несколько минут, пока панель мониторинга не покажет, что загрузки остановлены.
Наконец, вы можете удалить загруженные данные, используя следующую команду в контейнере wis2downloader:
rm -rf app/data/downloads/*
Note
Каталог app/data/downloads в контейнере wis2downloader сопоставлен с каталогом downloads в WIS2BOX_HOST_DATADIR, как это определено в вашем файле wis2box.env. Команда выше удаляет все загруженные данные.
Выйдите из контейнера wis2downloader, введя exit:
exit
Убедитесь, что каталог загрузок на вашем хосте снова пуст:
ls -R ~/wis2box-data/downloads
О шлюзах GTS-to-WIS2
В настоящее время существуют два шлюза GTS-to-WIS2, публикующие данные через WIS2 Global Broker и Global Caches:
- DWD (Германия): centre-id=de-dwd-gts-to-wis2
- JMA (Япония): centre-id=jp-jma-gts-to-wis2
Если в предыдущем упражнении вы замените de-dwd-gts-to-wis2 на jp-jma-gts-to-wis2, вы получите уведомления и данные, опубликованные шлюзом JMA GTS-to-WIS2.
Темы origin vs cache
При подписке на тему, начинающуюся с origin/, вы будете получать уведомления с каноническим URL, который указывает на сервер данных, предоставленный WIS-центром, публикующим данные.
При подписке на тему, начинающуюся с cache/, вы будете получать несколько уведомлений для одних и тех же данных, по одному для каждого Global Cache. Каждое уведомление будет содержать канонический URL, указывающий на сервер данных соответствующего Global Cache. Программа wis2downloader загрузит данные с первого канонического URL, к которому сможет подключиться.
Загрузка примерных данных с WIS2 Training Broker
В этом упражнении вы подпишетесь на WIS2 Training Broker, который публикует примерные данные для учебных целей.
Изменение конфигурации wis2downloader
Это демонстрирует, как подписаться на брокера, который не является брокером по умолчанию, и позволит вам загрузить данные, опубликованные через WIS2 Training Broker.
Отредактируйте файл wis2box.env и измените DOWNLOAD_BROKER_HOST на wis2training-broker.wis2dev.io, DOWNLOAD_BROKER_PORT на 1883, а DOWNLOAD_BROKER_TRANSPORT на tcp:
# настройки загрузчика
DOWNLOAD_BROKER_HOST=wis2training-broker.wis2dev.io
DOWNLOAD_BROKER_PORT=1883
DOWNLOAD_BROKER_USERNAME=everyone
DOWNLOAD_BROKER_PASSWORD=everyone
# механизм передачи данных (tcp или websockets)
DOWNLOAD_BROKER_TRANSPORT=tcp
Дважды проверьте изменения, которые вы внесли, с помощью команды:
cat ~/wis2box/wis2box.env | grep DOWNLOAD
Затем выполните команду 'restart', чтобы применить изменения:
python3 wis2box-ctl.py restart
Проверьте логи wis2downloader, чтобы убедиться, что подключение к новому брокеру прошло успешно:
docker logs wis2downloader
Вы должны увидеть следующее сообщение в логах:
...
INFO - Connecting...
INFO - Host: wis2training-broker.wis2dev.io, port: 1883
INFO - Connected successfully
Настройка новых подписок
Теперь мы настроим новую подписку на тему для загрузки данных о траекториях циклонов с WIS2 Training Broker.
Войдите в контейнер wis2downloader:
python3 wis2box-ctl.py login wis2downloader
И выполните следующую команду (скопируйте и вставьте, чтобы избежать ошибок):
wis2downloader add-subscription --topic origin/a/wis2/int-wis2-training/data/core/weather/prediction/forecast/medium-range/probabilistic/trajectory
Выйдите из контейнера wis2downloader, введя exit.
Проверка загруженных данных
Подождите, пока вы не увидите начало загрузок на панели мониторинга wis2downloader в Grafana.
Проверьте, были ли данные загружены, снова проверив логи wis2downloader с помощью:
docker logs wis2downloader
Вы должны увидеть сообщение в логах, похожее на следующее:
[...] INFO - Message received under topic origin/a/wis2/int-wis2-training/data/core/weather/prediction/forecast/medium-range/probabilistic/trajectory
[...] INFO - Downloaded A_JSXX05ECEP020000_C_ECMP_...
Снова проверьте содержимое каталога загрузок:
ls -R ~/wis2box-data/downloads
Вы должны увидеть новый каталог с именем origin/a/wis2/int-wis2-training/data/core/weather/prediction/forecast/medium-range/probabilistic/trajectory, содержащий загруженные данные.
Просмотр загруженных данных
Какой формат файла у загруженных данных?
Нажмите, чтобы увидеть ответ
Загруженные данные находятся в формате BUFR, что указано расширением файла .bufr.
Теперь попробуйте добавить еще две подписки для загрузки данных о месячных аномалиях температуры поверхности и глобальных прогнозах ансамбля из следующих тем:
origin/a/wis2/int-wis2-training/data/core/weather/prediction/forecast/medium-range/probabilistic/globalorigin/a/wis2/int-wis2-training/data/core/climate/experimental/anomalies/monthly/surface-temperature
Подождите, пока вы не увидите начало загрузок на панели мониторинга wis2downloader в Grafana.
Снова проверьте содержимое каталога загрузок:
ls -R ~/wis2box-data/downloads
Вы должны увидеть новые каталоги, соответствующие темам, на которые вы подписались, содержащие загруженные данные.
Заключение
Поздравляем!
В этом практическом занятии вы научились:
- использовать 'wis2downloader' для подписки на WIS2 Broker и загрузки данных на вашу локальную систему
- просматривать статус загрузок на панели мониторинга Grafana
- изменять конфигурацию по умолчанию wis2downloader для подписки на другого брокера
- просматривать загруженные данные на вашей локальной системе