Initialisation de wis2box
Objectifs d'apprentissage
À la fin de cette session pratique, vous serez capable de :
- exécuter le script
wis2box-create-config.pypour créer la configuration initiale - démarrer wis2box et vérifier l'état de ses composants
- consulter le contenu de wis2box-api
- accéder à wis2box-webapp
- se connecter au wis2box-broker local à l'aide de MQTT Explorer
Note
Les supports de formation actuels sont basés sur wis2box-release 1.2.0.
Consultez accessing-your-student-vm pour des instructions sur la façon de télécharger et d'installer la pile logicielle wis2box si vous suivez cette formation en dehors d'une session de formation locale.
Préparation
Connectez-vous à votre VM désignée avec votre nom d'utilisateur et mot de passe, et assurez-vous d'être dans le répertoire wis2box :
cd ~/wis2box
Création de la configuration initiale
La configuration initiale de wis2box nécessite :
- un fichier d'environnement
wis2box.envcontenant les paramètres de configuration - un répertoire sur la machine hôte à partager entre la machine hôte et les conteneurs wis2box, défini par la variable d'environnement
WIS2BOX_HOST_DATADIR
Le script wis2box-create-config.py peut être utilisé pour créer la configuration initiale de votre wis2box.
Il vous posera une série de questions pour vous aider à configurer votre environnement.
Vous pourrez examiner et mettre à jour les fichiers de configuration une fois le script terminé.
Exécutez le script comme suit :
python3 wis2box-create-config.py
Répertoire wis2box-host-data
Le script vous demandera d'entrer le répertoire à utiliser pour la variable d'environnement WIS2BOX_HOST_DATADIR.
Notez que vous devez définir le chemin complet vers ce répertoire.
Par exemple, si votre nom d'utilisateur est username, le chemin complet du répertoire est /home/username/wis2box-data :
username@student-vm-username:~/wis2box$ python3 wis2box-create-config.py
Please enter the directory to be used for WIS2BOX_HOST_DATADIR:
/home/username/wis2box-data
The directory to be used for WIS2BOX_HOST_DATADIR will be set to:
    /home/username/wis2box-data
Is this correct? (y/n/exit)
y
The directory /home/username/wis2box-data has been created.
URL de wis2box
Ensuite, il vous sera demandé d'entrer l'URL de votre wis2box. C'est l'URL qui sera utilisée pour accéder à l'application web, à l'API et à l'interface utilisateur de wis2box.
Veuillez utiliser http://<your-hostname-or-ip> comme URL.
Please enter the URL of the wis2box:
 For local testing the URL is http://localhost
 To enable remote access, the URL should point to the public IP address or domain name of the server hosting the wis2box.
http://username.training.wis2dev.io
The URL of the wis2box will be set to:
  http://username.training.wis2dev.io
Is this correct? (y/n/exit)
Mots de passe WEBAPP, STORAGE et BROKER
Vous pouvez utiliser l'option de génération aléatoire de mots de passe lorsqu'il vous est demandé de définir WIS2BOX_WEBAPP_PASSWORD, WIS2BOX_STORAGE_PASSWORD, WIS2BOX_BROKER_PASSWORD ou définir vos propres mots de passe.
Ne vous inquiétez pas de mémoriser ces mots de passe, ils seront stockés dans le fichier wis2box.env dans votre répertoire wis2box.
Vérification du fichier wis2box.env
Une fois le script terminé, vérifiez le contenu du fichier wis2box.env dans votre répertoire actuel :
cat ~/wis2box/wis2box.env
Ou vérifiez le contenu du fichier via WinSCP.
Question
Quelle est la valeur de WISBOX_BASEMAP_URL dans le fichier wis2box.env ?
Cliquez pour révéler la réponse
La valeur par défaut pour WIS2BOX_BASEMAP_URL est https://{s}.tile.openstreetmap.org/{z}/{x}/{y}.png.
Cette URL fait référence au serveur de tuiles OpenStreetMap. Si vous souhaitez utiliser un autre fournisseur de cartes, vous pouvez modifier cette URL pour pointer vers un autre serveur de tuiles.
Question
Quelle est la valeur de la variable d'environnement WIS2BOX_STORAGE_DATA_RETENTION_DAYS dans le fichier wis2box.env ?
Cliquez pour révéler la réponse
La valeur par défaut pour WIS2BOX_STORAGE_DATA_RETENTION_DAYS est de 30 jours. Vous pouvez modifier cette valeur pour un autre nombre de jours si vous le souhaitez.
Le conteneur wis2box-management exécute une tâche cron quotidiennement pour supprimer les données plus anciennes que le nombre de jours défini par WIS2BOX_STORAGE_DATA_RETENTION_DAYS du bucket wis2box-public et du backend API :
0 0 * * * su wis2box -c "wis2box data clean --days=$WIS2BOX_STORAGE_DATA_RETENTION_DAYS"
Note
Le fichier wis2box.env contient des variables d'environnement définissant la configuration de votre wis2box. Pour plus d'informations, consultez la documentation wis2box.
Ne modifiez pas le fichier wis2box.env sauf si vous êtes sûr des modifications que vous apportez. Des modifications incorrectes peuvent empêcher votre wis2box de fonctionner.
Ne partagez pas le contenu de votre fichier wis2box.env avec qui que ce soit, car il contient des informations sensibles comme des mots de passe.
Démarrer wis2box
Assurez-vous d'être dans le répertoire contenant les fichiers de définition de la pile logicielle wis2box :
cd ~/wis2box
Démarrez wis2box avec la commande suivante :
python3 wis2box-ctl.py start
Lors de la première exécution de cette commande, vous verrez la sortie suivante :
No docker-compose.images-*.yml files found, creating one
Current version=Undefined, latest version=1.2.0
Would you like to update ? (y/n/exit)
Sélectionnez y et le script créera le fichier docker-compose.images-1.2.0.yml, téléchargera les images Docker nécessaires et démarrera les services.
Le téléchargement des images peut prendre du temps en fonction de la vitesse de votre connexion Internet. Cette étape n'est requise que lors du premier démarrage de wis2box.
Inspectez l'état avec la commande suivante :
python3 wis2box-ctl.py status
Répétez cette commande jusqu'à ce que tous les services soient opérationnels.
wis2box et Docker
wis2box fonctionne comme un ensemble de conteneurs Docker gérés par docker-compose.
Les services sont définis dans les différents fichiers docker-compose*.yml qui se trouvent dans le répertoire ~/wis2box/.
Le script Python wis2box-ctl.py est utilisé pour exécuter les commandes Docker Compose sous-jacentes qui contrôlent les services wis2box.
Vous n'avez pas besoin de connaître les détails des conteneurs Docker pour exécuter la pile logicielle wis2box, mais vous pouvez inspecter les fichiers docker-compose*.yml pour voir comment les services sont définis. Si vous souhaitez en savoir plus sur Docker, vous pouvez trouver plus d'informations dans la documentation Docker.
Pour vous connecter au conteneur wis2box-management, utilisez la commande suivante :
python3 wis2box-ctl.py login
Notez qu'après vous être connecté, votre invite changera, indiquant que vous êtes maintenant à l'intérieur du conteneur wis2box-management :
root@025381da3c40:/home/wis2box#
À l'intérieur du conteneur wis2box-management, vous pouvez exécuter diverses commandes pour gérer votre wis2box, telles que :
wis2box auth add-token --path processes/wis2box: pour créer un jeton d'autorisation pour l'endpoint processes/wis2boxwis2box data clean --days=<number-of-days>: pour nettoyer les données plus anciennes qu'un certain nombre de jours du bucket wis2box-public
Pour quitter le conteneur et revenir à votre machine hôte, utilisez la commande suivante :
exit
Exécutez la commande suivante pour voir les conteneurs Docker en cours d'exécution sur votre machine hôte :
docker ps --format "table {{.Names}} \t{{.Status}} \t{{.Image}}"
Vous devriez voir les conteneurs suivants en cours d'exécution :
NAMES                     STATUS                   IMAGE
elasticsearch            docker.elastic.co/elasticsearch/elasticsearch:8.6.2                              "/bin/tini -- /usr/l…"   elasticsearch            Il y a environ une minute   Actif depuis environ une minute (healthy)     9200/tcp, 9300/tcp
elasticsearch-exporter   quay.io/prometheuscommunity/elasticsearch-exporter:latest                        "/bin/elasticsearch_…"   elasticsearch-exporter   Il y a environ une minute   Actif depuis environ une minute               7979/tcp
grafana                  grafana/grafana-oss:9.0.3                                                        "/run.sh"                grafana                  Il y a environ une minute   Actif depuis environ une minute               0.0.0.0:3000->3000/tcp
loki                     grafana/loki:2.4.1                                                               "/usr/bin/loki -conf…"   loki                     Il y a environ une minute   Actif depuis environ une minute               3100/tcp
mosquitto                ghcr.io/world-meteorological-organization/wis2box-broker:1.2.0                   "/docker-entrypoint.…"   mosquitto                Il y a environ une minute   Actif depuis environ une minute               0.0.0.0:1883->1883/tcp, 0.0.0.0:8884->8884/tcp
mqtt_metrics_collector   ghcr.io/world-meteorological-organization/wis2box-mqtt-metrics-collector:1.2.0   "python3 -u mqtt_met…"   mqtt_metrics_collector   Il y a environ une minute   Actif depuis 10 secondes                   8000/tcp, 0.0.0.0:8001->8001/tcp
nginx                    nginx:alpine                                                                     "/docker-entrypoint.…"   web-proxy                Il y a environ une minute   Actif depuis 9 secondes                    0.0.0.0:80->80/tcp
prometheus               prom/prometheus:v2.37.0                                                          "/bin/prometheus --c…"   prometheus               Il y a environ une minute   Actif depuis environ une minute               9090/tcp
wis2box-api              ghcr.io/world-meteorological-organization/wis2box-api:1.2.0                      "/app/docker/es-entr…"   wis2box-api              Il y a environ une minute   Actif depuis 36 secondes (healthy)
wis2box-auth             ghcr.io/world-meteorological-organization/wis2box-auth:1.2.0                     "/entrypoint.sh"         wis2box-auth             Il y a environ une minute   Actif depuis 10 secondes
wis2box-management       ghcr.io/world-meteorological-organization/wis2box-management:1.2.0               "/home/wis2box/entry…"   wis2box-management       Il y a environ une minute   Actif depuis 12 secondes
wis2box-minio            minio/minio:RELEASE.2024-08-03T04-33-23Z-cpuv1                                   "/usr/bin/docker-ent…"   minio                    Il y a environ une minute   Actif depuis environ une minute (healthy)     0.0.0.0:8022->8022/tcp, 0.0.0.0:9000-9001->9000-9001/tcp
wis2box-ui               ghcr.io/world-meteorological-organization/wis2box-ui:1.2.0                       "/docker-entrypoint.…"   wis2box-ui               Il y a environ une minute   Actif depuis 35 secondes                   0.0.0.0:9999->80/tcp
wis2box-webapp           ghcr.io/world-meteorological-organization/wis2box-webapp:1.2.0                   "sh /wis2box-webapp/…"   wis2box-webapp           Il y a environ une minute   Actif depuis environ une minute (unhealthy)   4173/tcp
wis2downloader           ghcr.io/wmo-im/wis2downloader:v0.3.2                                             "/home/wis2downloade…"   wis2downloader           Il y a environ une minute   Actif depuis environ une minute (healthy)
Ces conteneurs font partie de la pile logicielle wis2box et fournissent les différents services nécessaires pour exécuter le wis2box.
Exécutez la commande suivante pour voir les volumes Docker actifs sur votre machine hôte :
docker volume ls
Vous devriez voir les volumes suivants :
- wis2box_project_auth-data
- wis2box_project_es-data
- wis2box_project_minio-data
- wis2box_project_prometheus-data
- wis2box_project_loki-data
- wis2box_project_mosquitto-config
Ainsi que certains volumes anonymes utilisés par les différents conteneurs.
Les volumes commençant par wis2box_project_ sont utilisés pour stocker des données persistantes pour les différents services de la pile logicielle wis2box.
wis2box API
Le wis2box contient une API (Interface de Programmation d'Applications) qui fournit un accès aux données et des processus pour la visualisation interactive, la transformation des données et leur publication.
Ouvrez un nouvel onglet et accédez à la page http://YOUR-HOST/oapi.
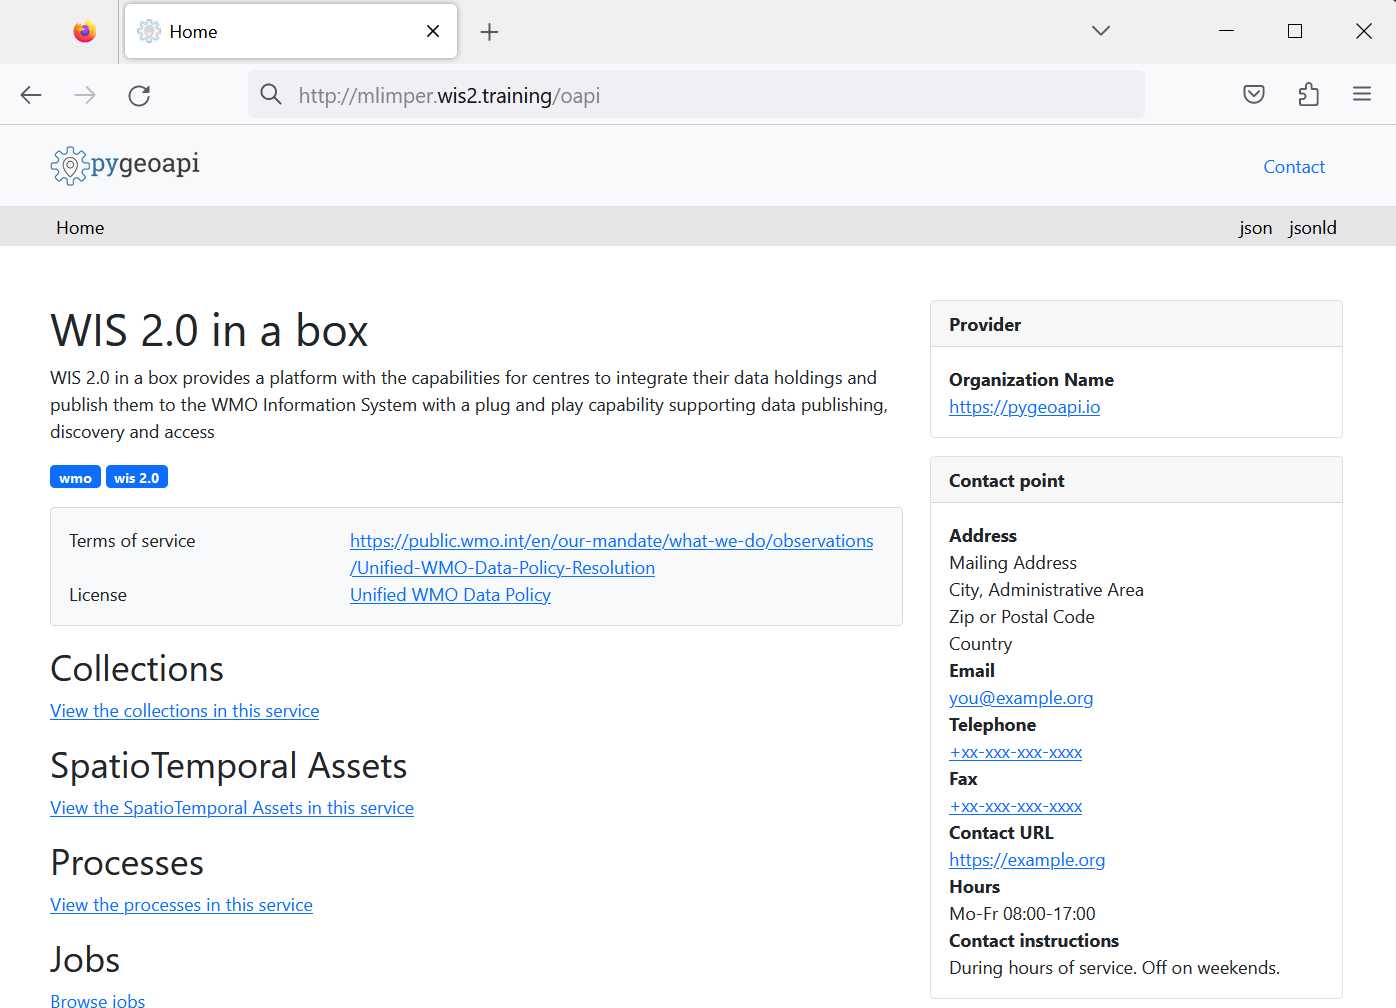
Ceci est la page d'accueil de l'API wis2box (exécutée via le conteneur wis2box-api).
Question
Quelles collections sont actuellement disponibles ?
Cliquez pour révéler la réponse
Pour voir les collections actuellement disponibles via l'API, cliquez sur View the collections in this service :
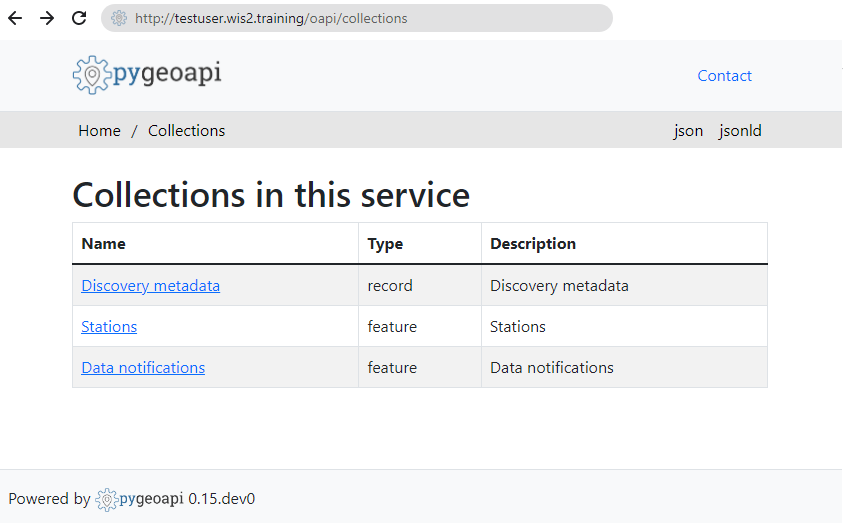
Les collections suivantes sont actuellement disponibles :
- Stations
- Notifications de données
- Métadonnées de découverte
Question
Combien de notifications de données ont été publiées ?
Cliquez pour révéler la réponse
Cliquez sur "Data notifications", puis cliquez sur Browse through the items of "Data Notifications".
Vous noterez que la page indique "No items" car aucune notification de données n'a encore été publiée.
wis2box webapp
Ouvrez un navigateur web et visitez la page http://YOUR-HOST/wis2box-webapp.
Vous verrez une fenêtre contextuelle demandant votre nom d'utilisateur et votre mot de passe. Utilisez le nom d'utilisateur par défaut wis2box-user et le WIS2BOX_WEBAPP_PASSWORD défini dans le fichier wis2box.env, puis cliquez sur "Sign in" :
Note
Vérifiez votre fichier wis2box.env pour la valeur de votre WIS2BOX_WEBAPP_PASSWORD. Vous pouvez utiliser la commande suivante pour vérifier la valeur de cette variable d'environnement :
cat ~/wis2box/wis2box.env | grep WIS2BOX_WEBAPP_PASSWORD
Une fois connecté, déplacez votre souris sur le menu à gauche pour voir les options disponibles dans l'application web wis2box :
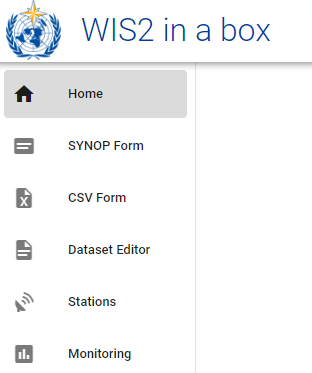
Ceci est l'application web wis2box qui vous permet d'interagir avec votre wis2box :
- créer et gérer des ensembles de données
- mettre à jour/vérifier les métadonnées de vos stations
- télécharger des observations manuelles en utilisant le formulaire synop FM-12
- surveiller les notifications publiées sur votre wis2box-broker
Nous utiliserons cette application web dans une session ultérieure.
wis2box-broker
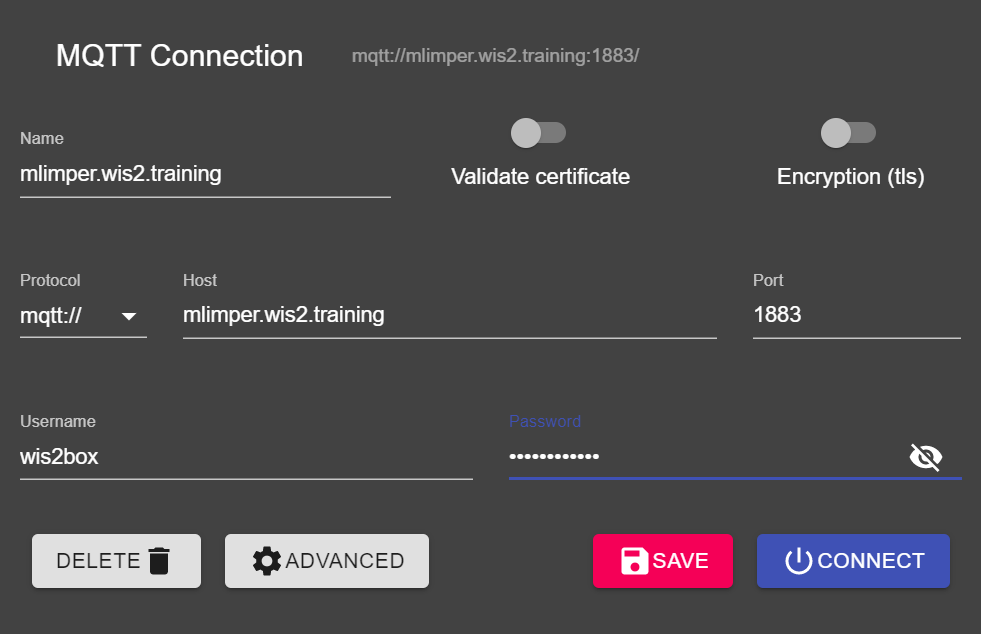
Ouvrez le MQTT Explorer sur votre ordinateur et préparez une nouvelle connexion pour vous connecter à votre broker (exécuté via le conteneur wis2box-broker).
Cliquez sur + pour ajouter une nouvelle connexion :
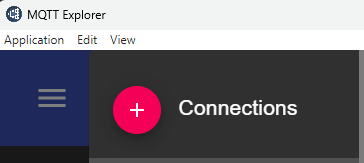
Vous pouvez cliquer sur le bouton 'ADVANCED' et vérifier que vous avez des abonnements aux sujets suivants :
#$SYS/#

Note
Le sujet # est un abonnement générique qui s'abonne à tous les sujets publiés sur le broker.
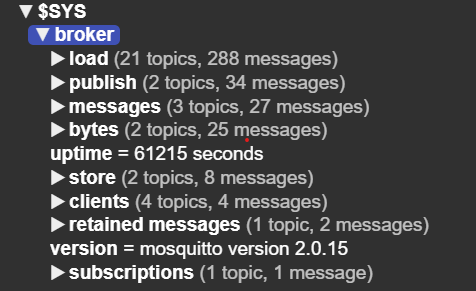
Les messages publiés sous le sujet $SYS sont des messages système publiés par le service mosquitto lui-même.
Utilisez les détails de connexion suivants, en veillant à remplacer la valeur de <your-host> par votre nom d'hôte et <WIS2BOX_BROKER_PASSWORD> par la valeur de votre fichier wis2box.env :
- Protocole : mqtt://
- Hôte :
<your-host> - Port : 1883
- Nom d'utilisateur : wis2box
- Mot de passe :
<WIS2BOX_BROKER_PASSWORD>
Note
Vous pouvez vérifier votre fichier wis2box.env pour la valeur de votre WIS2BOX_BROKER_PASSWORD. Vous pouvez utiliser la commande suivante pour vérifier la valeur de cette variable d'environnement :
cat ~/wis2box/wis2box.env | grep WIS2BOX_BROKER_PASSWORD
Notez que ceci est votre mot de passe interne pour le broker. Le Global Broker utilisera des identifiants différents (en lecture seule) pour s'abonner à votre broker. Ne partagez jamais ce mot de passe avec qui que ce soit.
Assurez-vous de cliquer sur "SAVE" pour enregistrer vos détails de connexion.
Ensuite, cliquez sur "CONNECT" pour vous connecter à votre wis2box-broker.
 ```
```
Une fois connecté, vérifiez que les statistiques internes de mosquitto sont publiées par votre broker sous le sujet $SYS :
Gardez MQTT Explorer ouvert, car nous l'utiliserons pour surveiller les messages publiés sur le broker.
Conclusion
Félicitations !
Au cours de cette session pratique, vous avez appris à :
- exécuter le script
wis2box-create-config.pypour créer la configuration initiale - démarrer wis2box et vérifier l'état de ses composants
- accéder à wis2box-webapp et wis2box-API dans un navigateur
- vous connecter au broker MQTT sur votre VM étudiante en utilisant MQTT Explorer