Initializing wis2box
Learning outcomes
By the end of this practical session, you will be able to:
- run the
wis2box-create-config.pyscript to create the initial configuration - start wis2box and check the status of its components
- view the contents of the wis2box-api
- access the wis2box-webapp
- connect to the local wis2box-broker using MQTT Explorer
Note
The current training materials are based on wis2box-release 1.3.0.
See accessing-your-student-vm for instructions on how to download and install the wis2box software stack if you are running this training outside of a local training session.
Preparation
Login to your designated VM with your username and password and ensure you are in the wis2box directory:
cd ~/wis2box
Creating the initial configuration
The initial configuration for the wis2box requires:
- an environment file
wis2box.envcontaining the configuration parameters - a directory on the host-machine to share between the host machine and the wis2box containers defined by the
WIS2BOX_HOST_DATADIRenvironment variable
The wis2box-create-config.py script can be used to create the initial configuration of your wis2box.
It will ask you a set of question to help setup your configuration.
You will be able to review and update the configuration files after the script has completed.
Run the script as follows:
python3 wis2box-create-config.py
wis2box-host-data directory
The script will ask you to enter the directory to be used for the WIS2BOX_HOST_DATADIR environment variable.
Note that you need to define the full path to this directory.
For example if your username is username, the full path to the directory is /home/username/wis2box-data:
username@student-vm-username:~/wis2box$ python3 wis2box-create-config.py
Please enter the directory to be used for WIS2BOX_HOST_DATADIR:
/home/username/wis2box-data
The directory to be used for WIS2BOX_HOST_DATADIR will be set to:
    /home/username/wis2box-data
Is this correct? (y/n/exit)
y
The directory /home/username/wis2box-data has been created.
wis2box URL
Next, you will be asked to enter the URL for your wis2box. This is the URL that will be used to access the wis2box web application, API and UI.
Please use http://<your-hostname-or-ip> as the URL.
Please enter the URL of the wis2box:
 For local testing the URL is http://localhost
 To enable remote access, the URL should point to the public IP address or domain name of the server hosting the wis2box.
http://username.training.wis2dev.io
The URL of the wis2box will be set to:
  http://username.training.wis2dev.io
Is this correct? (y/n/exit)
WEBAPP, STORAGE and BROKER passwords
You can use the option of random password generation when prompted for and WIS2BOX_WEBAPP_PASSWORD, WIS2BOX_STORAGE_PASSWORD, WIS2BOX_BROKER_PASSWORD and define your own.
Don't worry about remembering these passwords, they will be stored in the wis2box.env file in your wis2box-directory.
Review wis2box.env
Once the scripts is completed check the contents of the wis2box.env file in your current directory:
cat ~/wis2box/wis2box.env
Or check the content of the file via WinSCP.
Question
What is the value of WISBOX_BASEMAP_URL in the wis2box.env file?
Click to reveal answer
The default value for WIS2BOX_BASEMAP_URL is https://{s}.tile.openstreetmap.org/{z}/{x}/{y}.png.
This URL refers to the OpenStreetMap tile server. If you want to use a different map provider, you can change this URL to point to a different tile server.
Question
What is the value of the WIS2BOX_STORAGE_DATA_RETENTION_DAYS environment variable in the wis2box.env file?
Click to reveal answer
The default value for WIS2BOX_STORAGE_DATA_RETENTION_DAYS is 30 days. You can change this value to a different number of days if you wish.
The wis2box-management container runs a cronjob on a daily basis to remove data older than the number of days defined by WIS2BOX_STORAGE_DATA_RETENTION_DAYS from the wis2box-public bucket and the API backend:
0 0 * * * su wis2box -c "wis2box data clean --days=$WIS2BOX_STORAGE_DATA_RETENTION_DAYS"
Note
The wis2box.env file contains environment variables defining the configuration of your wis2box. For more information consult the wis2box-documentation.
Do not edit the wis2box.env file unless you are sure of the changes you are making. Incorrect changes can cause your wis2box to stop working.
Do not share the contents of your wis2box.env file with anyone, as it contains sensitive information such as passwords.
Start wis2box
Ensure you are in the directory containing the wis2box software stack definition files:
cd ~/wis2box
Start wis2box with the following command:
python3 wis2box-ctl.py start
When running this command for the first time, you will see the following output:
No docker-compose.images-*.yml files found, creating one
Current version=Undefined, latest version=1.3.0
Would you like to update ? (y/n/exit)
Select y and the the script will create the file docker-compose.images-1.3.0.yml, download the required Docker images and start the services.
Downloading the images may take some time depending on your internet connection speed. This step is only required the first time you start wis2box.
Inspect the status with the following command:
python3 wis2box-ctl.py status
Repeat this command until all services are up and running.
wis2box and Docker
wis2box runs as a set of Docker containers managed by docker-compose.
The services are defined in the various docker-compose*.yml which can be found in the ~/wis2box/ directory.
The Python script wis2box-ctl.py is used to run the underlying Docker Compose commands that control the wis2box services.
You don't need to know the details of the Docker containers to run the wis2box software stack, but you can inspect the docker-compose*.yml and files to see how the services are defined. If you are interested in learning more about Docker, you can find more information in the Docker documentation.
To login to the wis2box-management container, use the following command:
python3 wis2box-ctl.py login
Note that after you login, your prompt will change, indicating you are now inside the wis2box-management container:
root@025381da3c40:/home/wis2box#
Inside the wis2box-management container you can run various commands to manage your wis2box, such as:
wis2box auth add-token --path processes/wis2box: to create an authorization token for the processes/wis2box endpointwis2box data clean --days=<number-of-days>: to clean up data older than a certain number of days from the wis2box-public bucket
To exit the container and go back to your host machine, use the following command:
exit
Run the following command to see the docker containers running on your host machine:
docker ps --format "table {{.Names}} \t{{.Status}} \t{{.Image}}"
You should see the following containers running:
NAMES                     STATUS                         IMAGE
nginx                     Up 56 seconds                  nginx:1.30.1-alpine
mqtt_metrics_collector    Up 58 seconds                  ghcr.io/world-meteorological-organization/wis2box-mqtt-metrics-collector:1.3.0
wis2box-auth              Up 59 seconds                  ghcr.io/world-meteorological-organization/wis2box-auth:1.3.0
wis2box-ui                Up About a minute              ghcr.io/world-meteorological-organization/wis2box-ui:1.3.0
wis2box-management        Up About a minute              ghcr.io/world-meteorological-organization/wis2box-management:1.3.0
wis2box-minio             Up 2 minutes (healthy)         ghcr.io/world-meteorological-organization/wis2box-minio:latest
wis2box-api               Up About a minute (healthy)    ghcr.io/world-meteorological-organization/wis2box-api:1.3.0
elasticsearch             Up 2 minutes (healthy)         docker.elastic.co/elasticsearch/elasticsearch:8.6.2
grafana                   Up 2 minutes                   grafana/grafana-oss:12.4.2
loki                      Up 2 minutes                   grafana/loki:2.4.1
elasticsearch-exporter    Up 2 minutes                   quay.io/prometheuscommunity/elasticsearch-exporter:latest
prometheus                Up 2 minutes                   prom/prometheus:v2.37.0
mosquitto                 Up 2 minutes                   ghcr.io/world-meteorological-organization/wis2box-broker:1.3.0
wis2box-webapp            Up 2 minutes (healthy)         ghcr.io/world-meteorological-organization/wis2box-webapp:1.3.0
These containers are part of the wis2box software stack and provide the various services required to run the wis2box.
Run the following command to see the docker volumes running on your host machine:
docker volume ls
You should see the following volumes:
- wis2box_project_auth-data
- wis2box_project_es-data
- wis2box_project_minio-data
- wis2box_project_prometheus-data
- wis2box_project_loki-data
- wis2box_project_mosquitto-config
As well as some anonymous volumes used by the various containers.
The volumes starting with wis2box_project_ are used to store persistent data for the various services in the wis2box software stack.
wis2box API
The wis2box contains an API (Application Programming Interface) that provide data access and processes for interactive visualization, data transformation and publication.
Open a new tab and navigate to the page http://YOUR-HOST/oapi.
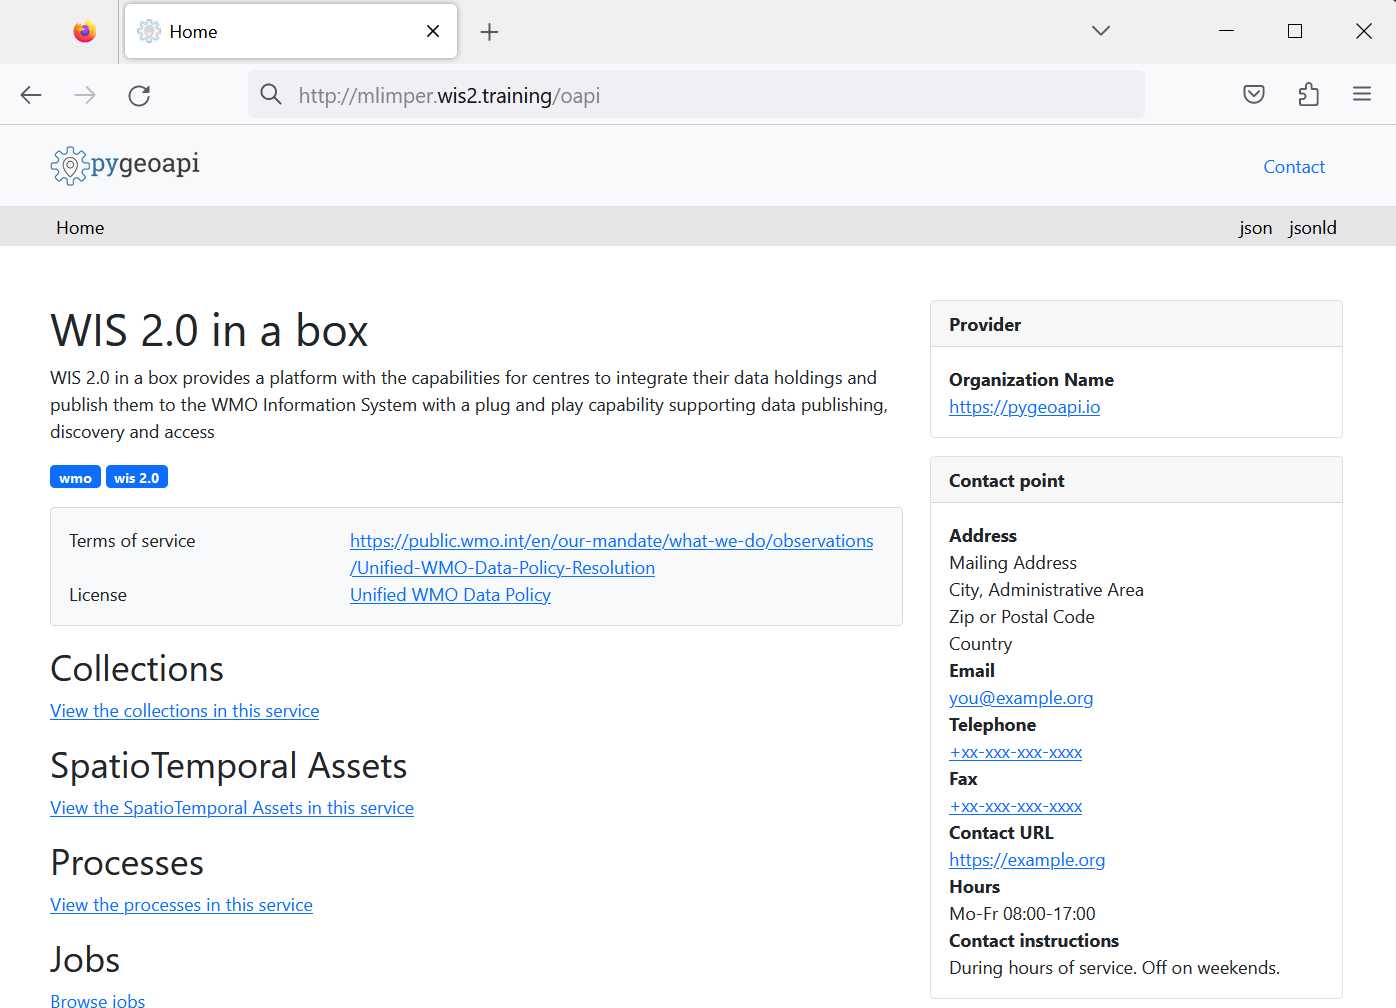
This is the landing page of the wis2box API (running via the wis2box-api container).
Question
What collections are currently available?
Click to reveal answer
To view collections currently available through the API, click View the collections in this service:
The following collections are currently available:
- Stations
- Data notifications
- Discovery metadata
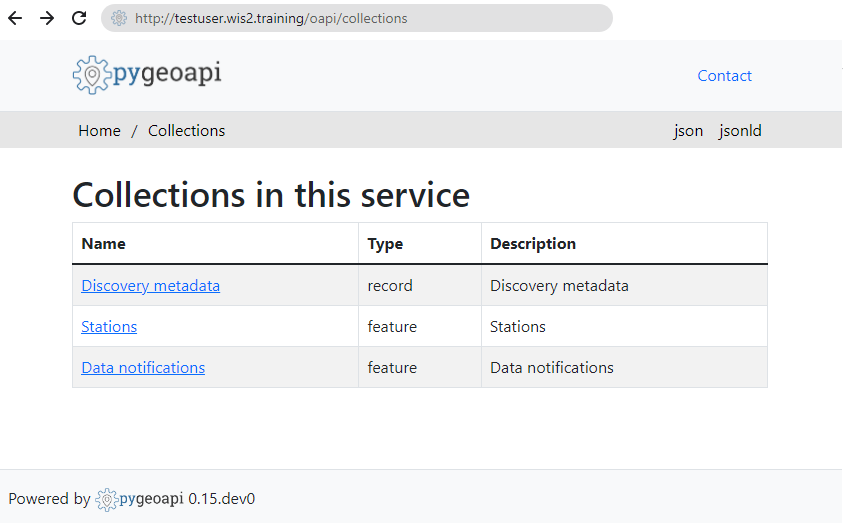
Question
How many data notifications have been published?
Click to reveal answer
Click on "Data notifications", then click on Browse through the items of "Data Notifications".
You will note that the page says "No items" as no Data notifications have been published yet.
wis2box webapp
Open a web browser and visit the page http://YOUR-HOST/wis2box-webapp.
You will see a pop-up asking for your username and password. Use the default username wis2box-user and the WIS2BOX_WEBAPP_PASSWORD defined in the wis2box.env file and click "Sign in":
Note
Check you wis2box.env for the value of your WIS2BOX_WEBAPP_PASSWORD. You can use the following command to check the value of this environment variable:
cat ~/wis2box/wis2box.env | grep WIS2BOX_WEBAPP_PASSWORD
Once logged in, you move your mouse to the menu on the left to see the options available in the wis2box web application:
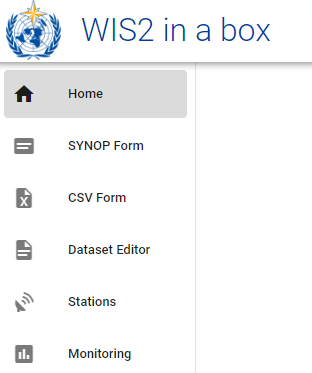
This is the wis2box web application to enable you to interact with your wis2box:
- create and manage datasets
- update/review your station metadata
- upload manual observations using FM-12 synop form
- monitor notifications published on your wis2box-broker
We will use this web application in a later session.
wis2box-broker
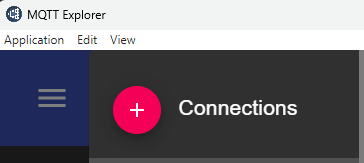
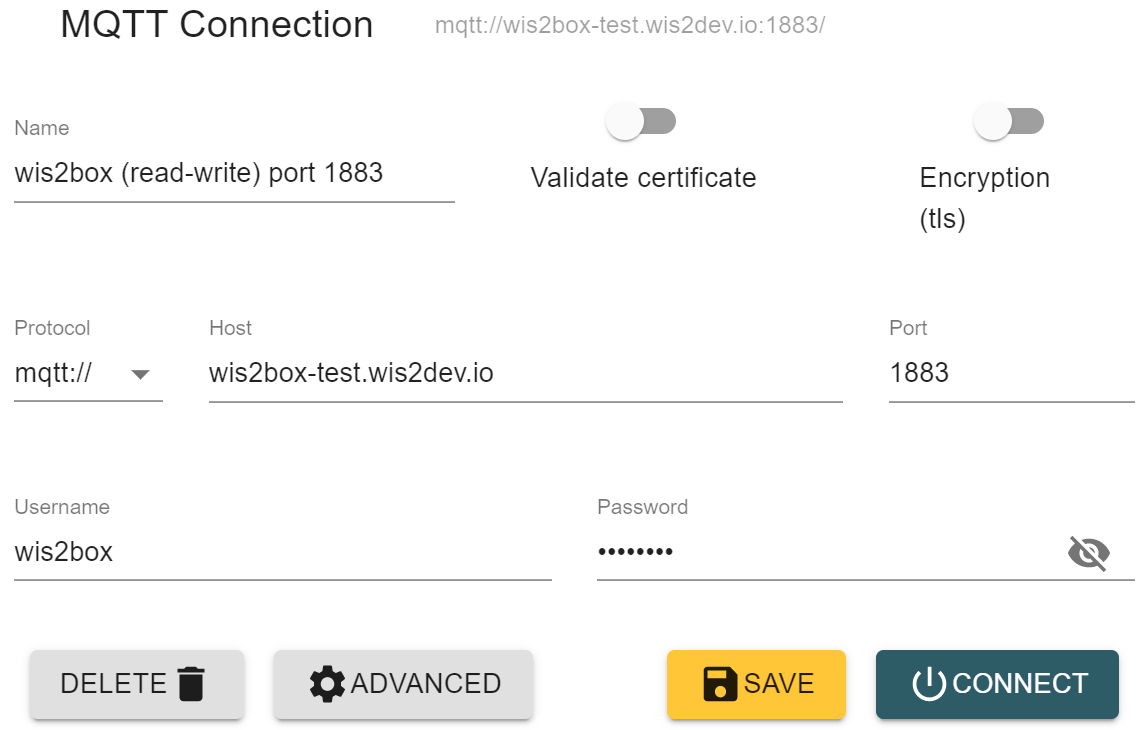
Open the MQTT Explorer on your computer and prepare a new connection to connect to your broker (running via the wis2box-broker container).
Click + to add a new connection:
You can click on the 'ADVANCED' button and verify you have subscriptions to the the following topics:
#$SYS/#
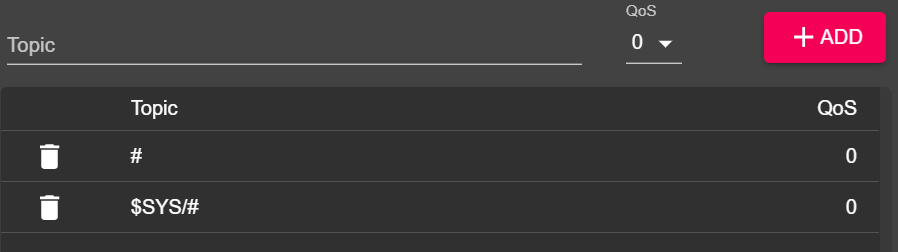
Note
The # topic is a wildcard subscription that will subscribe to all topics published on the broker.
The messages published under the $SYS topic are system messages published by the mosquitto service itself.
Use the following connection details, making sure to replace the value of <your-host> with your hostname and <WIS2BOX_BROKER_PASSWORD> with the value from your wis2box.env file:
- Protocol: mqtt://
- Host:
<your-host> - Port: 1883
- Username: wis2box
- Password:
<WIS2BOX_BROKER_PASSWORD>
Note
You can check your wis2box.env for the value of your WIS2BOX_BROKER_PASSWORD. You can use the following command to check the value of this environment variable:
cat ~/wis2box/wis2box.env | grep WIS2BOX_BROKER_PASSWORD
Note that this your internal broker password, the Global Broker will use different (read-only) credentials to subscribe to your broker. Never share this password with anyone.
Make sure to click "SAVE" to store your connection details.
Then click "CONNECT" to connect to your wis2box-broker.
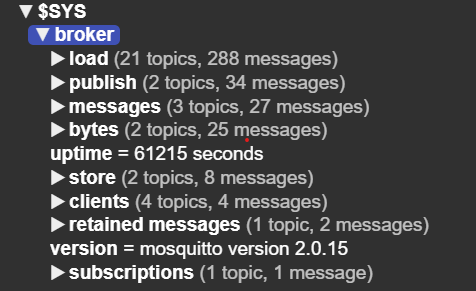
Once you are connected, you will see the internal mosquitto statistics being published by your broker under the $SYS topic:
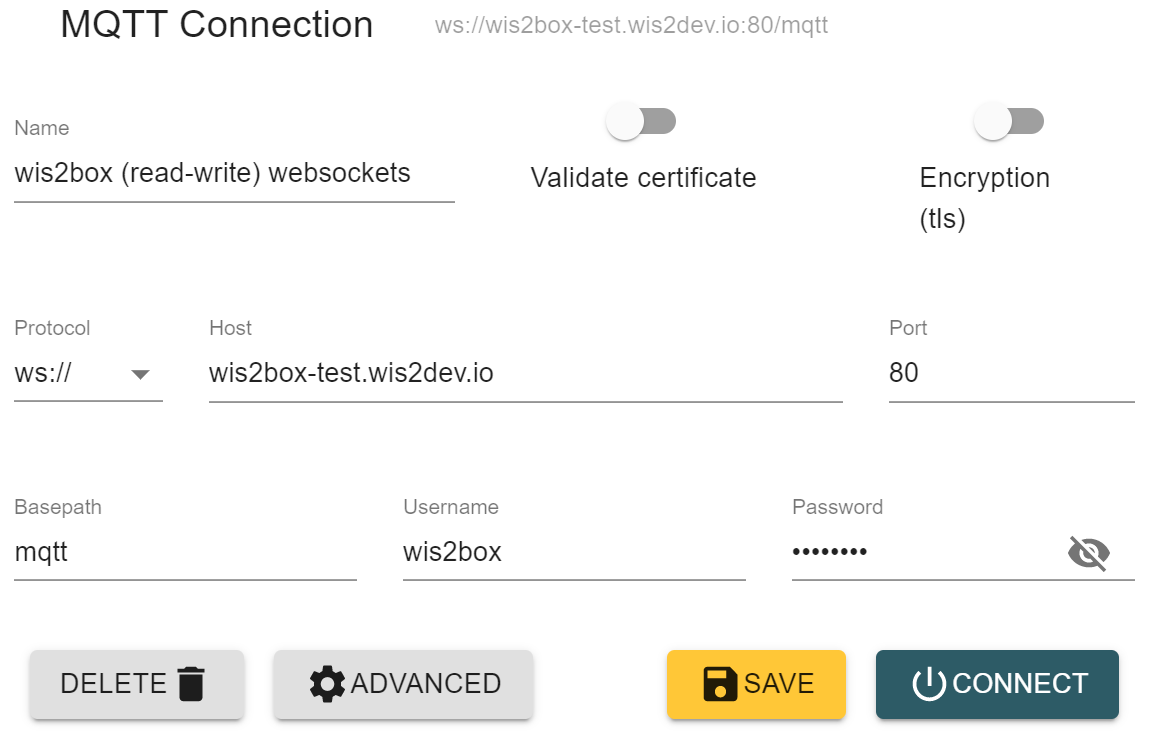
The same connection can also be achieved using MQTT over WebSockets on port 80, using the following connection details:
Conclusion
Congratulations!
In this practical session, you learned how to:
- run the
wis2box-create-config.pyscript to create the initial configuration - start wis2box and check the status of its components
- access the wis2box-webapp and wis2box-API in a browser
- connect to the MQTT broker on your student VM using MQTT Explorer